Thank you for purchasing Orphek Osix!
In this booklet (manual) you are receiving both Safety and Operational guides. Inside you will have not only detailed information about our product, but also all the information needed to install, connect and maintain your Orphek Osix. Orphek advises you to read the Safety Guides first.
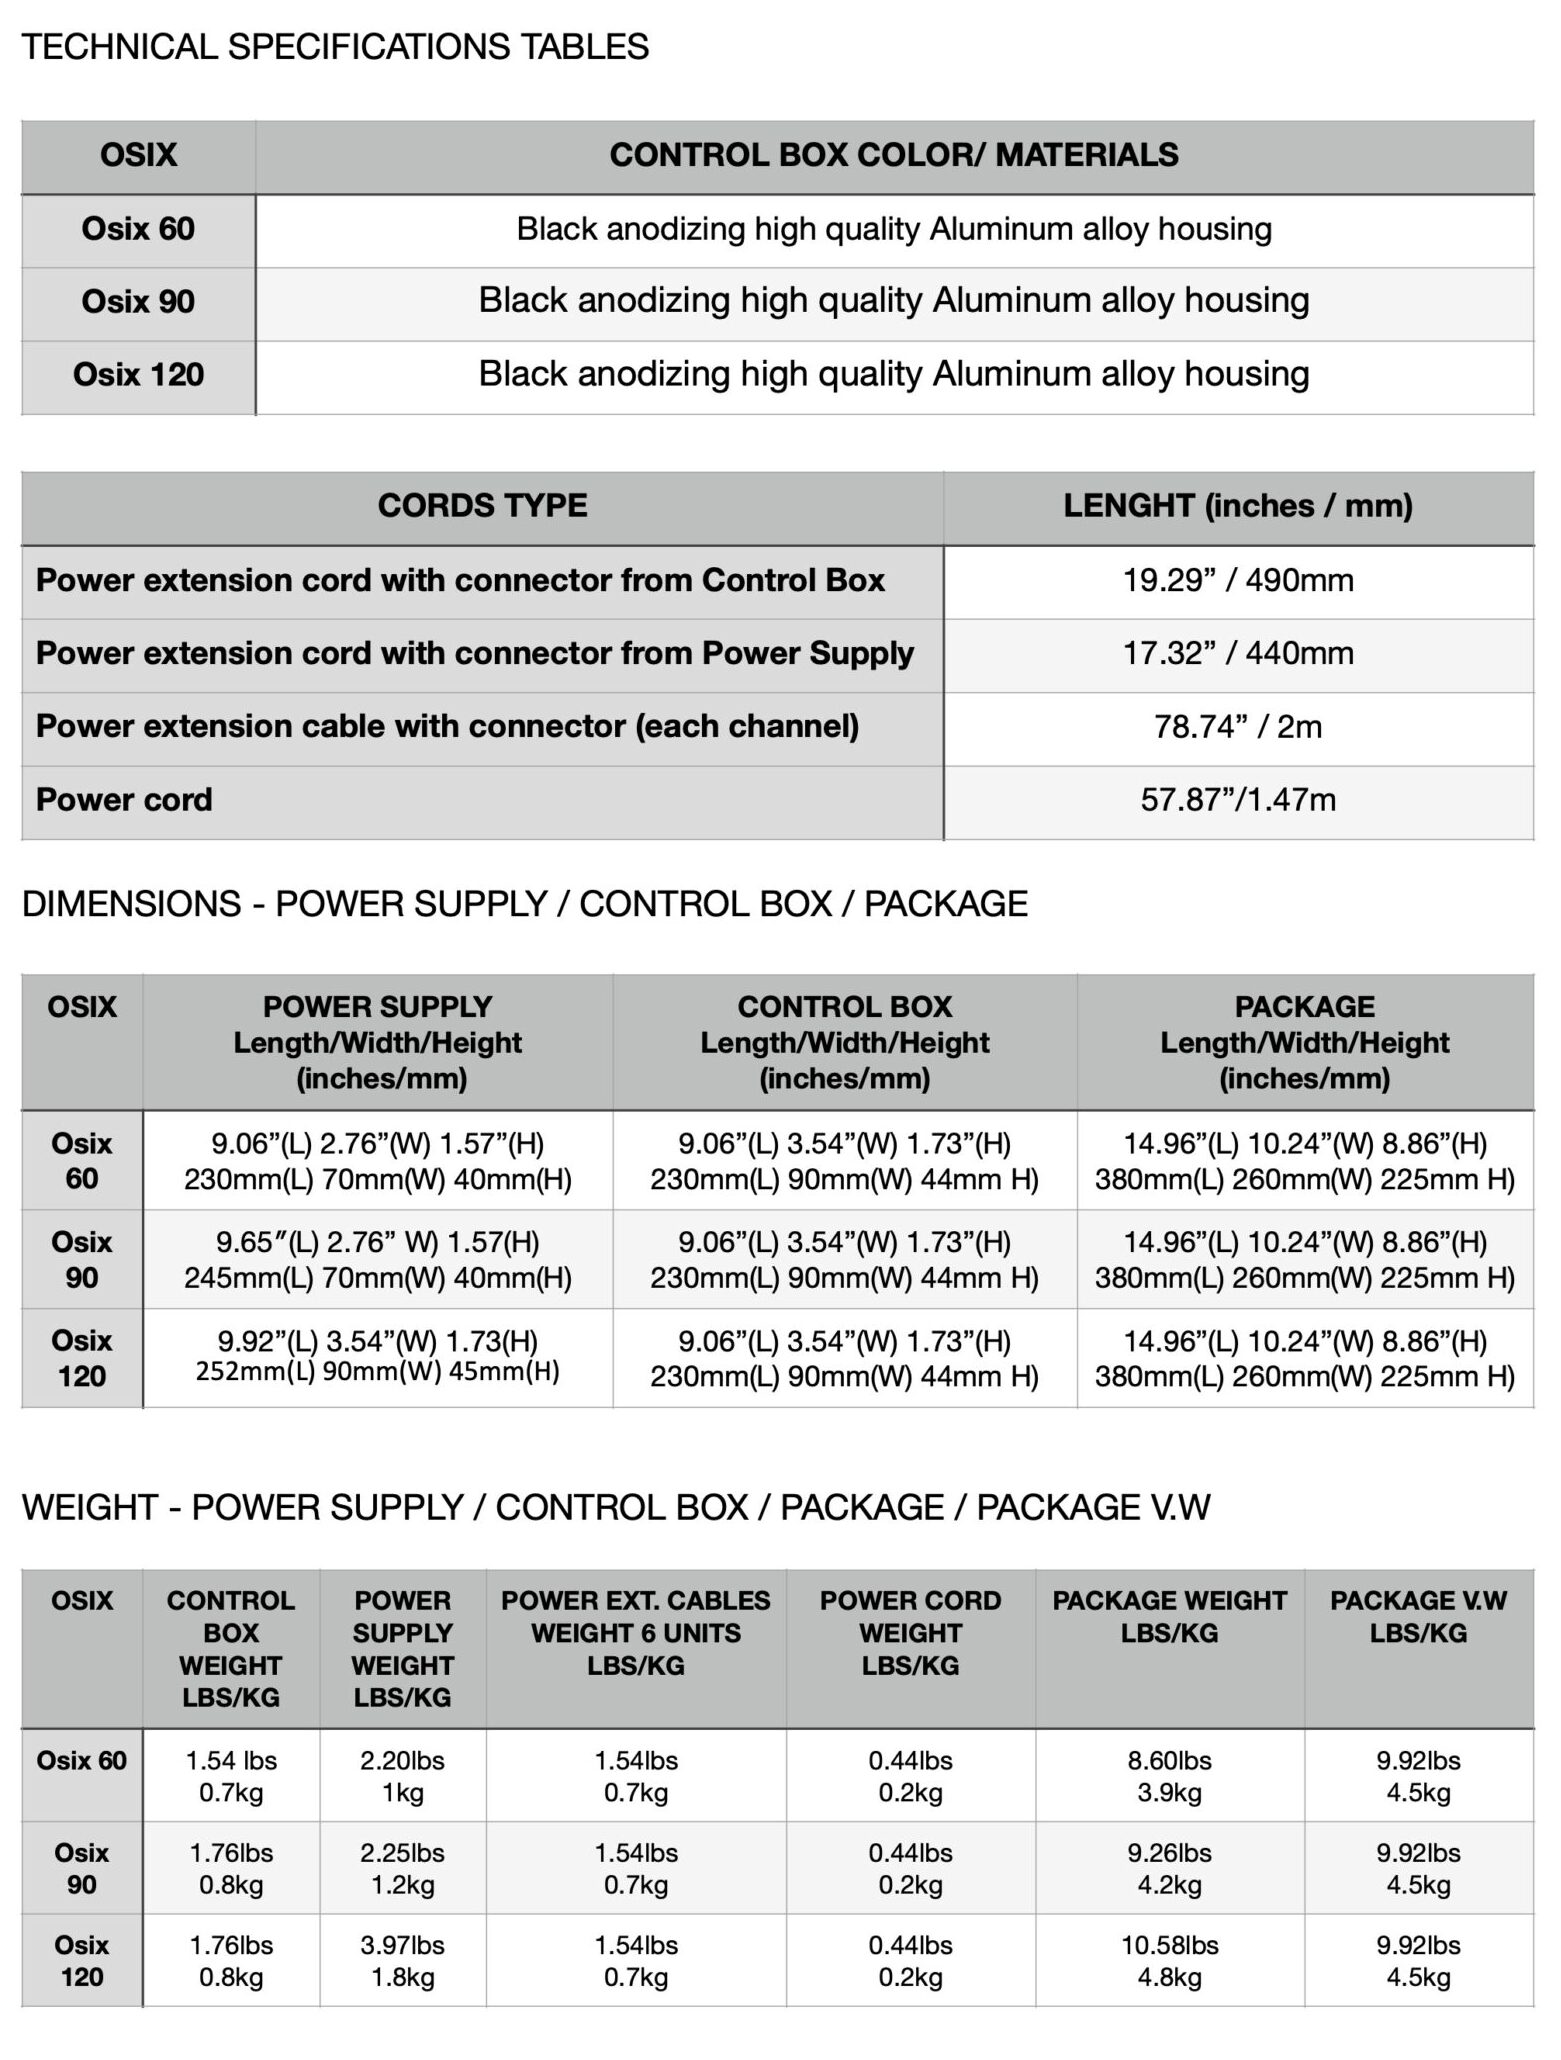
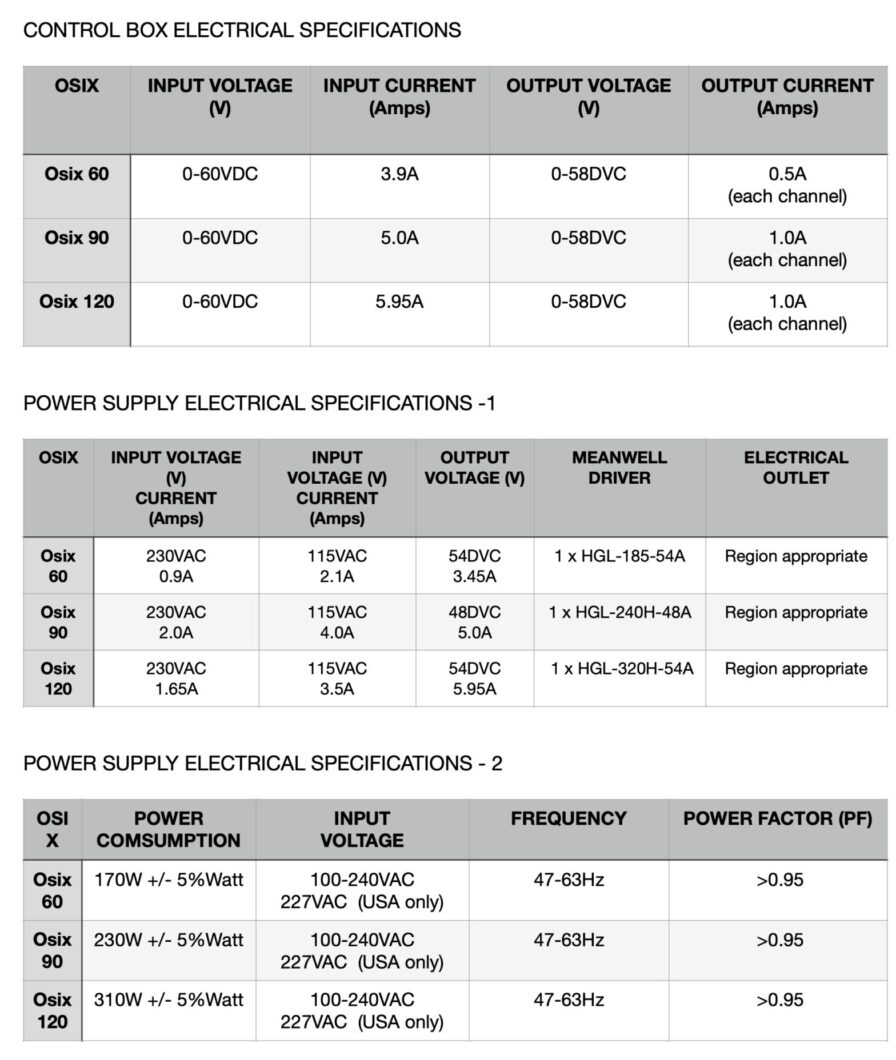
Osix Technical Information.
BEFORE INSTALLING AND CONNECTING YOUR OSIX SMART DEVICE PLEASE READ THE SAFTY GUIDES.
Osix Operational Manual.
Index
- Introduction.
- Commitment to the Environment.
- What is Osix.
- The Osix Series.
- Very important.
- What you can do with Osix.
- What comes in the box.
- OR3 LED bars assembly.
- Osix + OR3 LED bars assembly.
- Turning ON for the first time.
- Providing a safe environment.
- Safety guide first observations.
- Warning.
- Reduce electrical shock risk.
- More tips for injury prevention.
- Important.
- Safety instructions for installing.
- Safety instructions for storing.
- Safety instructions for cleaning.
- How to clean your Orphek Osix.
1. Introduction.
Thank you for purchasing Orphek Osix!
In this booklet (manual) you are receiving both Safety and Operational guides. Inside you will have not only detailed information about our product, but also all the information needed to install, connect and maintain your Orphek Osix. orphek advises you to read the Safety Guides first.
We expect that you will use your system well for many years to come and look forward to hearing from you about your success.
Please feel free to contact us at any time: contact@orphek.com
2. Commitment to the Environment.
Loving Nature as we do and being conscious about the environment, we only develop products with significant positive impact in everyone’s life.
With that said, help us to protect our Nature by not printing this manual! We suggest you save it in your computer instead. Trees are as much important as marine creatures! And they help to balance the temperature of Mother Nature. You can also access the manual in our website and watch videos that will help you in a fun way.
3. What is Osix.
Osix is a smart device with iCon technology that allows you to program, control, monitor and dim your OR3 Reef Aquarium LED Bars and integrate them with all Orphek iCon LED solutions.
4. The Osix Series
MODELS – OR3 LED BARS COMPATIBILITY
Osix 60 – OR3 60 LED Bars only
Osix 90 – OR3 90 LED Bars only
Osix 120 – OR3 120 LED Bars only
5. Very important
DAMAGE RESULTING OF DISREGARD OF THESE FOLLOWING INSTRUCTIONS ARE NOT COVERED BY BOTH ORPHEK WARRANTIES OF THE OR3 LED BARs AND ORPHEK OSIX!
6. What you can do with Osix.
- You can only connect Orphek OR3 LED Bars. Osix is not compatible with other brands.
- You can connect up to six units of OR3 LED Bars, but only if all of them are of the same sizes.
- Do not connect different sizes because it size of OR3 LED Bar has its own electrical specifications.
- Do not connect other Orphek LED Solutions to your Osix.
Orphek R&D team developed and engineered a sophisticated technology, converting what could be one more dimming controller in the market into a groundbreaking device that will integrate LED lighting solutions is a way never seen before.
- With Orphek Osix you will upgrade your OR3 LED Bars so they will operate with iCon technology (intelligent connectivity).
- With Orphek Osix you will be able to connect your OR3 LED Bars to Orphek awesome App which is compatible with both Android and iPhone.
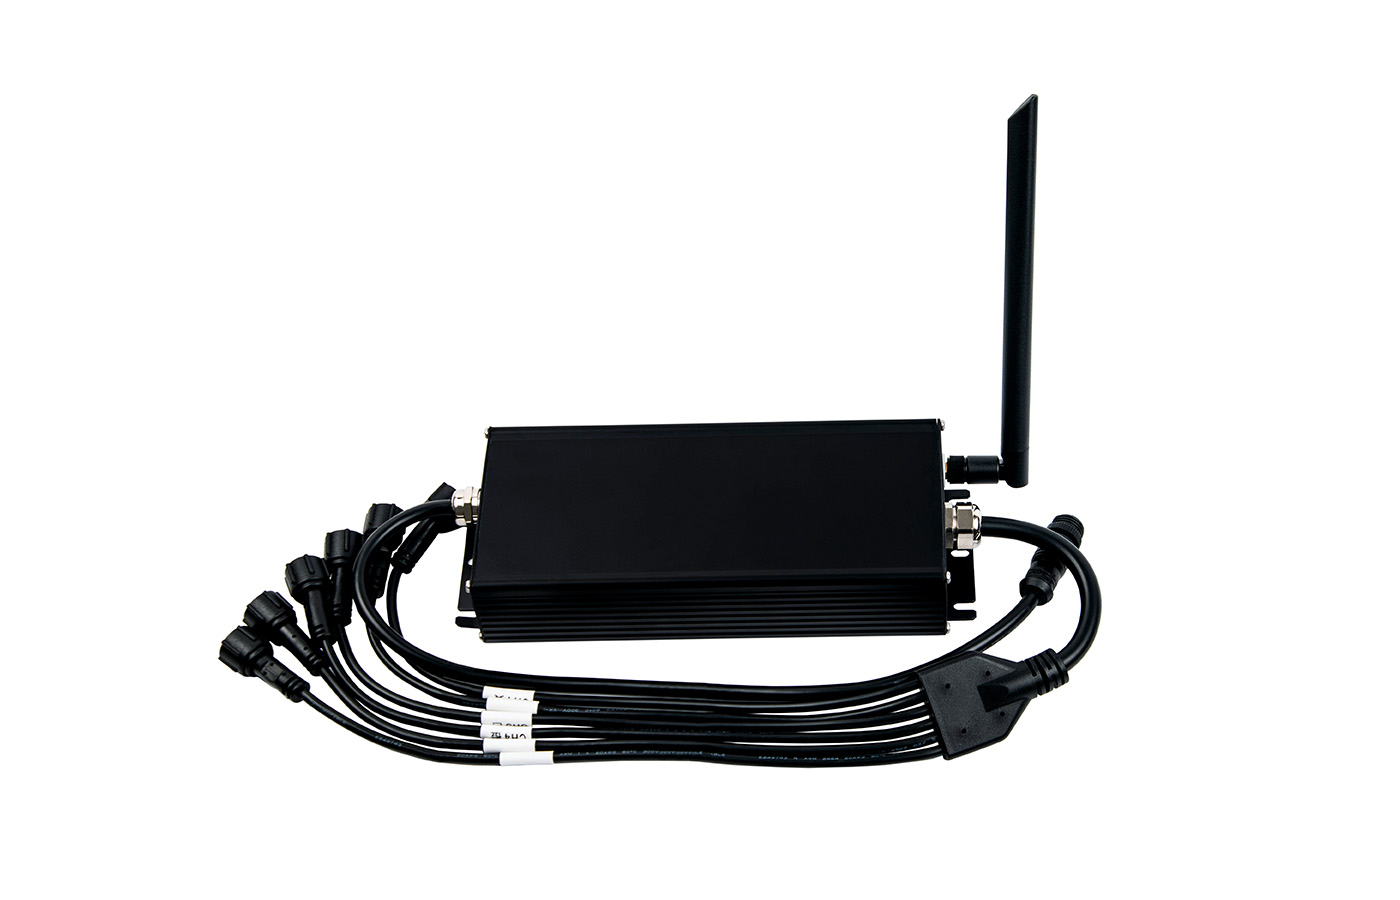
7. What comes in the box.
1x – Osix smart device with 06 connecting cables (for OR3 LED Bars connection)
1x – Meanwell power supply
1x – Antenna
1x – Electrical power cord region appropriate customized
6x – 2m/39.37” extension cables
8. OR3 LED bars assembly.
Once you have chosen the layout of your OR3 LED Bars over your tank and where the Osix will be placed, check the distances to install with or without extension cables. Check the distance from the electric socket. If everything is ok you can start to install your Osix and connect your OR3 LED Bars to it.
- Connect the antenna into the antenna socket in the Osix.
- Connect the Meanwell power supply driver to the Osix
- Connect the electrical power cord to the Osix
Your OR3 LED Bars comes with a manual. Please follow the instructions of the manual to install and assemble your OR3 LED units over your tank. If you are using Orphek’s fixing bracket please follow the instructions of the Fixing Brackets Kit manual. If you are using other Orphek’s mounting solutions please follow the instruction of their own manuals.
All Orphek manuals can be found in our website or be requested as a PDF by contacting us.
Orphek does not provide assembly manual for mounting solutions of other brands, nor is responsible or obliged to give warranty for these mounting solutions.
9. Osix + OR3 LED bars assembly.
Once you have assembled your Osix device you can star to connect your OR3 LED Bars to it.
You can either connect the Osix before or after hanging the OR3 LED Bars over your tank. It is completely up to you!
Connect the extension cables to the Osix cables according to the number of units you wish to connect. Orphek advices you to use them!
Connect the cables to the OR3 LED Bars.
Connect the electric power cord of your Osix into the electric socket.
10. Turning ON for the first time.
Once you are ready to start your Osix smart device follow these steps:
1. Download Orphek awesome App to your mobile phone.
Orphek provides the App Manual in its website www.orphek.com
Go to our website/ click on App Manual/ click on Android or iPhone according to the device you wish to use/download the App.
Or click on this link: https://orphek.com/orphek-icon-app-manual/
Click on Android or iPhone according to the device you wish to use/ Download the App.
Once the App download is completed it is time to turn on your Osix.
2. Press the reset button on the Osix device 4 times and you can start using your Osix.
This manual does not provide information on how to connect, program or monitor your OR3 LED Bars with the App You will find the instructions in the App Manual.
11. Providing a safe environment.
Osix is developed with exceptional quality and durability, developed specifically to provide a safe natural ambiance including aquariums with expensive rare, exotic & high maintenance species.
IP67 waterproof certified – All parts of Orphek Osix iCon Controller, including Orphek OR3 LED Bars connected are IP67 certified (and all parts, connectors, extension cables and plugs are water-proof, anti-rust, anti-corrosion).
High quality Aluminum electric anodized coating – All aluminium parts are made of high quality electric anodized aluminium coating, therefore it will never rust even in contact with salted water or environments with high humidity!
12. Safety guide first observations.
(PLEASE KINDLY FOLLOW THE STORING & CLEANING GUIDES TO PROTECT AND MAINTAIN ITS DURABILITY).
Only authorized and qualified electrical workers should install, repair or perform maintenance on electrical equipments. But if you still opt to do it yourself:
1. Check basic safety guides for electrical works before you install any electrical device by yourself (there are plenty of them available in the internet!).
2. Make sure you are following the safety procedures to avoid shock or fire hazard. If you are not sure that you can install your Orphek Osix by yourself bring a professional with the correct skills to assist you or install the unit(s) for you.
3. Do not install Osix near children or animals. Also place the contents of the package far from their reach.
4. Do not install your Osix with the help of a child or any person who does not have the basic skills and does not know the basic safety procedures for installing electrical apparatus.
13. Warning.
Electrical shock can cause death.
Electrical shock can often cause internal damage that may not be immediately apparent.
14. Reduce electrical shock risk.
1. Do not work on electrical equipment in a wet area or when touching an object that may provide a hazardous earth ground path.
2. Do not immerse your Orphek Osix in water. If it falls into the water, don’t reach for it! First unplug it and then retrieve it. If electrical components of the Osix get wet, unplug the unit immediately.
3. Never rely on your memory, read our manual and the safety guide before you start to install your Orphek Osix and have it with you for reference during installation.
If you have any questions, or did not understand any information of this guide please kindly contact Orphek Customer Assistance Team.
15. More tips for injury prevention.
1. Test if your electricity is operating correctly in the area installed and switches it off before installing your Orphek Osix.
2. Ensure equipment, tools and equipment are in good operating condition.
3. Never use equipment, tools or equipments that are in disrepair or not properly maintained.
4. Ensure electrical components (switches, resistors, capacitors, inductors, transistors, etc.) are appropriate for the circuit or apparatus.
5. Never overload circuits.
6. Never leave unprotected systems unattended.
7. Never place containers of liquid on electrical systems.
8. Ensure to turn off the power supply first before disassembling the circuit.
9. Use only tools and equipment with non-conducting handles when working on electrical devices.
10. Never use metallic pencils or rulers, or wear rings or metal watchbands when working with electrical equipment.
11. When it is necessary to handle equipment that is plugged in, be sure hands are dry and, when possible, wear nonconductive gloves and shoes with insulated soles.
12. If water or a chemical is spilled onto equipment, shut off power at the main switch or circuit breaker and unplug the equipment.
These are some of the safety tips. Orphek cannot provide you a full guide. Please check a complete electrical safety guide for all the safety rules of electrical installation procedures).
16. Important.
Orphek warranty policy does not cover damage to products or loss of components incurred in shipping of the product(s). Orphek has chosen carefully its transportation & delivery partners, but sometimes damage may occur for many reasons. In this case you should verify our shipping policies provided in our website: www.orphek.com. We strongly advice you to open your package(s) in front of the person delivering it (them) to check for damages. If you unfortunately do find damages or missing components, please take photos and make the person delivering the package(s) sign for these damages. Ensure all accessories are included in the box. If any component is missing, please contact Orphek or the retailer and inform of any missing components. Do not open the package(s) with a craft knife or edged tool – it may damage you unit(s). Do not use the unit(s) for other than intended use (Check our warranty policies)
Do not drop your Osix. Check instructions for maintenance and cleaning. Your Orphek Osix comes with an Orphek power supply – do not use another power supply from any other company. Do not use extension cables provided by any other company. If extension cables and cords are needed, contact Orphek for a price quotation. (Check our warranty policies before installing your Osix. Do not replace parts of your Osix for components not provided/sold by Orphek LED Lighting company (Check our warranty policies), before, during or after installing your Osix. Although your Orphek Osix is IP67 waterproof, do not immerse underwater. Water immersion can permanently damage it. This damage is not covered under the warranty.
17. Safety instructions for installing.
1. Carefully unpack unit(s) and components from box. We advice setting the Osix on a hard and stable surface being careful not scratched or damaged it.
2. Carefully examine your Orphek Osix after installation and before you plug it into the GFCI and wall outlet.
3. Never plug in a wet cord. If plugged Osix or socket does get wet, don’t touch it. Instead, promptly disconnect the fuse or circuit breaker that supplies power to the Osix. Then, you may unplug the Osix and examine for the presence of water.
4. A “drip-loop” should be employed for each cord connecting a unit to outlet. A “drip-loop” is the part of the cord below the level of the GFCI outlet (or the connector if an extension cord), to prevent water from traveling along the cord and coming in contact with the outlet. If the plug or outlet does get wet, don’t unplug the cord. Disconnect the fuse or circuit breaker that supplies power to the Osix then unplug and examine for presence of water in the outlet.
5. Do not install, operate your Osix in places to be exposed to temperatures below 0° Celsius or 32° Fahrenheit or above 50° Celsius or 122° Fahrenheit.
6. Ensure the Osix is securely installed before supplying power to the unit.
7. DO NOT use any form of alcohol or solvent to clean your Orphek Osix.
8. Never place any objects or instruments on top of your Osix ordinances.
9. Do not pull or cut the cord.
Improper storage will damage temporarily or permanently your Orphek Osix. (Please check for our warranty policies before storing your Orphek products). Please keep the original package(s) to store your Osix.
18. Safety instructions for storing.
1. Please store your Osix placed on a plain surface.
2. Do not place any heavy object or heavy packages on your Osix package.
3. Do not store your Osix in places to be exposed to temperatures below 0° Celsius or 32° Fahrenheit or above 50° Celsius or 122° Fahrenheit.
4. Do not store your Osix in a wet or humid place or exposed to dust.
5. Do not store your Osix in a place close to children or animal reach.
6. Do not store your Osix close to any kind of chemical or corrosive liquids, cleaning products, bleach, pool cleaning or maintenance product, etc…
Improper cleaning will damage temporarily or permanently your Orphek Osix. (Please check for our warranty policies before cleaning your Orphek products).
19. Safety instructions for cleaning.
1. Do not clean your Osix when turned on.
2. Do not apply excessive wiping pressure or your body weight on the Osix to clean it.
3. Do not use: dirty, abrasive or linty cloths/ alcohol/ any cleaners, such as acetone, which contain ketones/ or ammonia-cleaning products/ or acidic or alkaline cleansers because they may destroy the finish/ or metal or any kind of polishing to clean your Osix as they will destroy the Aluminum electric anodized coating.
4. Do not use hard sponges to clean your Osix, they will scratch the surfaces and damage it.
5. Do not you sharp tools in attempt to clean your unit(s).
20. How to clean your Orphek Osix.
1. Turn your Osix off and allow it to cool.
2. Make sure your cloth is dry, clean and free of any grit before starting.
3. Using light pressure wipe its surfaces to evenly remove any humidity or dust.
4. Do not turn the Osix to clean.
5. If possible uninstall Osix before cleaning.
6. Wipe gently and do not overwork or apply excessive pressure to avoid damaging its coating.
7. Finally clean the edges and corners by lifting any dust or debris onto the cloth or use a clean soft sponge.
8. Do not pull cords while cleaning your Osix. Remember: Keeping your Osix clean is very important to keep your Orphek Osix running well, but over or unnecessary cleaning may cause temporarily or permanently damage! So don’t over do it!