Orphek Atlantik How to set MY PROGRAM
Programming is very easy if you visualize your Atlantik as having four different LED lighting systems combined in one housing. Each lighting system can have its own intensity levels and time periods. Each lighting system or channel has seven different set points available.

Each set point can a start or an end time and have a percentage of intensity level. We call the individual lighting systems channels. They are I1, I2, I3, and I4 and “I” means illumination.

I1 controls the blue LEDs
I2 controls the white LEDs
I3 controls the remaining blue LEDs and UV LEDs
I4 controls the +red LEDs
Before we go further, it is important to understand that the set points are all smart points where the setting on one point is directly affected to what the previous and next point is set at. This is very important. Here is an example:
If point 7 or your last point is set at 21:00 @ 0 percent, and you program Point 1 (or the starting point) at 08:00 @ 70%, your lights will ramp up from 0% at 21:00 and go to 70% at 08:00. Your last point and point 1 must always be set to 0%. This ensures that no lights will operate between 21:00 and 08:00 hours.
Another area that is worthy to note is that you do not have to set multiple dimming times. Some people have done the following and are a waste of set points.
Point 1 – 07:00 @ 0%
Point 2 – 08:00 @ 20%
Point 3 – 09:00 @ 50%
Point 4 – 10:00 @ 100%
All that is necessary is the following program.
Point 1 – 07:00 @ 0%
Point 2 – 10:00 @ 100%
The lights will proportionately ramp up from 0 to 100% during this time period.
So let’s do an example program.

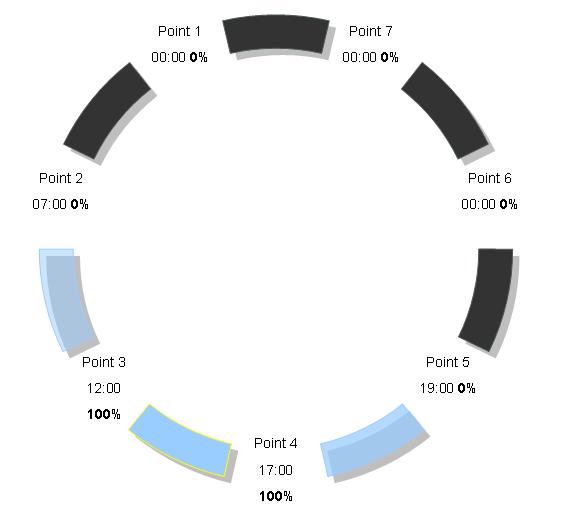
Point 1 00:00 0% LIGHT IS OFF, no intensity. From Last Point 7 to point 1
Point 2 07:00 0% LIGHT IS OFF, no intensity. From 00:00 to 07:00 .This means the end time of Point 1 and will begin at 07:00 with 0% intensity. This point has to start at 0%. If 10% or any other number would be put in, the lights would then ramp up at midnight (Point 1) to 10% at 07:00 which is not desirable !
Point 3 12:00 100% This means that from 07:00 will proportionately increase in intensity from 0% at 07:00 to 100% at 12:00.
Point 4 17:00 100% This means that from 12:00 to 17:00, will remain at 100%.
So now the photoperiod is coming to an end and we want to proportionately dim channel 1 to 0% at 19:00. So we program this in by doing the program below.
Point 5 19:00 0% This means that at 17:00, the intensity will proportionately dim from 100% to 0% at 19:00.
Point 6 00:00 0% This point LIGHT IS OFF. From 19:00 to 24:00
Point 7 00:00 0% This point LIGHT IS continue OFF
Very simple, isn’t it. The remaining three channels can be programmed in the same method and using whatever start / end time you wish as well as intensity level. Remember, there are four different lighting systems or channels combined in one housing and you can program each system or channel to your liking.
Please note that all four channels or lighting systems can be programmed as one by simply selecting “All Set” at the beginning of the program.
What this will do is control all channels at the same start and end time as well as their intensity levels. This eliminates the need to individually program all four channels. If you wish to have moonlight effects, this can be programmed in I3 (blue and UV). If any time is programmed after 22:00, other than moonlight, the controller will give a warning. This is necessary to ensure the corals get a photoperiod rest which is necessary for their well being and biological functions.
Using the cloud function will result in random reduction in light intensity and is not the fault of your programming.
If you wish not to program your own photoperiod, there are eight preset programs built in to the Atlantik for different applications. Because of the intensity the Atlantik is capable of producing, it is recommended that you use the Coral Acclimation Program for the first two weeks of operation.
An example of a typical program is shown below.
0700 – Turn on moonlights at 10% (Illumination 3)
0700-0800 – Ramp up intensity of moonlights Blue and UV from 10% to 100% (Illumination 3)
0800 – Turn on white, All LEDs at 10% intensity (Illumination 1,2,3,4)
0800-0900 – Ramp up All LEDs from 10% to 80% (Illumination 1,2,3,4)
0900-1800 – All LEDs on at 80% (or whatever intensity you desire) (Illumination 1,2,3,4)
1800-1900 – Ramp down All LEDs from 80% to 0%
1900-2000 – Ramp down moonlights from 100% to 0% (or whatever night time intensity is desired).
Individual channels can all have different intensity levels as well as program times.
Note: About the UV LEDs we use. The UV LEDs may not appear to be on to some people because our eyes can only see wavelengths in the 400nm to 700nm range. The UVs are in the 380-440nm range and they are used to add fluorescence to the corals. Because they are high range UV’s, they are of no danger to our eyes or to the corals.
When finished programming the Atlantik, you can run a test by disconnecting the controller from the Atlantik after you have set the program and then turn the power off and back on.
This test ensures you have completed the programming correctly. You can now store the controller in a safe dry place for future use.
The controller is also used for programming multiple Atlantiks and does not require a battery to back the program up in the controller.
The program is burned to an EPROM and it will remember the program until it is erased or a new program is entered. This feature allows programming multiple Atlantiks without the need to program each unit individually.
To load the same program into another Atlantik you simply select MY PROGRAM, and choose A, B, or C on the controller, press and hold the SET button for three seconds, and your program is now loaded to another Atlantik.
Example Video of How to set “MY Program”