Section 2- Setup: connecting your light to your home router system.
In this section we will connect to the light via Wifi and enable it to connect to your home router. There are several different ways to connect the light. The best option is to set a static IP address and allow the light to remain constant on your home router. The second best option is to allow your router to control the IP address and the last option is to connect to the light directly to your Android tablet or smart phone via wifi. This option allows you to only control one light at a time.
Before we can begin you must understand a few terms and definitions that will be used in the remainder of this section.
- Home network– This is your home system that provides wireless internet service to your wifi Nearly all home networks operate on a TCP/IP protocol, which means that they route messages for devices based on the IP address of the destination. This is why the Atlantik series needs an IP address, so that your system knows where to send the control commands from the Orphek app on your Android device.
- IP Address– An IP addressis an identifier for a computer or device on a TCP/IP Networks using the TCP/IP protocol route messages based on the IP address of the destination.
- SSID– This is the “Name” of your home network. SSID is short for service set identifier. SSID is a case sensitive, 32 alphanumeric characterunique identifier attached to the header of packets sent over a wireless local-area network (WLAN) that acts as a password when a mobile device tries to connect to the basic service set (BSS) — a component of the IEEE 802.11 WLAN architecture. The SSID differentiates one WLAN from another, so all access points and all devices attempting to connect to a specific WLAN must use the same SSID to enable effective roaming. As part of the association process, a wireless network interface card (NIC) must have the same SSID as the access point or it will not be permitted to join the BSS.
If you would like to learn more about network connections you can do so here More Network Information.
Now you are ready to begin programming your light. The first connection must be directly to the light via wifi-socket. This is the factory access point that your unit is shipped with and can be restored (deleted the word “to”) with a factory reset.
2.1 Connecting to Atlantik via wifi-socket
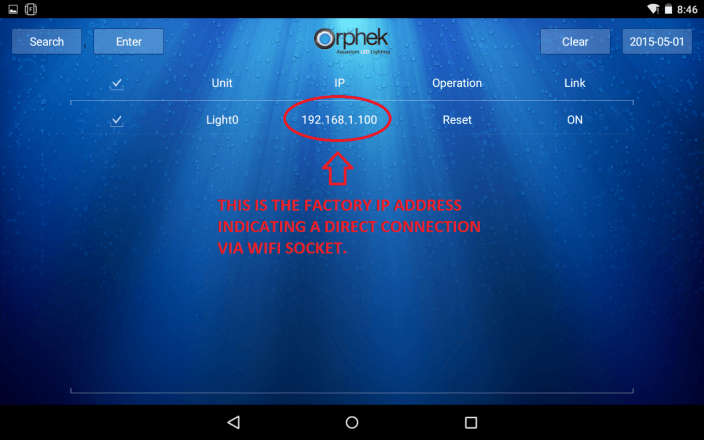
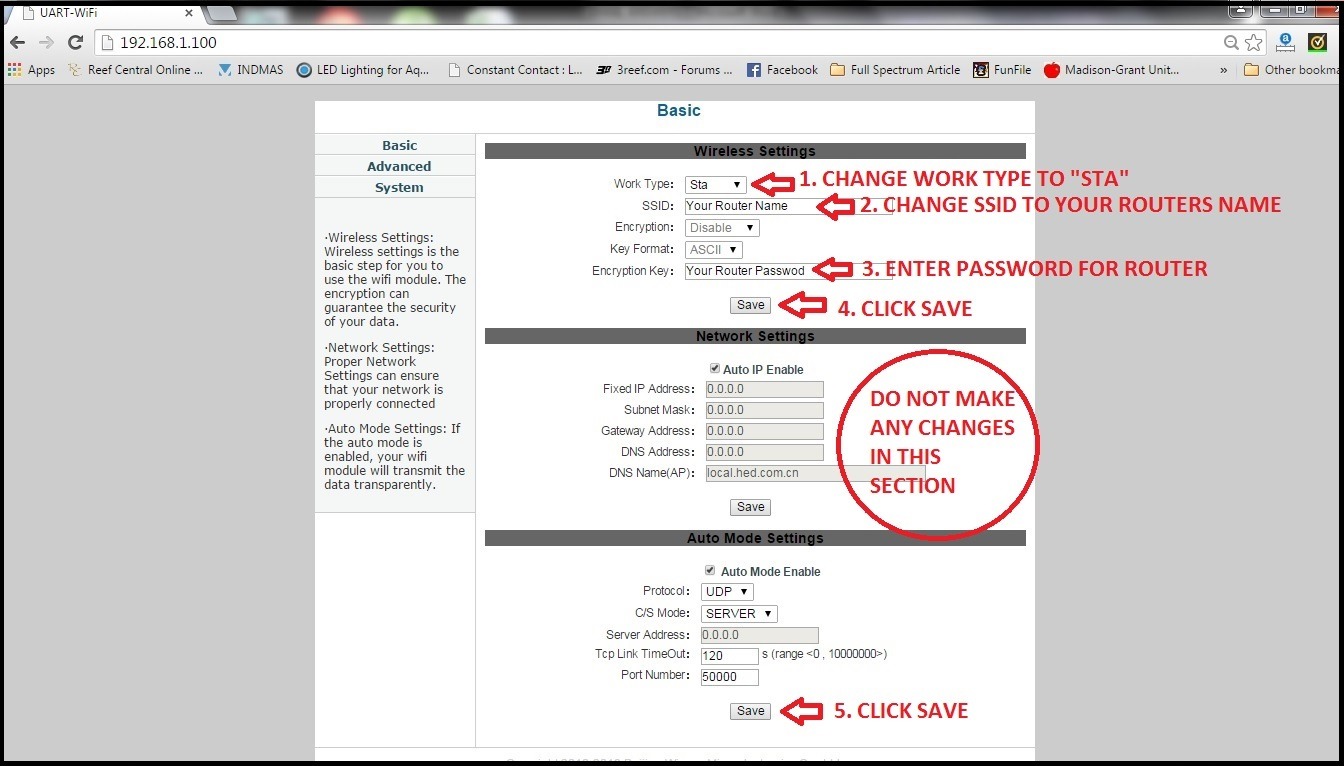
Orphek Atlantik LEDs ship from the factory with their wifi set in default mode. The default mode of each Atlantik model is 192.168.1.100. You will need to connect to the light, access the firmware and enter the information regarding your home router and password in order to allow the light to be accessible via your home network. This is easily accomplished via a few short steps on your android device.
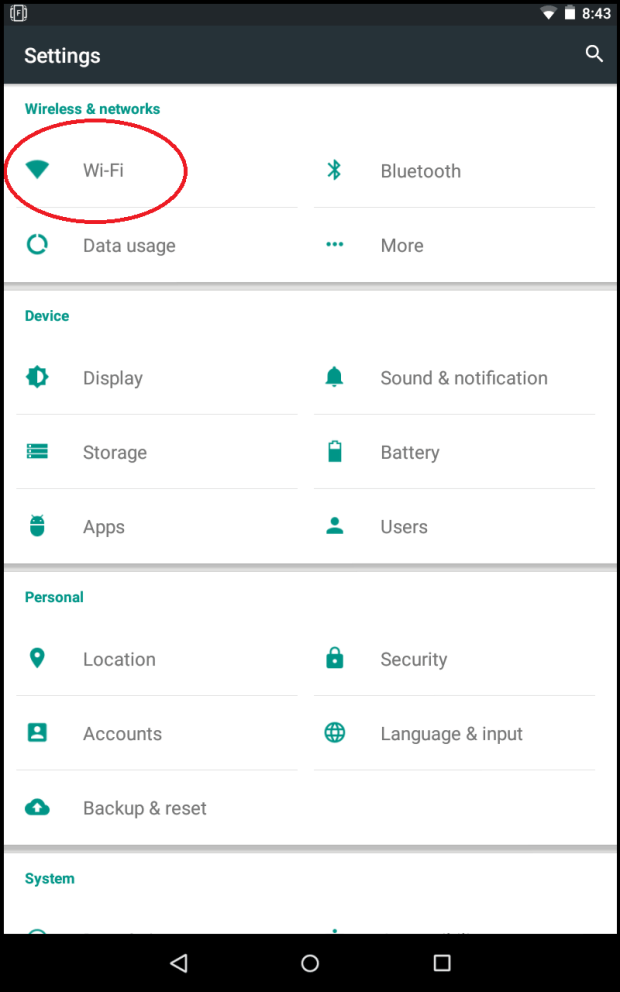
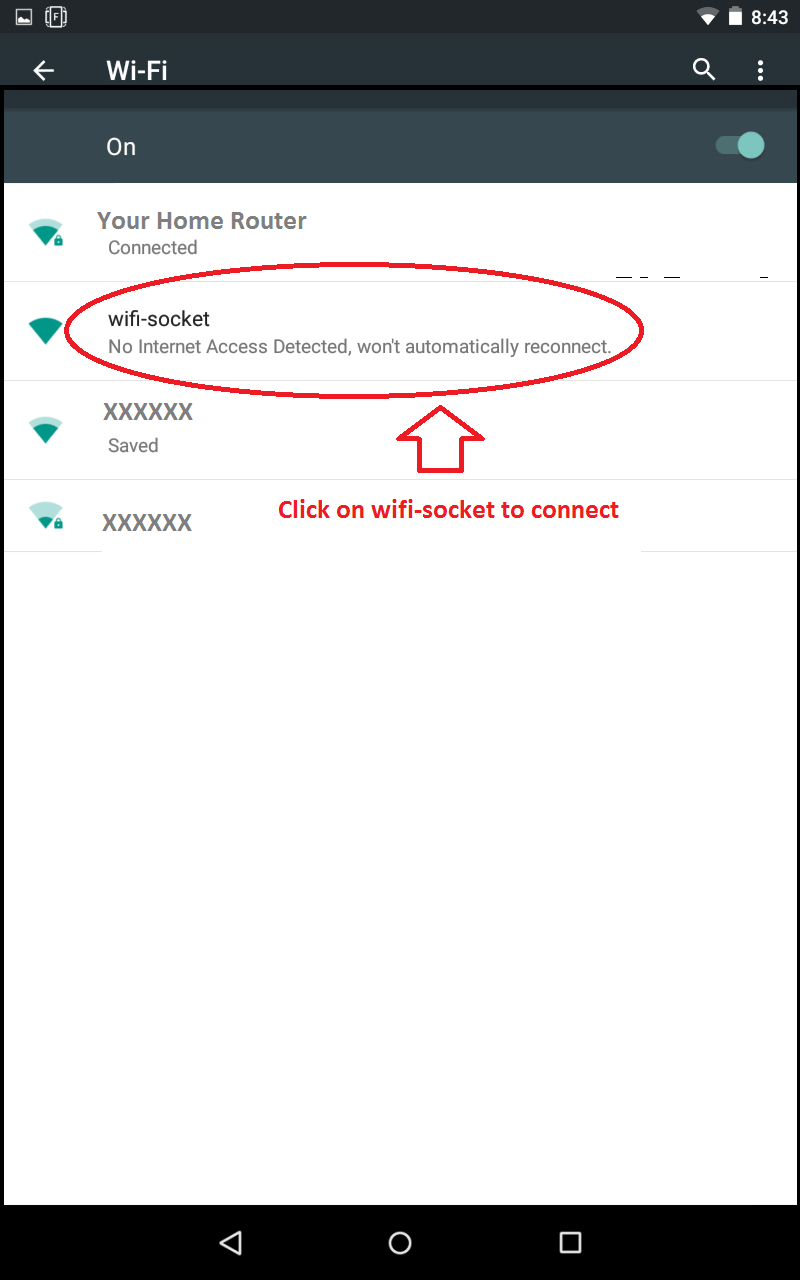
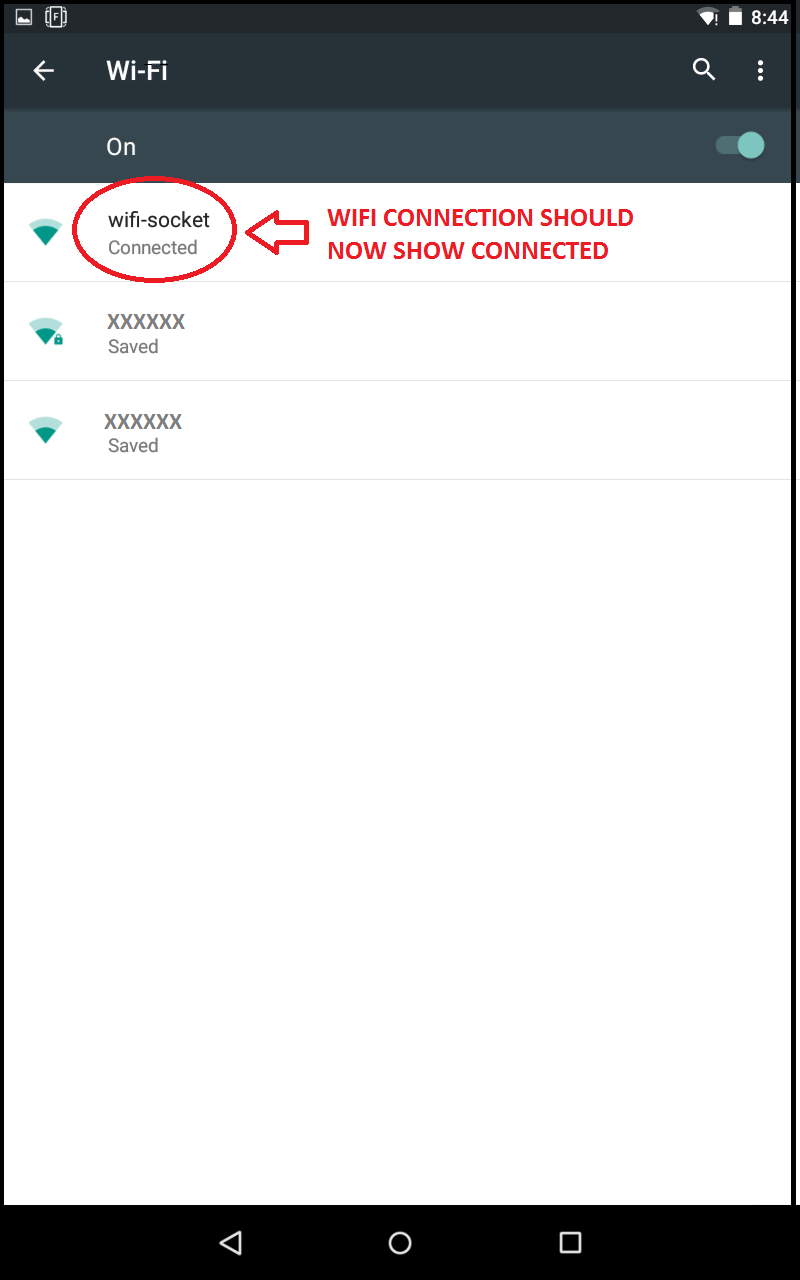
First you need to connect to the light directly to your smart phone or tablet. This is accomplished by finding the light access point on your wifi connections. The light comes default listed as “wifi-socket” This is also how the light will be listed if a factory reset is performed.
Connect to wifi-socket in your android settings.


2.2- Accessing Atlantik firmware
You will now access the firmware in the light using your web browser. This can be Google, Chrome or any other web browser that is installed on your Android device. Please keep in mind that you must remain connected to “wifi socket” while performing these steps.
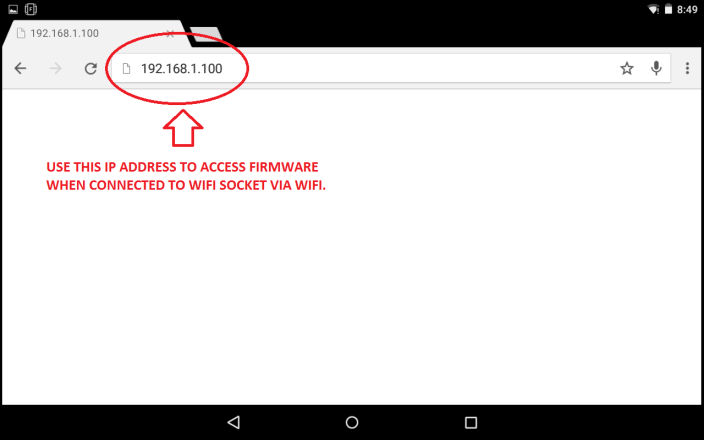
Open your web browser and type “192.168.1.100” in the address bar.
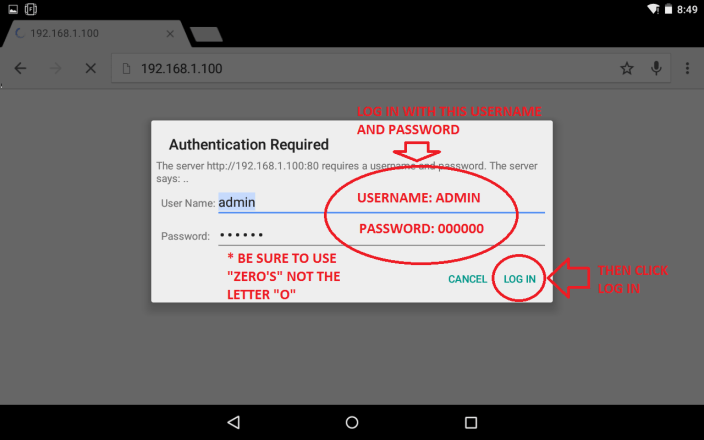
This will bring up the UART firmware screen and prompt you for a username and password.
- Username: Admin
- Password: 000000
Be sure to use “zeros” for the password and not the letter “o”.
Once you have completed the login the firmware screen will become visible. This is where you will make changes allowing your light to connect to your home network.

2.3- Connecting via wifi-socket only and controlling Atlantik without a home network Router.
Controlling your light directly via the wifi-socket connection is possible. Each time that you wish to control the light via the app you will need to ensure that you are connected to wifi-socket as illustrated below. Once you are connected directly to the light you may precede to section 3.
You can only control one light at a time with this method of connection in this step.
After you have finished programming/controlling the light you will need to reconnect to your home network or local area network in order to receive internet connectivity.
First you need to connect to the light directly. This is accomplished by finding the light access point on your wifi connections. The light comes default listed as “wifi-socket.” This is also how the light will be listed if a factory reset is performed.
Connect to wifi-socket in your android settings.

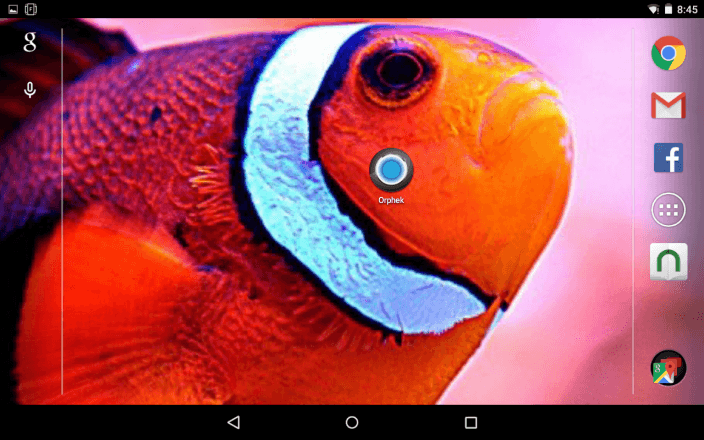
Now you need to open the Orphek app- Return to your home screen and locate the Orphek app and click on it to open.
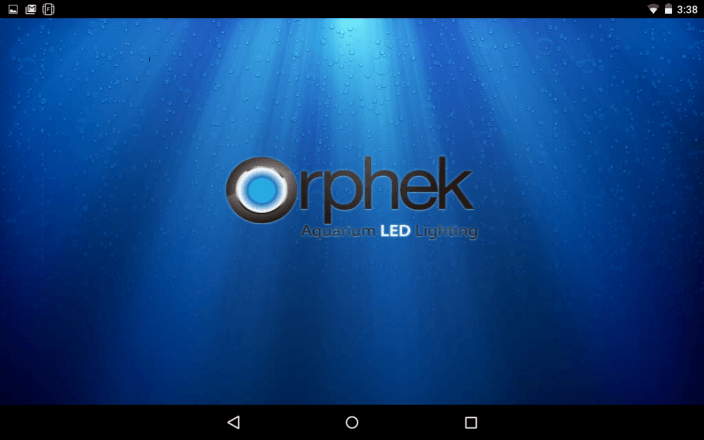
Once you open the Orphek application the animated Orphek splash screen will be displayed.
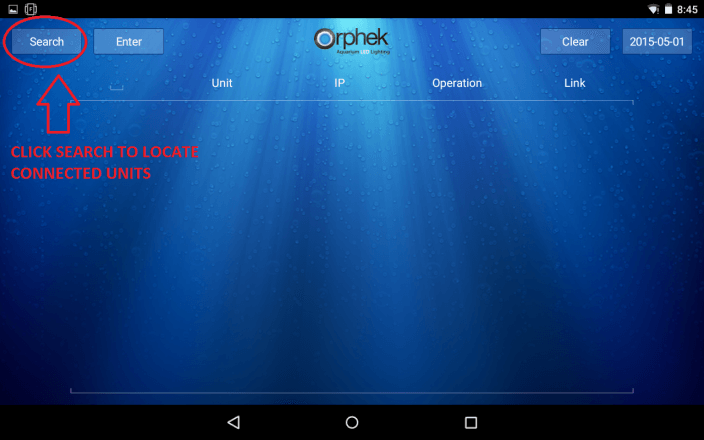
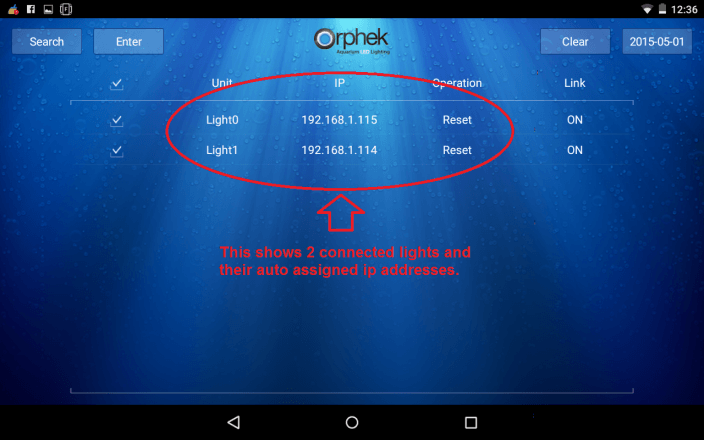
You will need to click on SEARCH to locate your light. If your light does not appear please click the SEARCH button up to 5 times as it goes through all of the potential IP addresses.
Now you can proceed to section 3 and begin using your Orphek Atlantik LED light.
2.4- Connecting via SSID only to control multiple Atlantiks
It is not possible to control multiple lights at the same time without a home network router but you can still use the wifi-socket access point to program multiple lights in locations without a home network router. You will just have to connect to each light separately to control and program it.
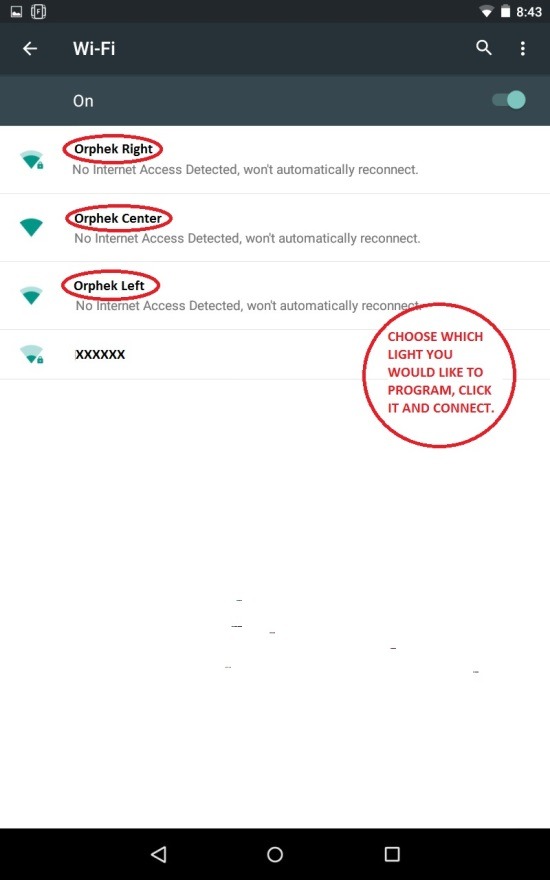
In this section you will be changing the name of the access point (SSID) from “wifi-socket” to another name. For the example we will use Orphek Left for the first unit, Orphek Center for the second and Orphek Right for the third unit. You can choose the names you wish for each light.
Because this method does not allow you to control more than one light at a time it is not recommended for locations where wireless communication cannot be used. you must use the Static IP methods in sections 2.5 – 2.8.
Begin by unplugging all units waiting 30 seconds and then plugging in one unit. Only one unit can be plugged in and programmed initially. Once all units have been programmed they can all be plugged in and operated at the same time.
First you need to connect to the light directly. This is accomplished by finding the light access point on your wifi connection. The light default name is listed as “wifi-socket.” This is also how the light will be listed if a factory reset is performed.
Connect to wifi-socket in your android settings.
You will now access the firmware in the light using your web browser. This can be google chrome or any other web browser that is installed on your Android device. Please keep in mind that you must remain connected to “wifi socket” while performing these steps
Open your web browser and type “192.168.1.100” in the address bar.
This will bring up the UART firmware screen and prompt you for a username and password.
- Username: Admin
- Password: 000000
Be sure to use “zeros” for the password and not the letter “o”.
Once you have completed the login the firmware screen will become visible. This is where you will make changes allowing your light to connect to your home network.
Once you have accessed the firmware screen you will make a few changes and restart the system.
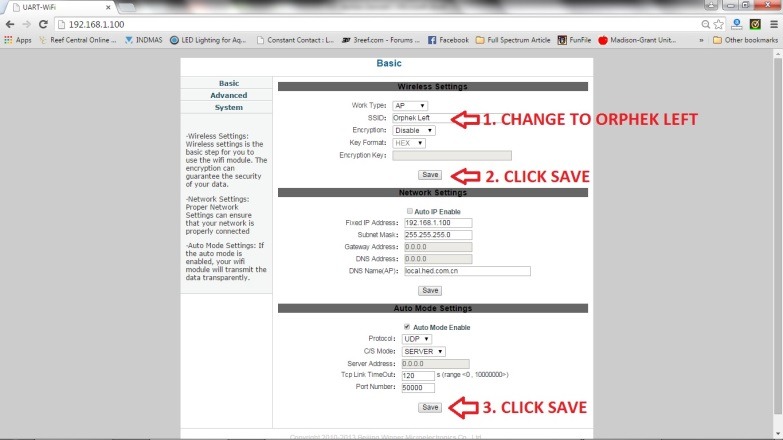
A. Unchecked The Enable DHCP
B. Enter a static IP address . the IP address must be unique,
C. You should also enter the submask and in most cases it is 255.255.255.0.
D. Then do the same to the remaining units. BUT etch unit must have unique IP address .
For example: set this IP for First unit 192.168.1.110 , and for the second unit IP 192.168.1.111 .

After this has been completed you will now be able to plug the second light in and perform the same steps inputting “Orphek Center” for the second light and then “Orphek Right” for the third light in the SSID box.
Once all three lights “SSID” have been renamed and Static unique IP been set , plug them in and allow them a few seconds to power up. Access your wifi connections again via the android settings and you will be able to see the lights, each listed as a separate wireless access point. Choose the light you wish to program first, connect to it and proceed to section 3. Once you have programmed the first light you will need to connect to the next light and program it and then the same for the third.
Because this method does not allow you to control more than one light at a time it is not recommended for locations where wireless can be used. We strongly urge you to use the Static IP methods in sections 2.5 – 2.8.
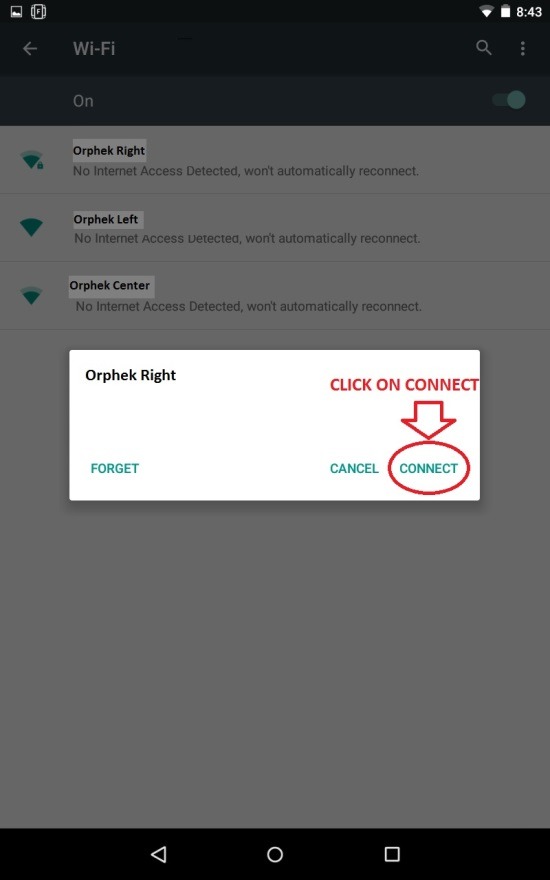
Connect to the light of your choice from all available lights and then proceed to section 3 for programming.

Now you need to open the Orphek app. Return to your home screen and locate the Orphek app and click on it to open.
Once you open the Orphek application the animated Orphek splash screen will be displayed.
You will need to click on SEARCH to locate your light. If your light does not appear please click the SEARCH button up to 5 times as it goes through all of the potential IP addresses.
Now you can proceed to section 3 and begin using your Orphek Atlantik LED light.
Don’t forget that you will need to go back to wifi connections and select a different light to connect to once you are finished programming each light.
2.5- Connecting one Atlantik to your home network and allowing your router to assign the IP address
Connecting your Atlantik series light to your home router and allowing the network to control the IP address is the easiest way to connect the lights. It’s also a good way to determine the IP preferences of your router as you will be able to see the IP address once the unit is connected and the Orphek app is opened. This method often allows you to go back in and set a static IP after the fact which will add more stability to your system.
Allowing the router to assign IP addresses often causes conflicts down the road when using the Orphek app at a later date. If the IP address is changed by the router the app you will need to hit CLEAR and SEARCH in the app to locate the new IP addresses. While this is not a big issue, its best in the long run to use the static IP address setup outlined in sections 2.7 and 2.8.
First you need to connect to the light directly. This is accomplished by finding the light access point on your wifi connections. The light comes default listed as “wifi socket.” This is also how the light will be listed if a factory reset is performed.
Connect to wifi-socket in your android settings.
You will now access the firmware in the light using your web browser. This can be Google Chrome or any other web browser that is installed on your Android device. Please keep in mind that you must remain connected to “wifi socket” while performing these steps
Open your web browser and type “192.168.1.100” in the address bar.
This will bring up the UART firmware screen and prompt you for a username and password.
- Username: Admin
- Password: 000000
Be sure to use “zeros” for the password and not the letter “o”.
Once you have completed the login the firmware screen will become visible. This is where you will make changes allowing your light to connect to your home network.
Once you have accessed the firmware screen you will make a few changes and restart the system.
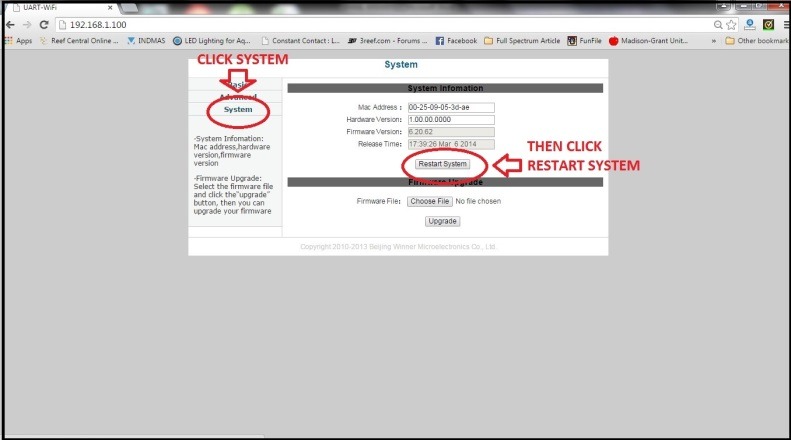
Once you have entered all of the correct info and ensured that it is all correct, you will need to restart the system. PLEASE VERIFY THAT ALL INFO IS CORRECT BEFORE RESTARTING THE SYSTEM.
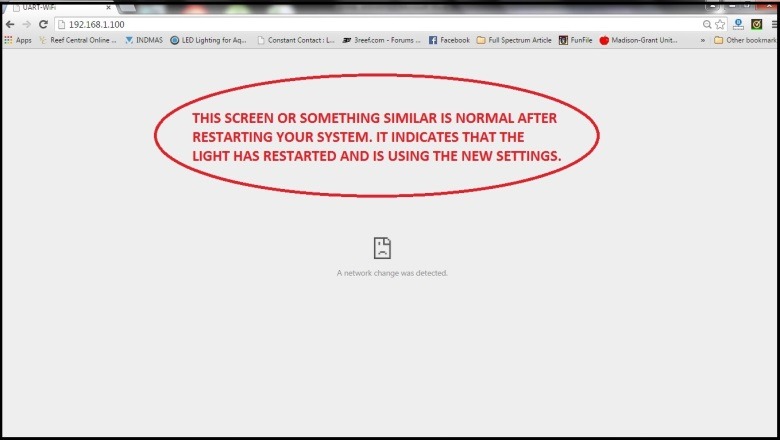
Once the system restarts you will lose connection with the wifi socket and you should get some sort of error screen on your browser notifying you that connection has been lost or unable to connect to 192.168.1.100. At this time the light is now connected to your home network. You can test this connection by skipping directly to section 3.
If you are connecting multiple lights to your network you will need to perform this step for each light, one at a time, selecting a different IP address for each. Please plug in the next light and return to step 2.1.
Now you need to open the Orphek app- Return to your home screen and locate the Orphek app and click on it to open.
Once you open the Orphek application the animated Orphek splash screen will be displayed.
You will need to click on SEARCH to locate your light. If your light does not appear please click the SEARCH button up to 5 times as it goes through all of the potential IP addresses.
Now you can proceed to section 3 and begin using your Orphek Atlantik LED light.
2.6- Connecting multiple Atlantiks to your home network and allowing your router to assign IP addresses
Connecting your Atlantik series lights to your home router and allowing the network to control the IP addresses is the easiest way to connect the lights. It’s also a good way to determine the IP preferences of your router as you will be able to see the IP addresses once the units are connected and the Orphek app is opened. This method allows you to go back in and set a static IP after the fact which will add more stability to your system.
Allowing the router to assign IP addresses often causes conflicts down the road when using the Orphek app at a later date. If the IP address is changed by the router, you will need to hit CLEAR and SEARCH in the app to locate the new IP addresses. While this is not a big issue, it’s best in the long run to use static IP addresses.
IMPORTANT- You will need to perform the initial steps of entering the router information and password for each of your Atlantik series lights in order to connect multiple units to your home router.
Begin by unplugging all units waiting 30 seconds and then plugging in one unit. Only one unit can be plugged in and programmed initially. Once all units have been programmed they can all be plugged in and operating at the same time.
First you need to connect to the first light directly. This is accomplished by finding the light access point on your wifi connections. The light comes default listed as “wifi-socket.” This is also how the light will be listed if a factory reset is performed.
Connect to wifi-socket in your android settings.
You will now access the firmware in the light using your web browser. This can be Google Chrome or any other web browser that is installed on your Android device. Please keep in mind that you must remain connected to “wifi socket” while performing these steps.
Open your web browser and type “192.168.1.100” in the address bar.
This will bring up the UART firmware screen and prompt you for a username and password.
- Username: Admin
- Password: 000000
Be sure to use “zeros” for the password and not the letter “o”.
Once you have completed the login the firmware screen will become visible. This is where you will make changes allowing your light to connect to your home network.
Once you have accessed the firmware screen you will make a few changes and restart the system.

Once you have entered all of the correct info and ensured that it is all correct, you will need to restart the system. PLEASE VERIFY THAT ALL INFO IS CORRECT BEFORE RESTARTING THE SYSTEM.
Once the system restarts you will lose connection with the wifi socket and you should get some sort of error screen on your browser notifying you that connection has been lost or unable to connect to 192.168.1.100. At this time the light is now connected to your home network. You can test this connection by skipping directly to section 3.
If you are connecting multiple lights to your network you will need to perform this step for each light, one at a time, selecting a different IP address for each. Please plug in the next light and return to step 2.1.
You will now need to plug in the next light and perform the above steps in order to connect all lights to your router.
Once all lights are connected to the router you can proceed to the remaining steps in this section.
Now you need to open the Orphek app- Return to your home screen and locate the Orphek app and click on it to open.
Once you open the Orphek application the animated Orphek splash screen will be displayed.
You will need to click on SEARCH to locate your light. If all of your lights do not appear please click the SEARCH button up to 5 times as it goes through all of the potential IP addresses.
Now you can proceed to section 3 and begin using your Orphek Atlantik LED light.
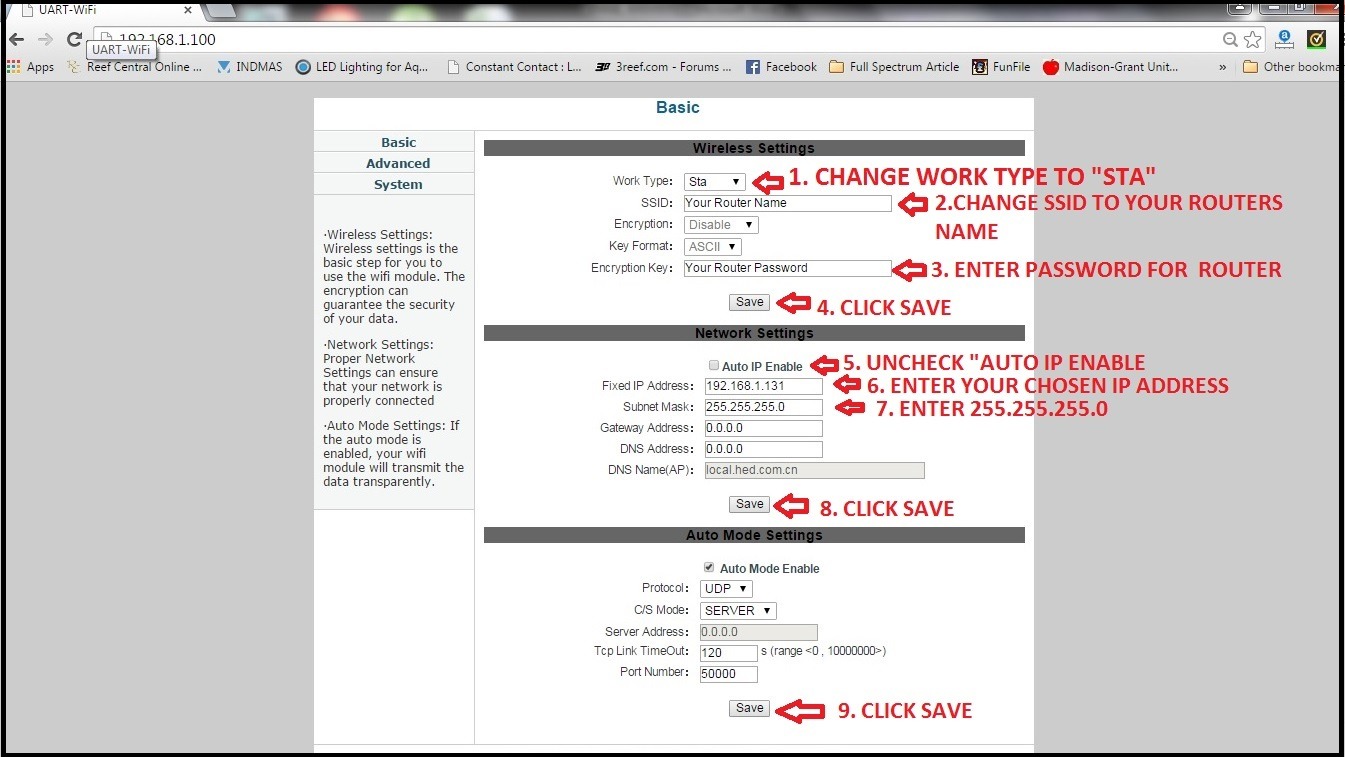
2.7- Connecting one Atlantik to your home network and assigning static IP addresses (BEST METHOD)
Connecting the light to your home router and setting a static IP address will ensure that your lights are accessible even after months of operation without changes. Keep in mind that the Orphek Atlantik series is designed to operate without continued need for programming and changes. The system will continue to follow its program daily until you make a change via the app. The Atlantik series does not require continual connection with the app or with other lights in order to operate. All lights operate on their own, via their internal circuitry. This eliminates the reliance on a master unit or device to control the lights 24/7. The system is designed to be set and then allowed to work on its own for years without changing. We suggest that any changes be well planned and as infrequent as possible.
When setting an IP address, most routers use 192.168.1.xxx where xxx is the actual location of the device on the network. Some routers use 10.0.0.xxx. You will need to determine the IP format that your router uses. If you are unable to determine this you can try the 192.168.1.xxx setting and if needed you can perform a factory reset to restore the light and begin again.
When choosing your IP address, Orphek suggests using an IP address that’s not likely to cause conflicts. For this reason we suggest using IP addresses higher than 120. For example; 192.168.1.121 or 192.168.1.122
When assigning multiple lights to a network it is beneficial to keep the lights grouped in a series in order to make it easier to keep them straight. As you can see in the examples, only the last three numbers change so you could do 121, 122, 123,124 … In this example we will be setting a light to the IP address of 192.168.1.131
The subnet mask will always be the same for the lights. 255.255.255.0
Your router info and password must be EXACT with capitals, spaces, number and symbols. Please have this info onhand before entering it into the firmware. If a mistake is made and the light restarted, you will need to perform a factory reset in order to restore the firmware and begin again.
Connect to wifi-socket in your android settings.
You will now access the firmware in the light using your web browser. This can be Google Chrome or any other web browser that is installed on your Android device. Please keep in mind that you must remain connected to “wifi socket” while performing these steps.
Open your web browser and type “192.168.1.100” in the address bar.
This will bring up the UART firmware screen and prompt you for a username and password.
- Username: Admin
- Password: 000000
Be sure to use “zeros” for the password and not the letter “o”.
Once you have accessed the firmware screen you will make a few changes and restart the system.
Once you have entered all of the correct info and ensured that it is all correct. You will need to restart the system. PLEASE VERIFY THAT ALL INFO IS CORRECT BEFORE RESTARTING THE SYSTEM.
Once the system restarts you will lose connection with the wifi socket and you should get some sort of error screen on your browser notifying you that connection has been lost or unable to connect to 192.168.1.100. At this time the light is now connected to your home network. You can test this connection by skipping directly to section 3.
If you are connecting multiple lights to your network you will need to perform this step for each light, one at a time, selecting a different IP address for each. Please plug in the next light and return to step 2.1.
Now you need to open the Orphek app- Return to your home screen and locate the Orphek app and click on it to open.
Once you open the Orphek application the animated Orphek splash screen will be displayed.
You will need to click on SEARCH to locate your light. If all of your lights do not appear please click the SEARCH button up to 5 times as it goes through all of the potential IP addresses.
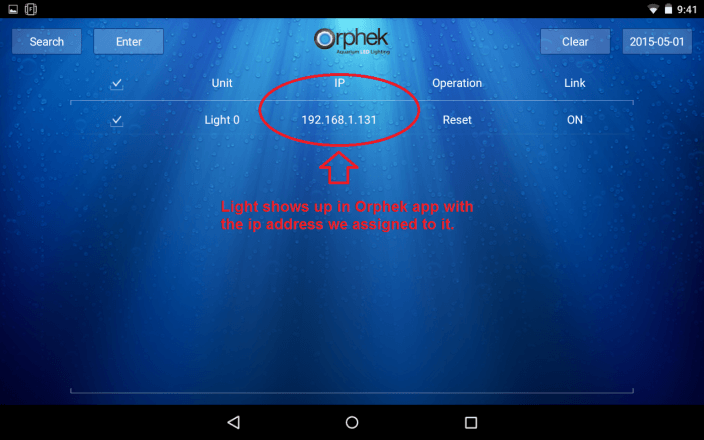
Now you can proceed to section 3 and begin using your Orphek Atlantik LED light.
2.8- Connecting multiple Atlantiks to your home network and assigning static IP addresses (BEST METHOD)
Connecting the lights to your home router and setting a static IP address will ensure that your lights are accessible even after months of operation without changes. Keep in mind that the Orphek Atlantik series is designed to operate without continued need for programming and changes. The system will continue to follow its program daily until you make a change via the app. The Atlantik series does not require continual connection with the app or with other lights in order to operate. All lights operate on their own, via their internal circuitry. This eliminates the reliance on a master unit or device to control the lights 24/7. The system is designed to be set and then allowed to work on its own for years without changing. We suggest that any changes be well planned and as infrequent as possible.
When setting an IP address, most routers use 192.168.1.xxx where xxx is the actual location of the device on the network. Some routers use 10.0.0.xxx. You will need to determine the IP format that your router uses. If you are unable to determine this you can try the 192.168.1.xxx setting and if needed you can perform a factory reset to restore the light and begin again.
When choosing your IP address, Orphek suggests using an IP address that’s not likely to cause conflicts. For this reason we suggest using IP addresses higher than 120. For example; 192.168.1.121 or 192.168.1.122
When assigning multiple lights to a network it is beneficial to keep the lights grouped in a series in order to make it easier to keep them straight. As you can see in the examples, only the last three numbers change so you could do 121, 122, 123,124 … In this example we will be setting a lights to the IP address of 192.168.1.131 and 192.168.1.132
The subnet mask will always be the same for the lights. 255.255.255.0
Your router info and password must be EXACT with capitals, spaces, number and symbols. Please have this info onhand before entering it into the firmware. If a mistake is made and the light restarted, you will need to perform a factory reset in order to restore the firmware and begin again.
Begin by unplugging all units waiting 30 seconds and then plugging in one unit. Only one unit can be plugged in and programmed initially. Once all units have been programmed they can all be plugged in and operating at the same time.
First you need to connect to the first light directly. This is accomplished by finding the light access point on your wifi connections. The light comes default listed as “wifi-socket.” This is also how the light will be listed if a factory reset is performed.
Connect to wifi-socket in your android settings.
You will now access the firmware in the light using your web browser. This can be google chrome or any other web browser that is installed on your Android device. Please keep in mind that you must remain connected to “wifi socket” while performing these steps
Open your web browser and type “192.168.1.100” in the address bar.
This will bring up the UART firmware screen and prompt you for a username and password.
- Username: Admin
- Password: 000000
Be sure to use “zeros” for the password and not the letter “o”.
Once you have completed the login the firmware screen will become visible. This is where you will make changes allowing your light to connect to your home network.
Once you have accessed the firmware screen you will make a few changes and restart the system.

Once you have entered all of the correct info and ensured that it is all correct. You will need to restart the system. PLEASE VERIFY THAT ALL INFO IS CORRECT BEFORE RESTARTING THE SYSTEM.
Once the system restarts you will lose connection with the wifi socket and you should get some sort of error screen on your browser notifying you that connection has been lost or unable to connect to 192.168.1.100. At this time the light is now connected to your home network. You can test this connection by skipping directly to section 3.
If you are connecting multiple lights to your network you will need to perform this step for each light, one at a time, selecting a different IP address for each. Please plug in the next light and return to step 2.1.
You will now need to plug in the next light and perform the above steps in order to connect all lights to your router.
Once all lights are connected to the router you can proceed to the remaining steps in this section.
Now you need to open the Orphek app- Return to your home screen and locate the Orphek app and click on it to open.
Once you open the Orphek application the animated Orphek splash screen will be displayed.
You will need to click on SEARCH to locate your light. If all of your lights do not appear please click the SEARCH button up to 5 times as it goes through all of the potential IP addresses.
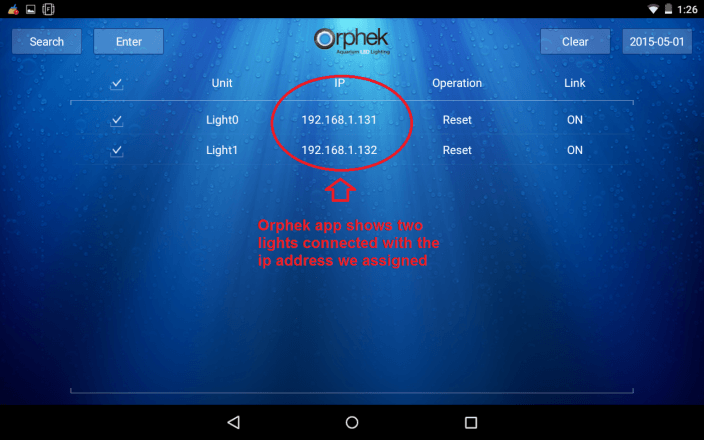
Now you can proceed to section 3 and begin using your Orphek Atlantik LED light.