Welcome to the Orphek iCon Sun & Moon Synchronization features!
Experience Unprecedented Control with Our Cutting-Edge Lighting Technology
This guide will walk you through setting up and using the Orphek App to control the Sun & Moon Synchronization features.
Please note: Sun & Moon Synchronization is available with Orphek iCon technology in the following devices: Natura iCon, OR4 iCon LED Bars, Atlantik iCon, Atlantik Compact iCon, Amazonas 960 iCon, and OR3 LED Bars (when connected via the Osix Smart Device).
Important: If you own Orphek lighting solutions purchased before the introduction of iCon technology, you will not be able to use the Sun & Moon Synchronization features.
Upgrade to iCon technology by purchasing new Orphek LED solutions with iCon technology or updating your current operating system. Contact us for personalized advice and a quotation, or visit Orphek Products / Orphek online shop.
Sun & Moon Synchronization is the core technology that allows Orphek iCon lighting systems to follow real astronomical cycles, recreating natural daylight, moonlight, and seasonal rhythms with exceptional biological accuracy. This system integrates daily sun movement, lunar phases, and long-term seasonal progression into one continuous, automated lighting behavior.
NEW! With the latest update, Sun & Moon Synchronization now incorporates an advanced Lunar Mode Brightness Limit, setting a new benchmark in precise nocturnal light control.
VERY IMPORTANT – Updating the Orphek iCon App:
If you already have the Orphek iCon App installed on your device, make sure it is updated to the latest version.
Note: You can enable the Auto Upgrade feature to automatically update your light settings. However, some important updates may still require your confirmation.
Device Update: When a new update is available, the App will notify you with a pop-up message stating “NEW DEVICE FIRMWARE FOUND” Simply click on “UPDATE NOW.”
Once the update is complete, perform the NET PAIRING process again by pressing the reset button four times.
Clear Cache: To clear the cache, go to “Me,” then click the settings symbol (located at the top right), and select “Clear Cache.”
Orphek iCon App: New Features to Revolutionize Your Sun & Moon Aquarium Experience
The Orphek iCon App has just gotten even more powerful! We’re excited to introduce new features that give you unprecedented control over your aquarium lighting, building on our already advanced sun and moon synchronization capabilities.
Effortless Automatic detection via your device
Orphek’s groundbreaking technology allows you to synchronize your aquarium lighting with the sunrise, sunset, moonrise, and moonset times based on your local time. Your Orphek iCon LED solution comes with automatic location detection via your device.
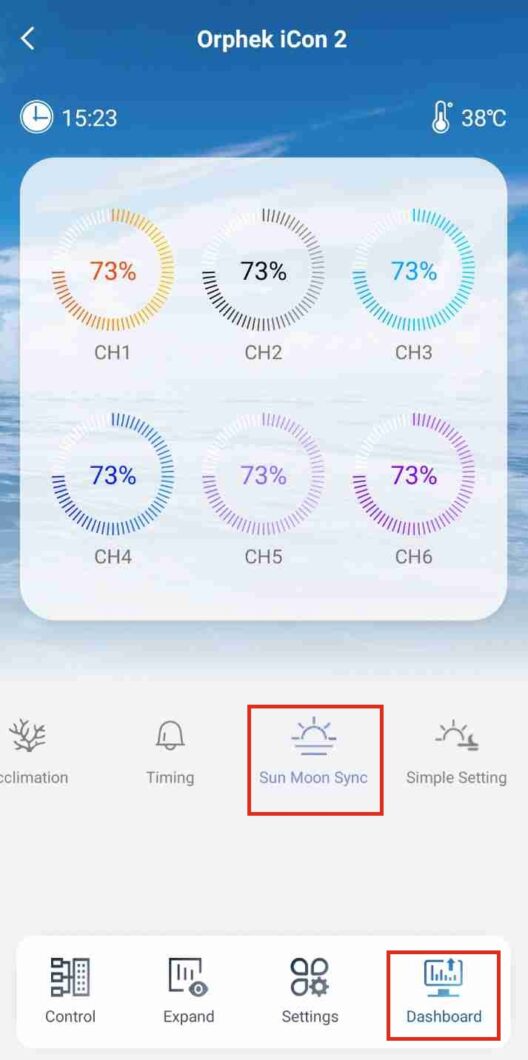
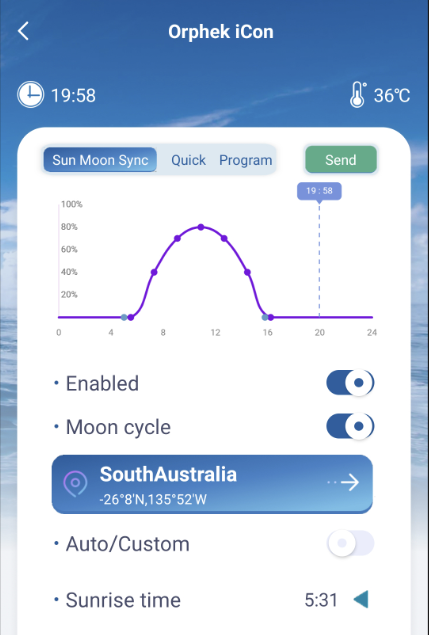
Upon initial entry into the application, users are introduced to the Sun & Moon Synchronizer feature (button on the left side up – Sun Moon Sync), which operates on default settings!
This mean that you not need to do any program the light is already sync with your local sun and moon,
When navigating from the Dashboard (lower right corner), users will notice the Sun Moon Sync button illuminated in blue, indicating its activation. You’ll find both sections outlined with red color in the screenshot.
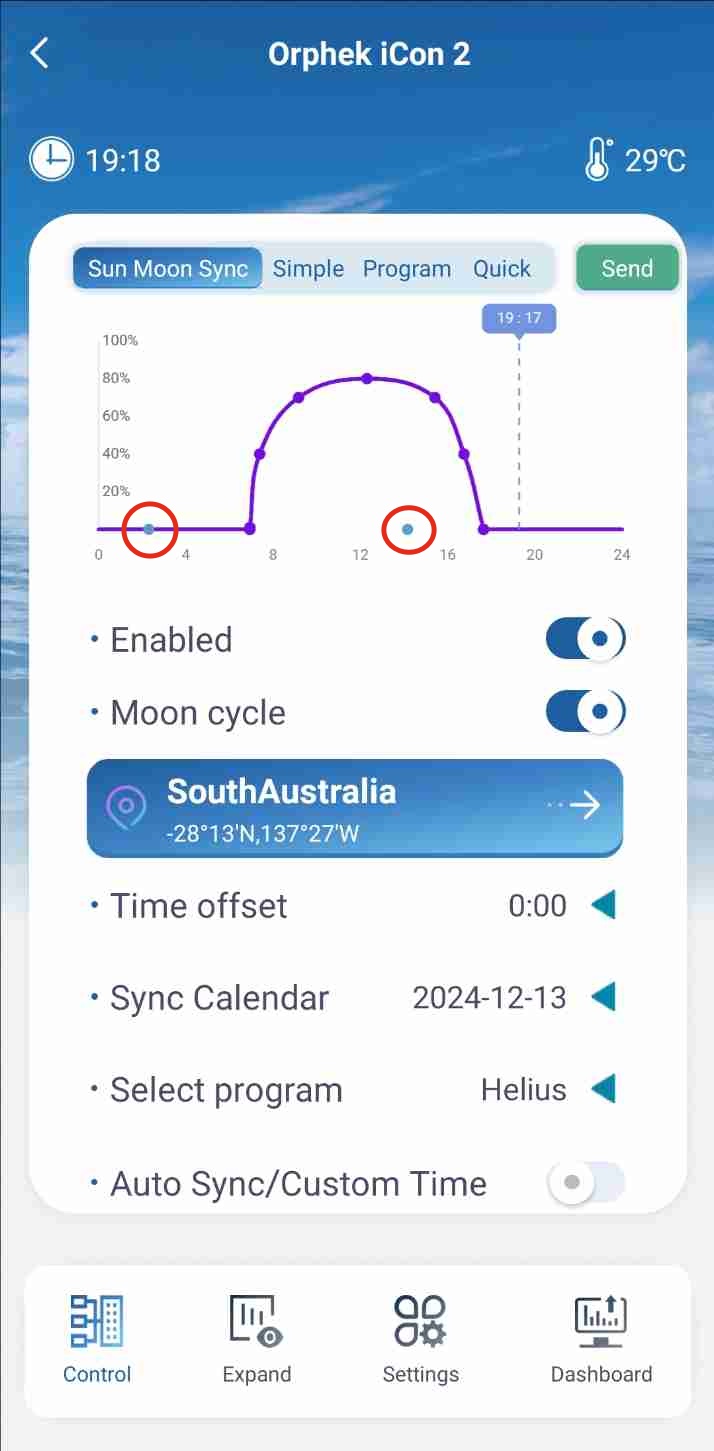
Additionally, the light intensity adjusts dynamically based on HELIUS Pre-Installed Program enhancing user experience and environmental responsiveness. The included graph provides a visual representation of how light intensity varies throughout the day.
Two cyan markers on the time axis indicate the start and end of the moon cycle, providing clear reference points for users. Circled and highlighted in red in the screenshot below:
Manual Location Selection
In addition to automatic location detection, you can manually select your location:
How to Manually Select a Different Location:
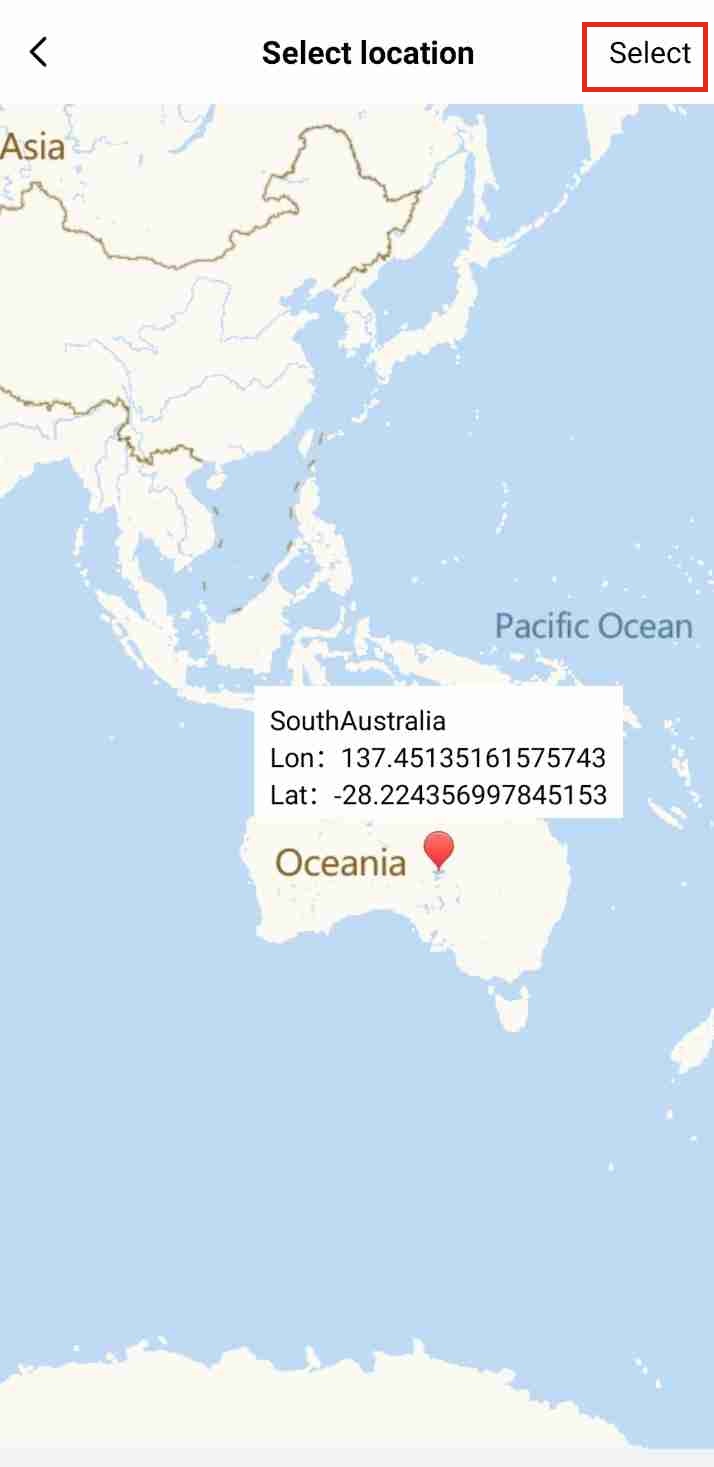
Access the Map: Click the location setting to open the map interface.Pinpoint Your Location: Use the map to find and pinpoint your desired location.Confirm Selection: After selecting your location on the map, click the (SELECT) button to confirm your choice. You will find this button highlighted in red in the following screenshot.

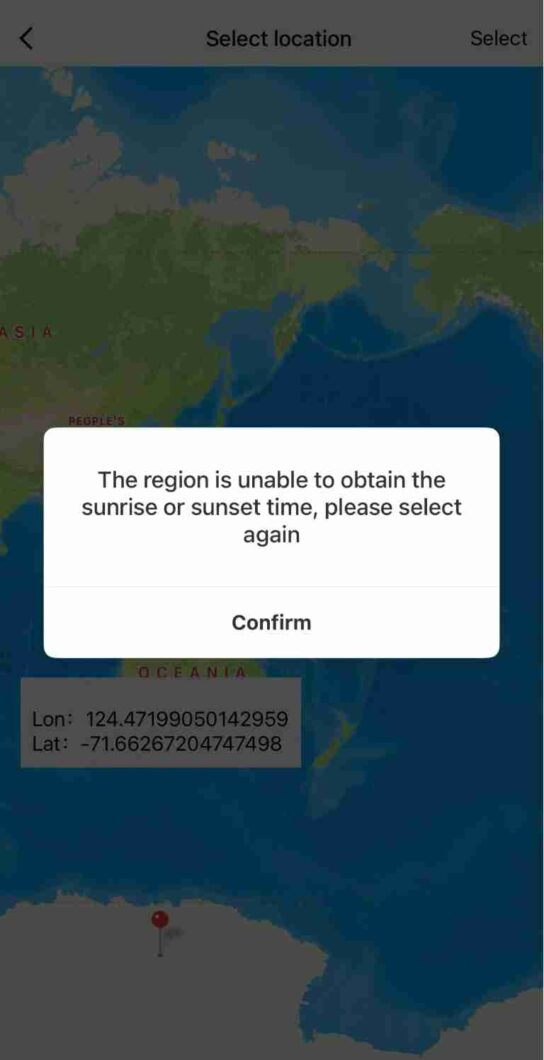
Error Handling: If sunrise and sunset times cannot be retrieved for the chosen region, a notification will appear, prompting you to select an alternative location. This ensures that the application can retrieve accurate sunrise and sunset data for your selected location.
Custom Programs Now Synchronize: Your Lighting, Your Way
Design Your Ideal Program: The heart of this enhancement is the ability to synchronize your own custom-built lighting programs with the sun and moon cycles. In the “Program” section, you have complete control to design the ideal lighting schedule for your aquarium. (Scroll down to learn how to do it)
Seamless Synchronization: After you’ve created your program, simply go to the “Sun & Moon Sync” section and select it from the available options. Your custom program will then automatically align with the natural cycles.
How to do it:
After you have created your program using the “Program” page, navigate to the “Sun & Moon Sync” section.
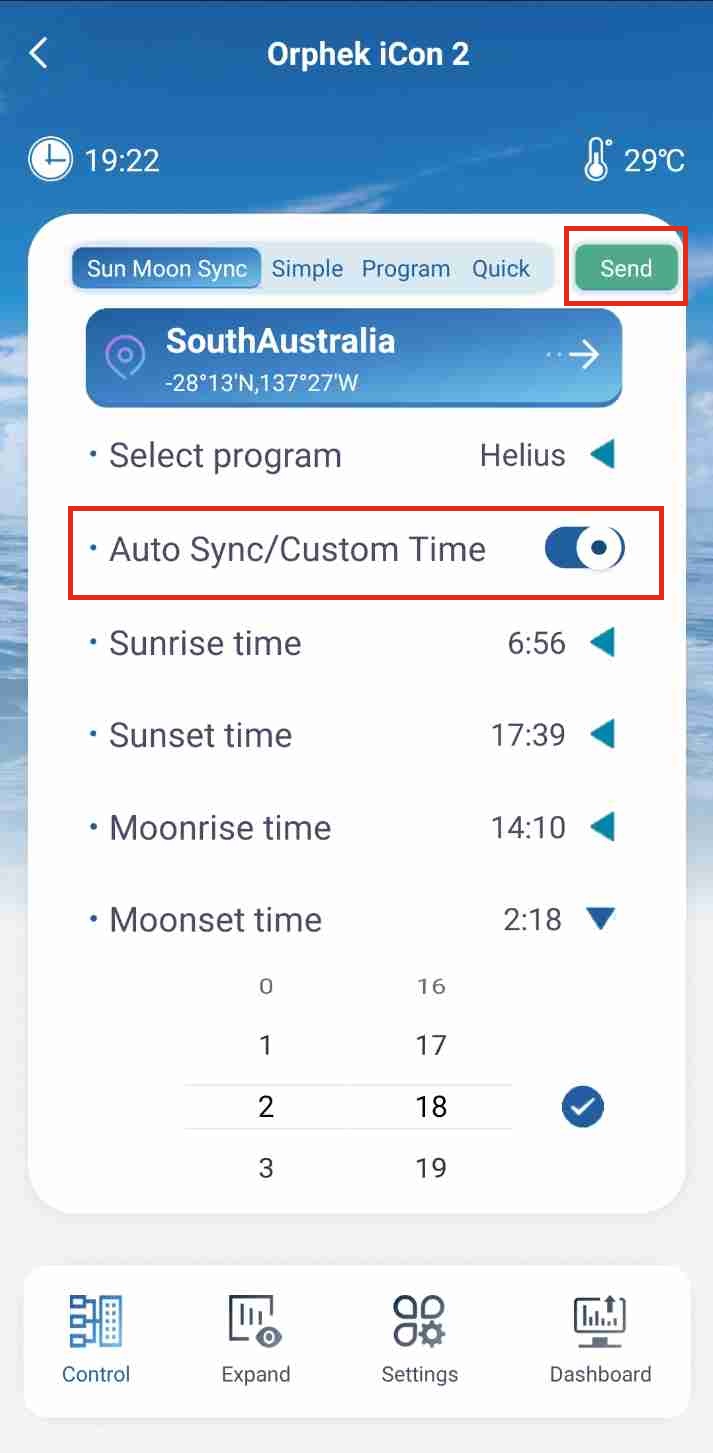
Selecting Your Custom Program: Within the “Select Program” feature, choose your custom program from the list of available options. Your custom program will now be used for synchronization, aligning with the natural sunrise/sunset/moonrise/moonset cycles.
Adjusting Time Settings in Custom Mode: To manually adjust the time settings, switch from (AUTO) mode to (CUSTOM). You’ll find this section outlined with red color in the screenshot.
Selecting a Time Point: Select the desired time point by clicking the side-facing arrow icon.
Confirming Your Selection: After making your adjustments, click the down-pointing arrow icon to confirm your selection and save the changes for that time point.
Implementing the Settings: Once you have made all the desired adjustments in (CUSTOM) mode, click the (SEND) button to apply the updated settings. You’ll find this button outlined with red color in the screenshot.
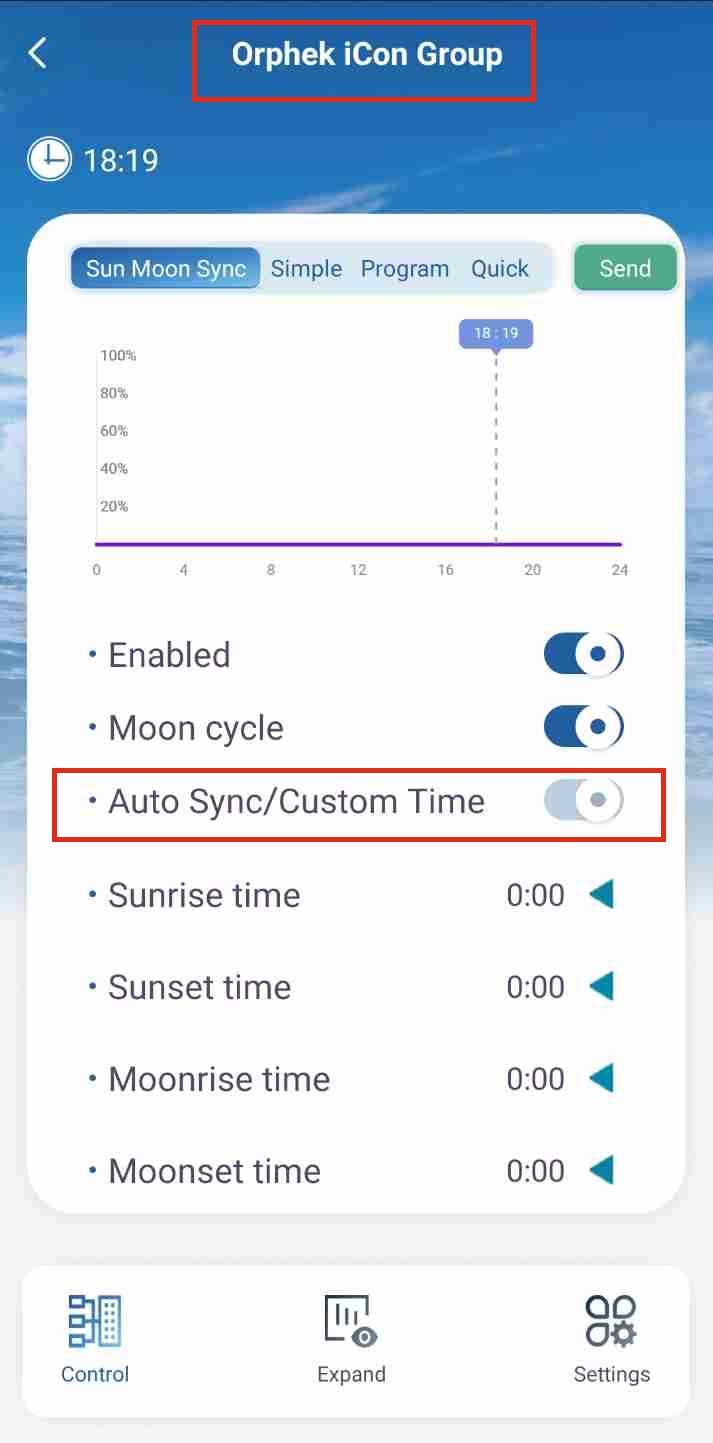
Sun & Moon Sync in Group Mode: When operating in Group mode (with multiple lights grouped together), the Sun & Moon Sync feature has specific behaviors:
Custom Mode Only: In Group mode, Sun & Moon Sync only functions in Custom mode.
Default Time: The default time settings in Group mode are set to 0.
Manual Time Configuration: You are responsible for manually setting the desired sunrise, sunset, moonrise, and moonset times in advance.
Graph Display: The graph will update to reflect the sunrise/sunset/moonrise/moonset times you have manually configured.
GENERAL IMPORTANT NOTE:
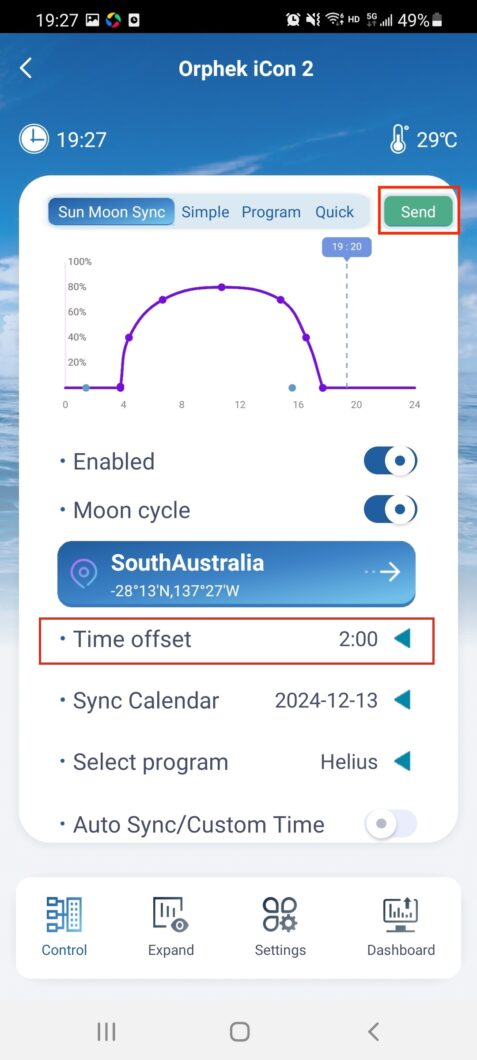
Applying Changes with the (SEND) Button: (You’ll find this button outlined with red color in the screenshot).
Always ensure you click the (SEND) button after making any adjustments within the Sun & Moon Sync feature to guarantee your settings are applied and saved correctly. Failure to do so will result in the light not executing the new changes or operations, and the modifications will not be saved.
Please note that the Clouds mode is not compatible with Sun & Moon Synchronization. Simultaneous operation of Clouds mode with Sun & Moon Synchronization is not supported.
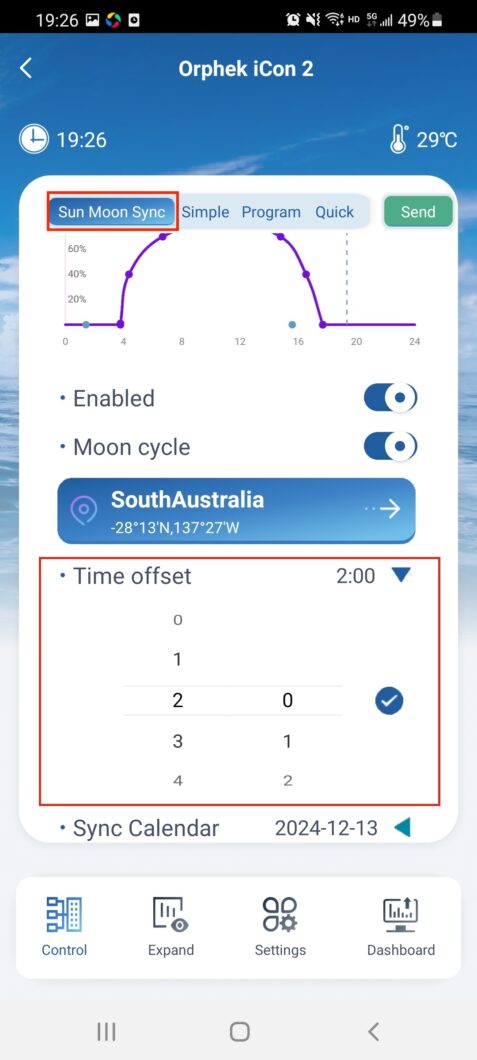
Precise Time Control with Time Offset:
Fine-Tune Your Start Time: Use the new “Time Offset” feature to precisely control when the sun and moon synchronization begins. Easily add or subtract hours to align with your preferred schedule. For example, if sunrise is at 7 AM, but you want your lights to start at 9 AM, simply add +2 hours.
How do do it:
Access Sun & Moon Sync: Click the “Sun & Moon Sync” button, located in the upper left corner of the application. This button is highlighted with a red outline in the screenshot.
Adjust the Time Offset: In the “Time Offset” section, specify the amount of time (in hours) you want to delay. This will shift the sunrise, sunset, moonrise, and moonset times later. You’ll find this section outlined with red color in the screenshot.
Apply the Changes: Click the “Send” button located in the upper left corner of the application to apply the time offset. This button is highlighted with a red outline in the screenshot.
IMPORTANT CONSIDERATIONS:
To Remove the Time Offset: Set the “Time Offset” back to “0” and click “Send.” This will ensure the sunrise/sunset/moonrise/moonset times are no longer delayed.
Custom Mode Limitation: This time offset feature does not work with the “Custom” mode. Custom mode schedules are manually configured, not automatically synced.
Graph Display: The program’s visual graph will not reflect the time delay you’ve set.
Channel Intensity: You will see the impact of the time offset on the intensity levels of each channel on the Dashboard. This is where you’ll observe the changes based on the delayed timings.
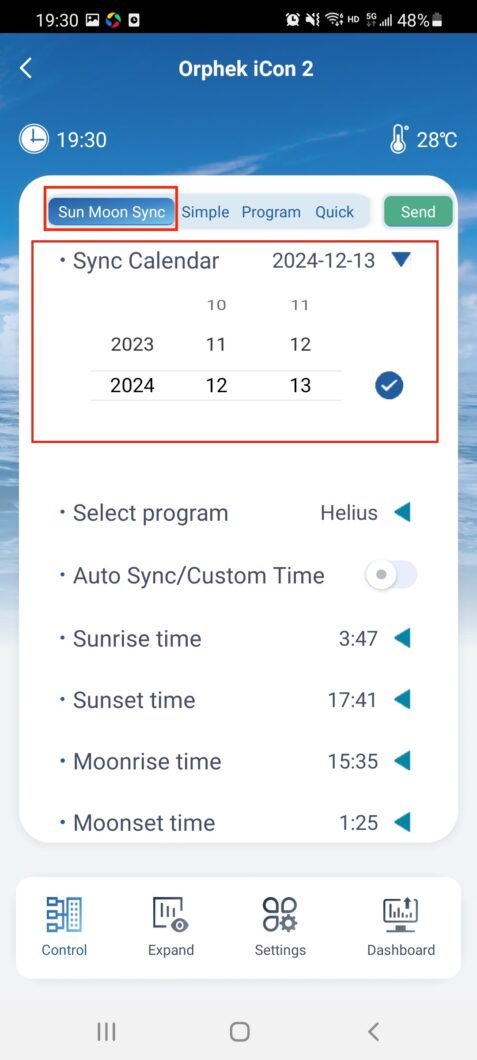
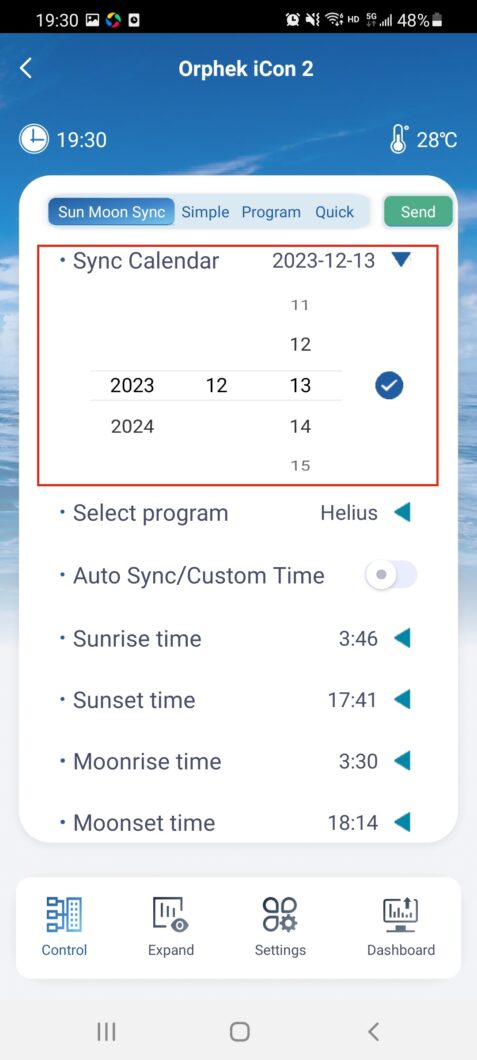
Seasonal Synchronization with Calendar Control:
Sync Your Reef’s Calendar: Introducing the revolutionary “Synchronization Calendar.” This feature lets you select the start date for your synchronization cycle, allowing you to align it with specific times of the year.
Why this is cutting-edge tech?
Enhance Spawning: Want to prepare your corals for spawning? Set the calendar to begin 2-3 months before the summer, simulating the natural environmental cues.
Evolutionary Improvement: This is a significant advancement, giving you the power to orchestrate your reef’s lighting to mirror the natural world, promoting optimal health and behavior.
Experience the Cycle:
With these combined features, your custom lighting program will automatically mimic sunrise, sunset, and the moon’s phases, all starting at the date and time you define. The moon sync will begin at 0.06% intensity, gradually increasing to 1% during the full moon.
How to do it:
Access Sun & Moon Sync: Click the “Sun & Moon Sync” button, located in the upper left corner of the application. This button is highlighted with a red outline in the screenshot.
Select the desired date from the “Sync Calendar.” The sunrise/sunset/moonrise/moonset times will update to match the selected date. You’ll find this section outlined with red color in the screenshot.
IMPORTANT CONSIDERATION:
One-Year Limit: You are allowed to change back the data within one year of the current date. As an example, check how the dates were set in the following screen:
Custom Mode Limitation: This feature does not work with the “Custom” mode. Custom schedules are manually configured and not automatically synced.
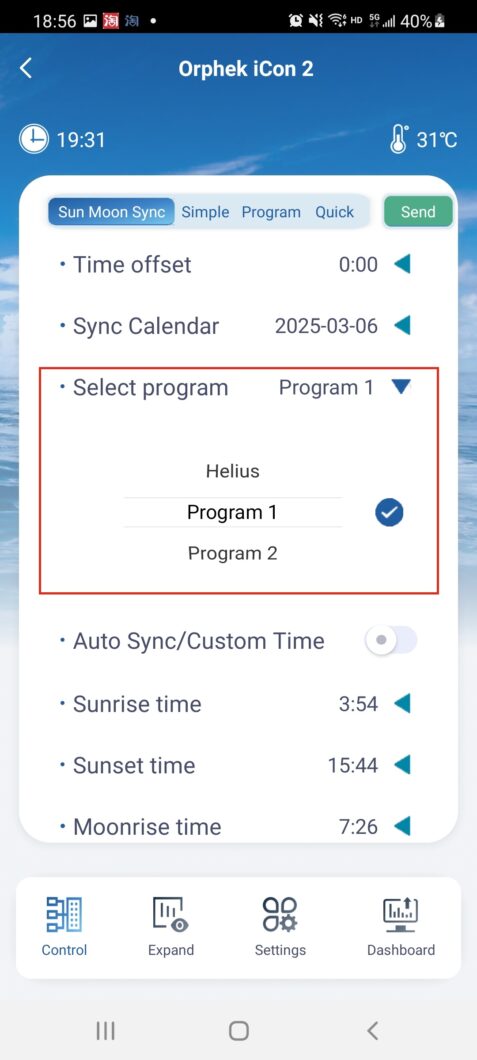
Select Program:
Purpose: This feature allows you to choose which program controls the sunrise/sunset/moonrise/moonset synchronization. You can select either the built-in program “Helius” or a custom program that you have created on the “Program” page.
How to Use: Choose the desired program from the “Select Program” dropdown menu. You’ll find this section outlined with red color in the screenshot.
IMPORTANT CONSIDERATION:
Graph Updates: When you select a program, the graph displayed in the application will update to reflect the sunrise/sunset/moonrise/moonset times associated with that program. You’ll find this section outlined with red color in the screenshot.

Group Mode Limitation: The “Select Program” feature is not available in “Group” mode. In Group mode, the built-in program “Helius” runs by default.
Get ready to unlock the full potential of your Orphek lighting with intelligent connectivity!
Managing Sun & Moon Sync Settings:
To deactivate the Sun & Moon Synchronizer feature, move the (ENABLE) button to the off position and click the (SEND) button to apply the changes.
Moon Cycle Activation and Functionality (LUNAR SCREEN):
This section describes how to activate and use the Moon Cycle feature.
By moving the (MOON CYCLE) button to the on position, the moon mode will operate during moonrise and moonset times. During this period, the Lunar function within the Expand section will activate automatically, with the start and end times determined by the moonrise and moonset times, respectively. You’ll find this section outlined with red color in the screenshot.
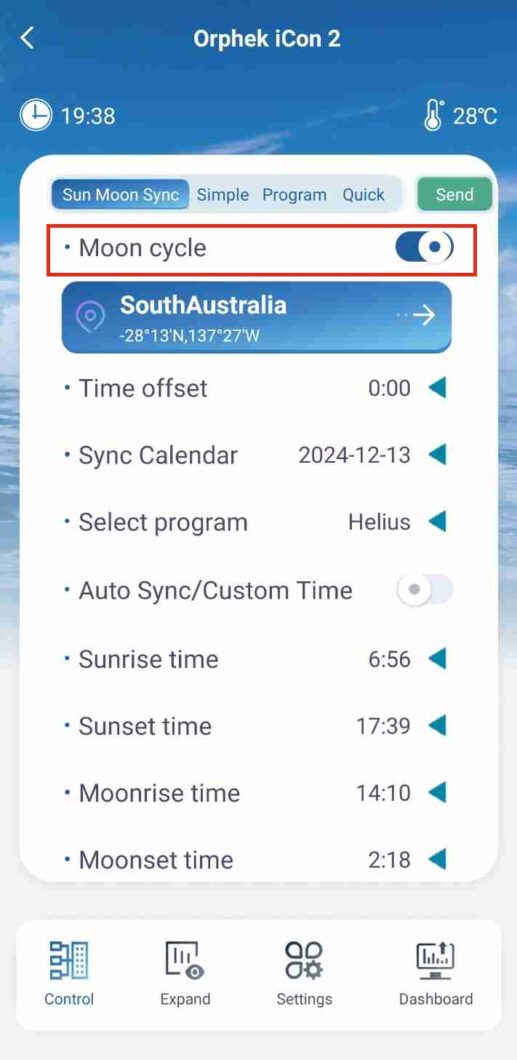
Note: In this case, you are not allowed to set the start and end times manually.
If you have previously set the start and end times in Lunar, you will observe that these times are automatically adjusted when you access the Lunar feature.
However, when you deactivate the Sun Moon Sync feature and initiate the Program to run, the Lunar start and end times will revert to the previously set times. This occurs because the Lunar function operates under the Program setting, leading to the reversion of time settings.
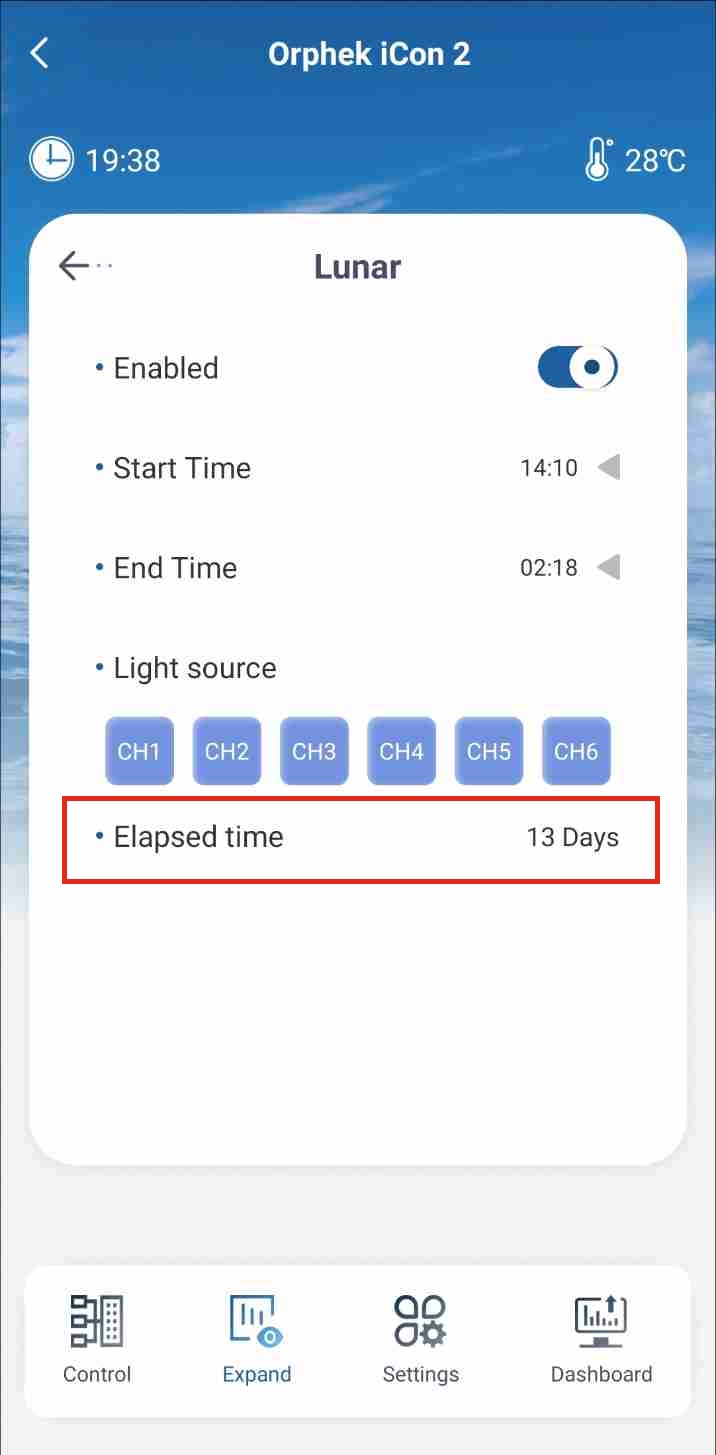
In Moon Cycle mode, the light intensity adjusts according to the calendar date, simulating the phases of the moon. The Elapsed Time indicator displays the current calendar date. You’ll find this section outlined with red color in the screenshot.
For instance, if today is the first day of the month, the Elapsed Time indicator will display “1 day” and the light intensity will operate at 0.067%. By the fifteenth day, corresponding to the full moon phase, the Elapsed Time will show “15 days” and the light intensity will increase to 1%.
The light intensity increases by 0.067% daily from the first to the fifteenth day, and then decreases by 0.067% each day thereafter until it reaches 0% on the thirtieth day.
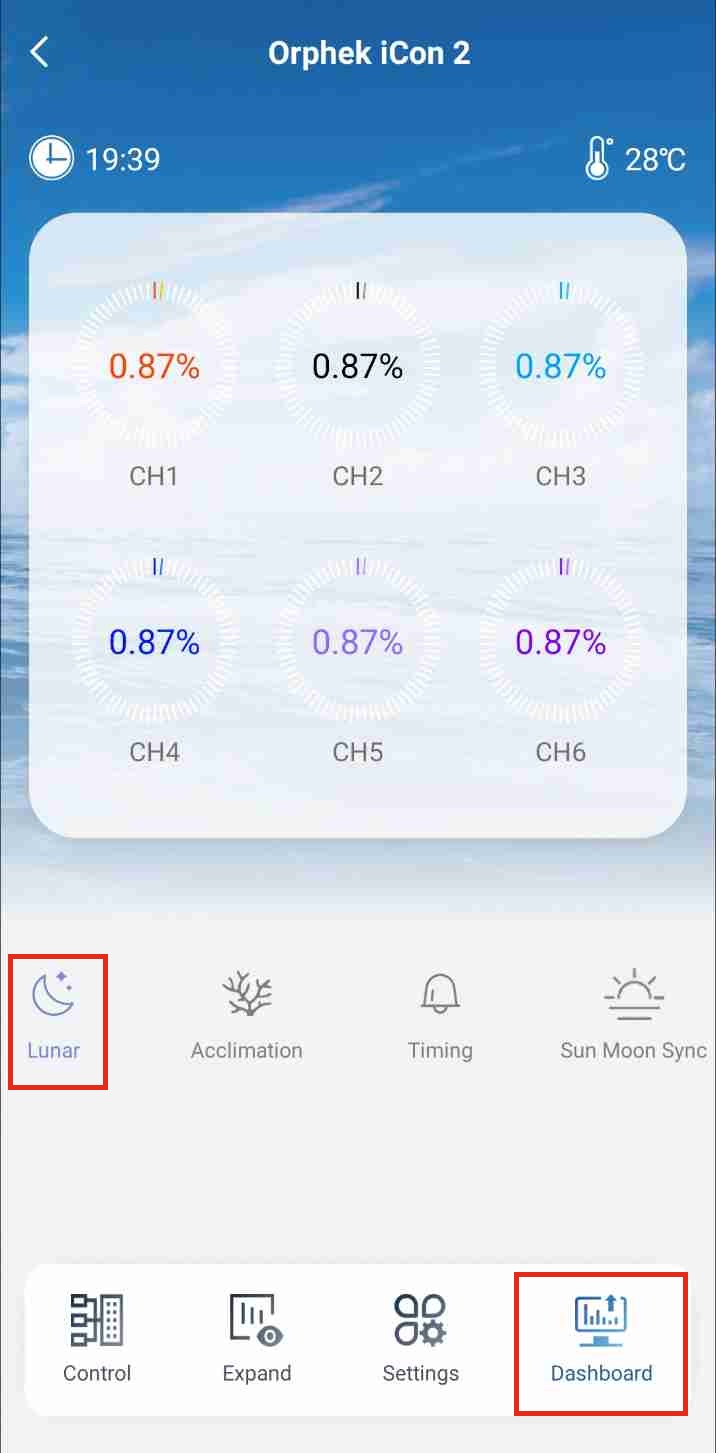
Whether the Solar & Lunar Synchronizer feature or the Program mode is active, when it is moon time, the lunar icon on the Dashboard will illuminate in blue, indicating that the moon mode is operational. You’ll find this section outlined with red color in the screenshot.
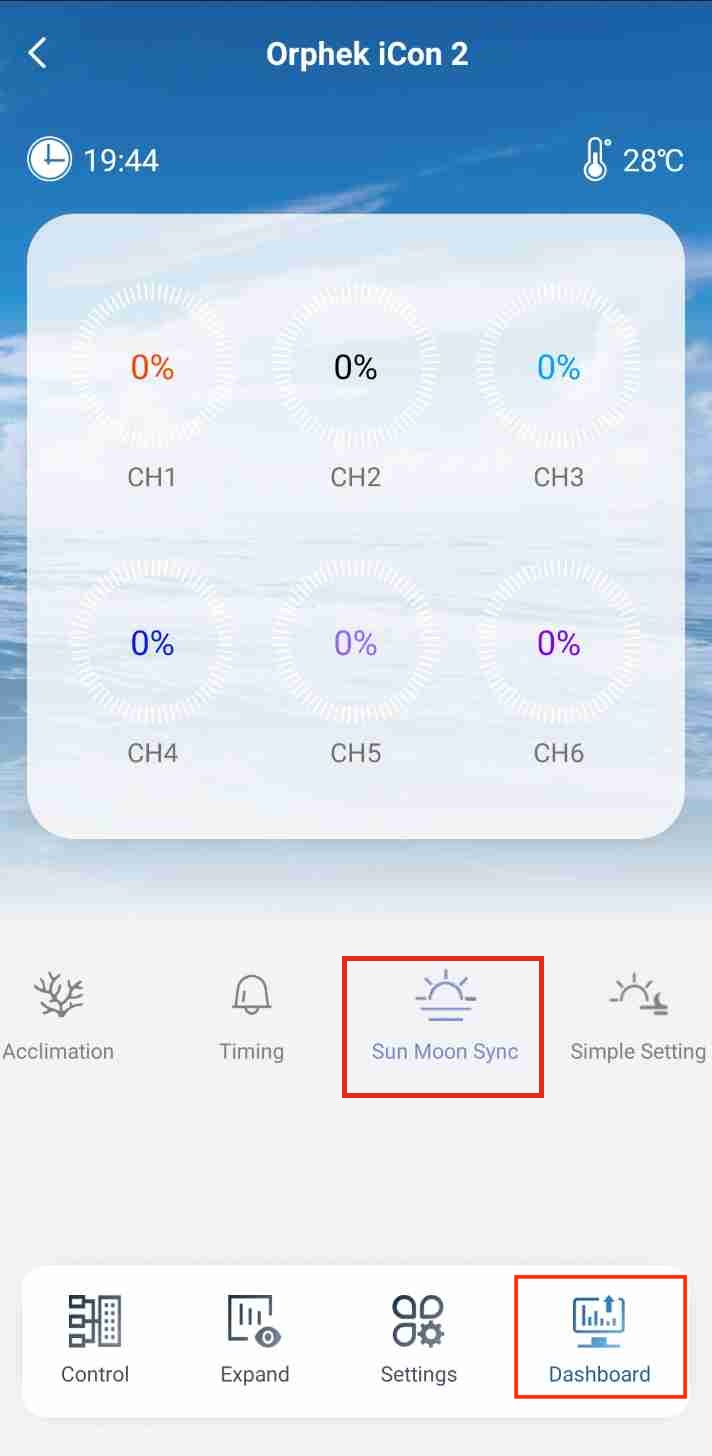
If the Sun Moon Sync is active and the sunrise and sunset times encompass the moonrise and moonset times, resulting in no lunar presence, all channels on the Dashboard will display 0%.
For more information go to ORPHEK APP MANUAL