Orphek iCon Lighting Systems: App Setup and Operation
Welcome to the Orphek iCon series!
This guide will help you set up and operate the Orphek App to control your iCon lighting systems. Orphek App is both Android & iOS compatible and free of charge!
iCon Intelligent Connectivity offers a friendly technology experience through the Orphek iCon App, with compatibility across IOS and Android via Wi-Fi/Bluetooth. Enjoy iCloud support, internet connectivity, high-speed response, and extra data security.
The app seamlessly connects with the following devices: Natura iCon, OR4 iCon LED Bars, Atlantik iCon, Atlantik Compact iCon, Amazonas 960 iCon, and OR3 LED Bars (connected via the Osix Smart Device).
Get ready to unlock the full potential of your Orphek lighting with intelligent connectivity!
Updating the Orphek App (IMPORTANT):
To ensure optimal performance and access to the latest features, it is crucial to keep your Orphek App updated.” If you already have the Orphek App installed on your device, make sure it is updated to the latest version.
Note: You can enable the Auto Upgrade feature to automatically update your light settings. However, some important updates may still require your confirmation.
Device Update: When a new update is available, the App will notify you with a pop-up message stating “NEW UPDATES.” Simply click on “UPDATE NOW.”
Once the update is complete, perform the NET PAIRING process again by pressing the reset button four times.
Clear Cache: To clear the cache, go to “Me,” then click the settings symbol (located at the top right), and select “Clear Cache.”

The App also offers the option of upgrading at a later time.
To upgrade at a later time:

In this section you will learn how to download the App for the first time. Here is the short version of the procedure:
Downloading the Orphek App:
- Before starting:
- Ensure your iCon lights are powered on for initial connection.
- For iOS (Apple Devices):
- Open App Store
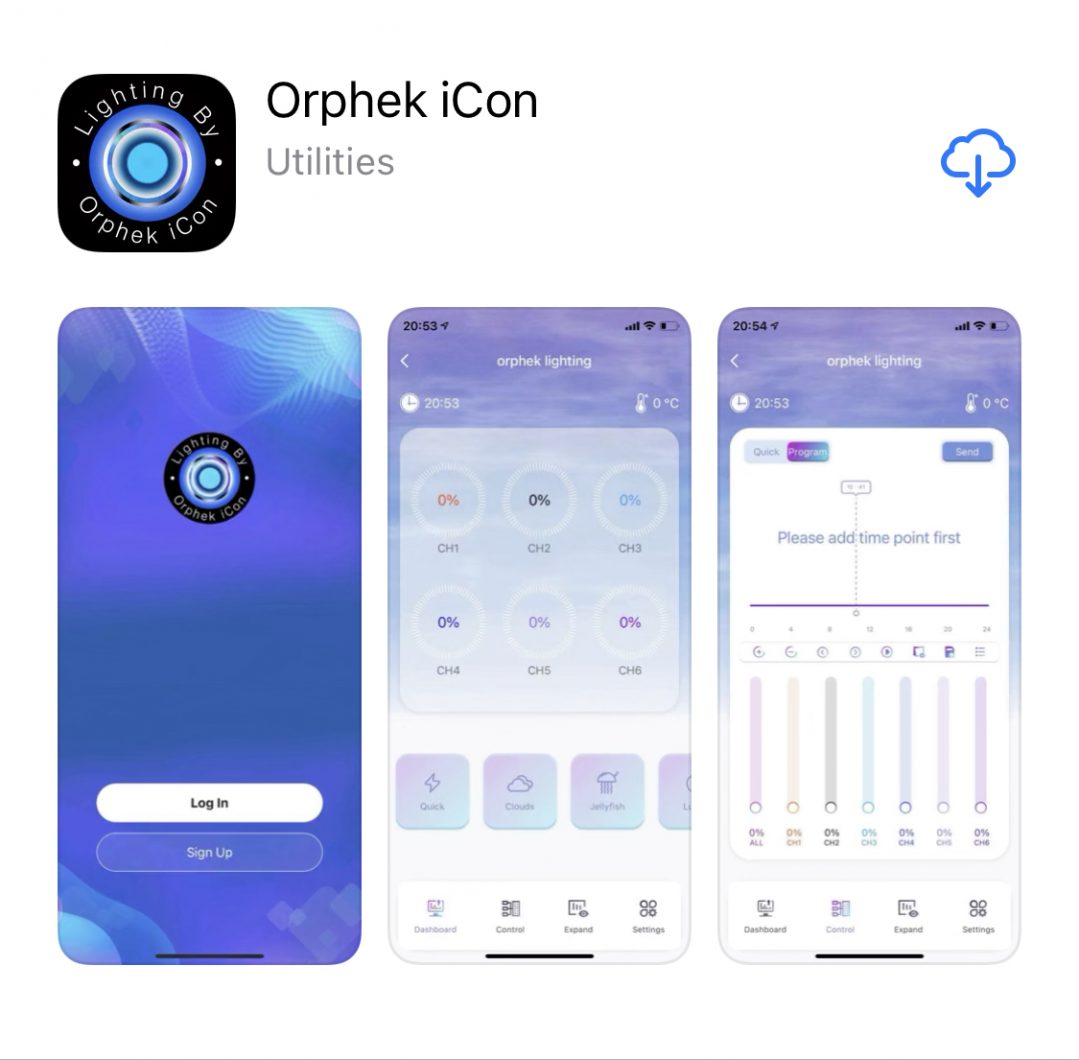
- Search for “Orphek iCon“
- Tap Get and install
- For Android:
- Open Google Play Store
- Search for “Orphek iCon”
- Tap Install
Scroll down for an illustrated step-by-step version:
Downloading the Orphek App for the First Time:
Ready to start controlling your Orphek iCon lighting system? This section will guide you through downloading and installing the Orphek App on your smartphone or tablet.
Important Note Before You Begin: Before downloading the app, ensure that your Orphek iCon light(s) are powered on. This will help with the initial connection process later.
Download Options:
With your light(s) turned on, select one of the following options to download the Orphek iCon App based on your device’s operating system:
For iOS (Apple Devices):
Open the App Store on your iPhone or iPad.
Search for “Orphek iCon.”
Locate the Orphek iCon App in the search results and tap “Get” to download and install it.
For Android Devices:
Open the Google Play Store on your Android phone or tablet.
Search for “Orphek iCon.”
Locate the Orphek iCon App in the search results and tap “Install” to download and install it.
Now that you have concluded downloading the Orphek App let’s learn how to use it.
Using the Orphek iCon App: Setting Up Your Account & Initial Connection
Now that you’ve downloaded and updated the Orphek iCon App, it’s time to get started! This section will guide you through the initial setup process, including signing up for an account and logging in for the first time.
In this section you will learn how to create an account. Here is the short version of the procedure:
Create an Account:
- Open the app.
- Tap Sign Up.
- Review and accept the User Agreement and Privacy Policy.
- Enter your email address (a verification code will be sent).
- Tap Get Verification Code.
- Check your email, copy the 6-digit code.
- Enter the code into the app.
- Complete registration.
Scroll down for an illustrated step-by-step version:
Signing Up for an Account:
To begin using the Orphek iCon App, you’ll need to create an account. Here’s how:
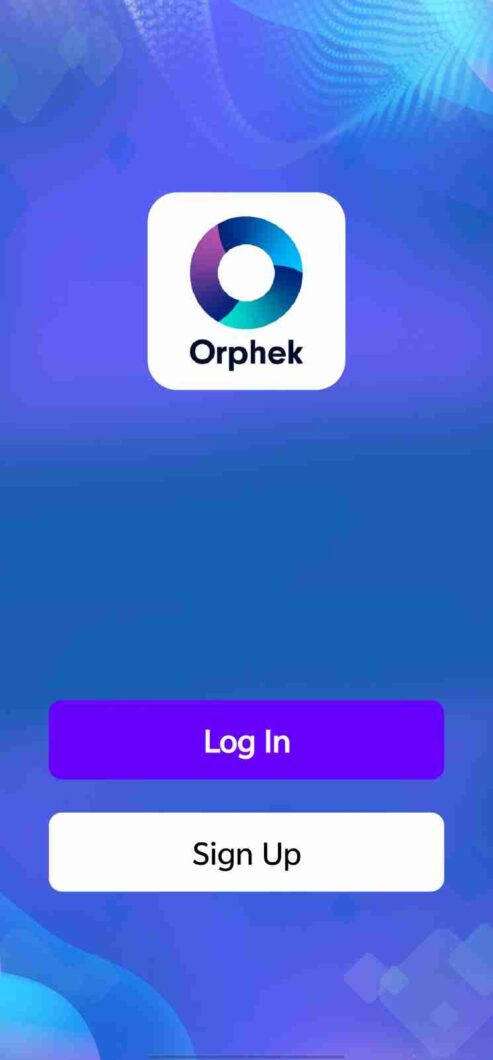
Launch the App: Open the Orphek iCon App on your device.
Sign Up or Log In: The Orphek iCon App will prompt you to either Sign Up or Log In.
1. As it is your initial interaction, opt for the Sign Up option.
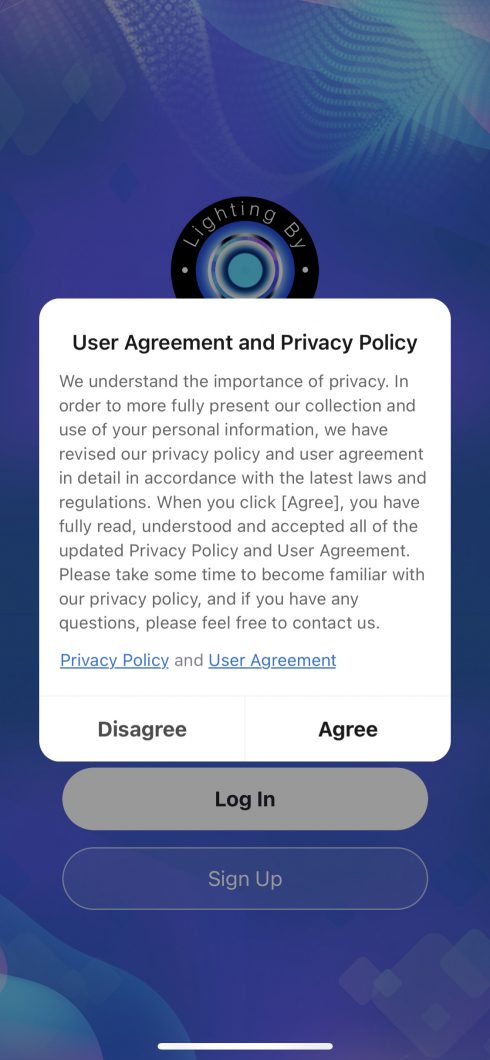
2. Select the option to (agree) with the User Agreement and Privacy Policy by clicking.
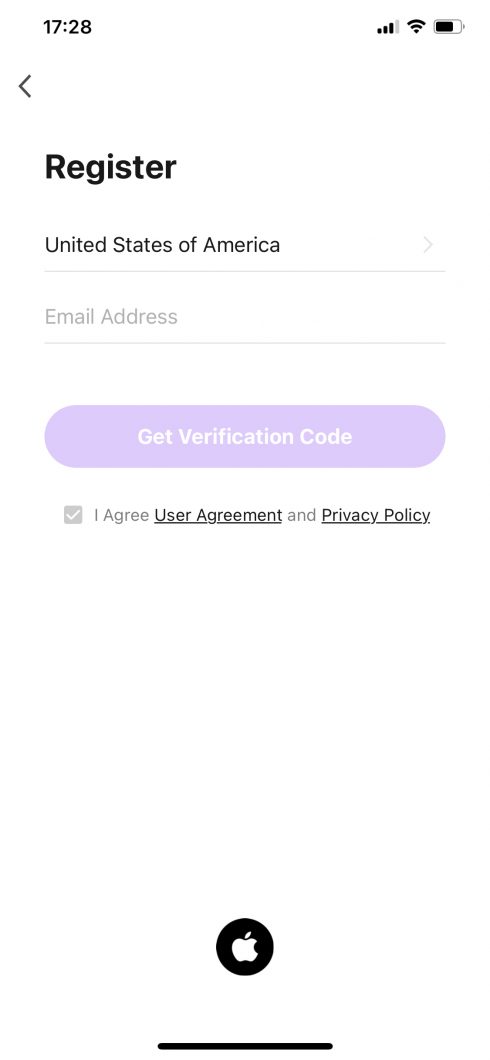
3. Conclude the registration process by selecting an email address (ensure that you have one pre-existing, as a verification code will be sent to this email address) and click on GET VERIFICATION CODE.
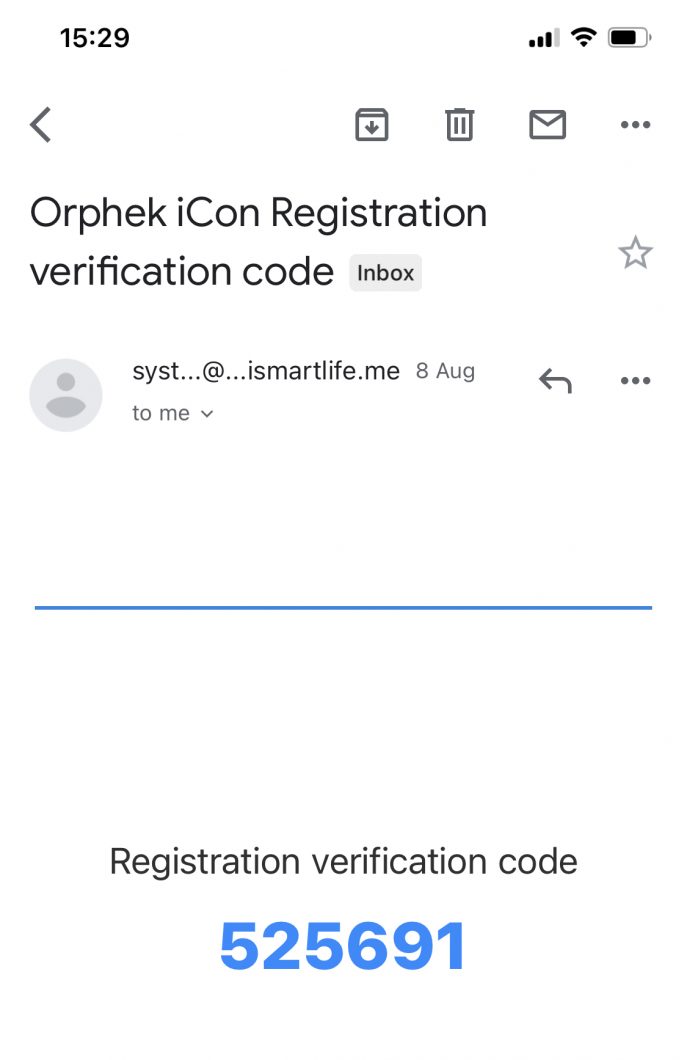
4. Now, inspect your email for the previously mentioned verification code and proceed to copy it.
In the image below you can see an example of a verification code:
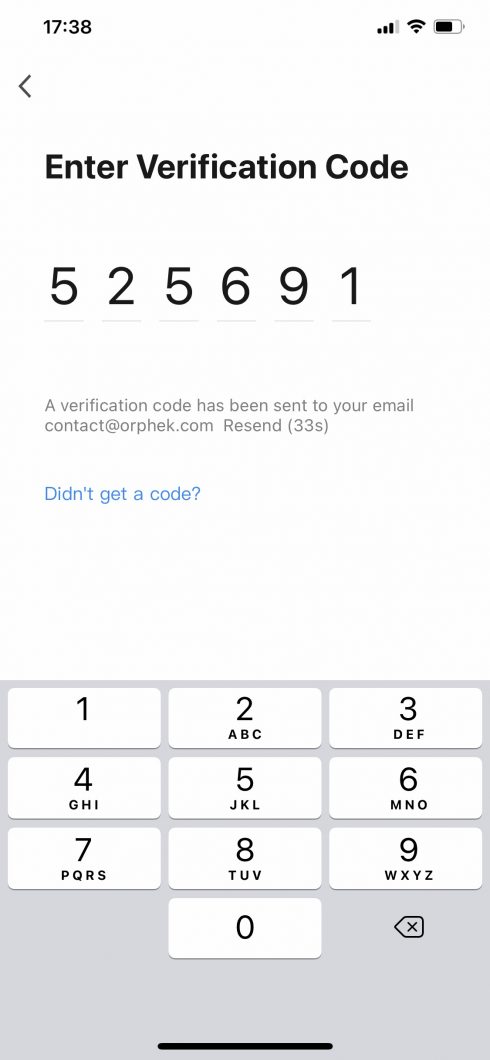
5. Enter the 6 digit Verification Code.
In this section you will learn how to connect your light. Here is a short version of the procedure:
Connection Steps:
- Grant Bluetooth permission: OK.
- Allow location access: Allow While Using App.
- Tap Add Device.
- Confirm by tapping Got It.
- Press the Reset Button on your light four times until it flashes.
- Within 1 minute, select your Wi-Fi network (SSID).
- Enter your Wi-Fi password.
- Wait for the app to find your device.
- Tap Add when your device appears.
- Confirm successful connection; “Added successfully” will display.
Scroll down for an illustrated step-by-step version:
Connecting your device(s)
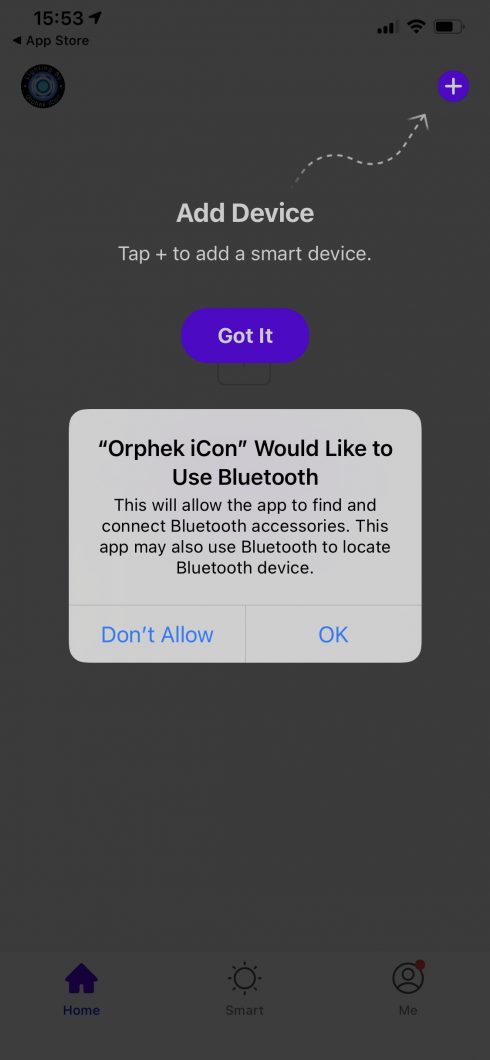
- Grant permission for the Orphek iCon App to utilize Bluetooth by clicking on (OK). The Orphek light with iCon technology operates seamlessly using both Bluetooth and WiFi.
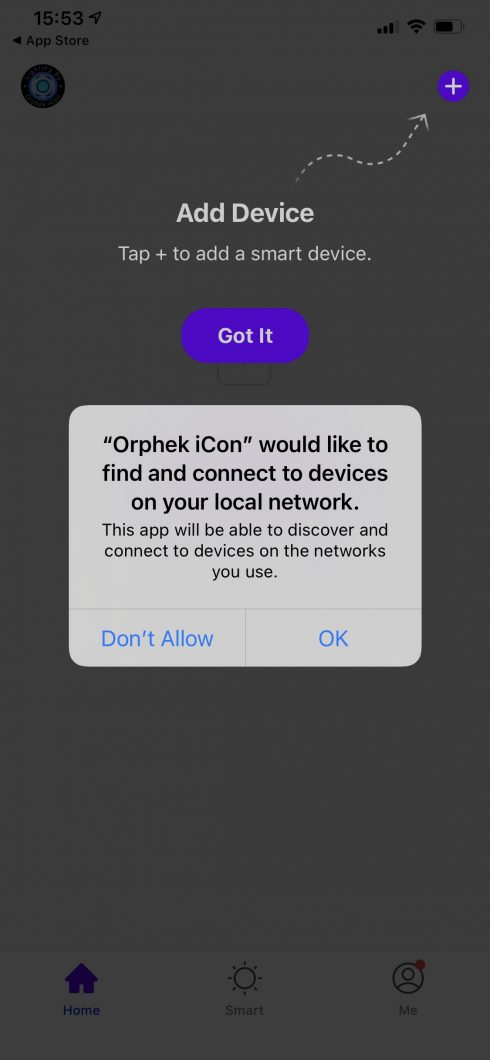
2. The Orphek iCon App will have the capability to discover and establish a connection with your device on the local network upon clicking (OK).
3. Select the provided options for accessing your location: (ALLOW) WHILE USING APP. (It is crucial to permit this access; otherwise, you will be unable to utilize the smart device’s features, including times, weather, and time zone information).
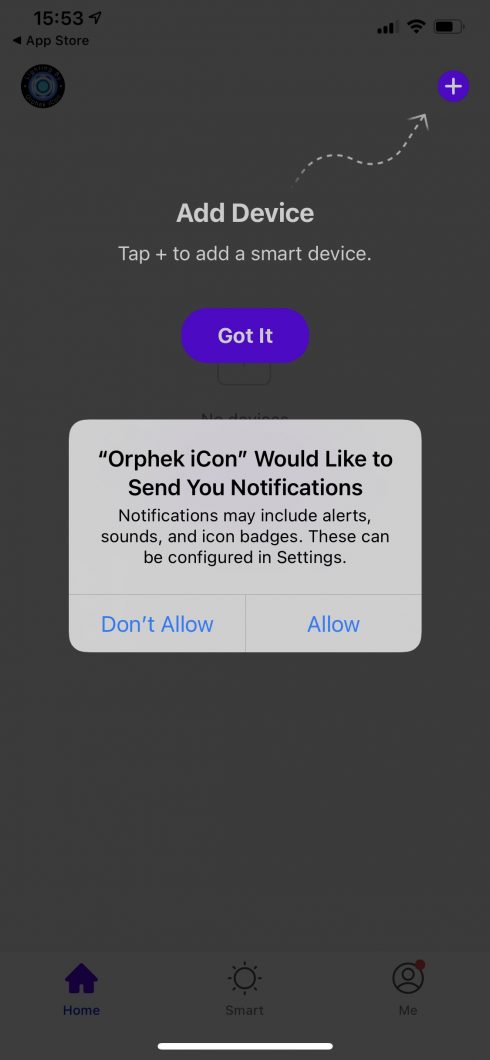
- Incorporate a device by tapping on (ADD DEVICE).
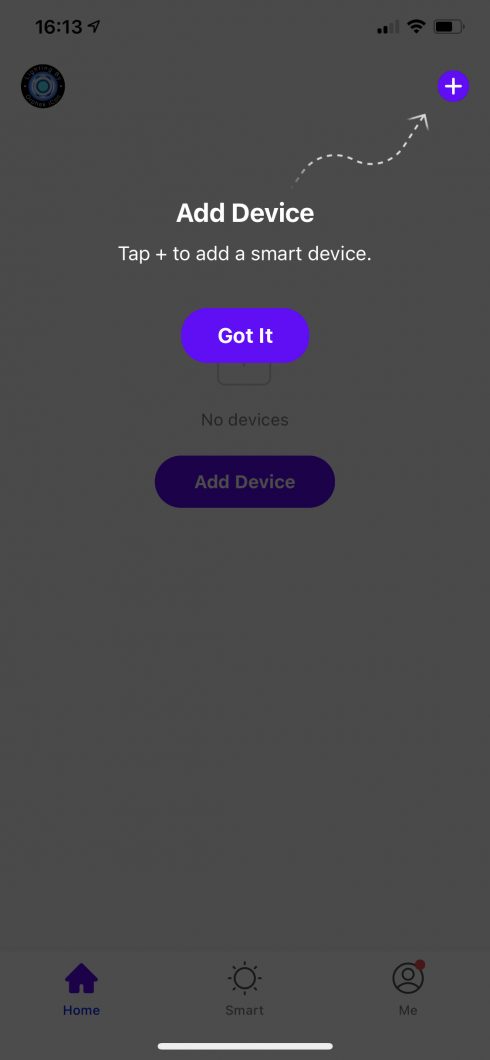
2. Click on (GOT IT) to conclude this process
After successfully establishing the connection with the light, proceed by adding it.
If you wish to change the language for the Orphek iCon App please follow the following steps or jump this section to the next one – Adding your light(s) for the first time.
In this section you will learn how to configure language settings. Here is a short version of the procedure:
Configuring Language Settings
- Automatic Language:
- The app will automatically use your device’s language if supported (14 options).
- Manual Language Selection:
- Tap Me (bottom right).
- Tap the Settings (gear icon).
- Select Language.
- Choose your preferred language.
- The app language updates instantly.
Scroll down for an illustrated step-by-step version:
Setting the Language in the Orphek iCon App
The Orphek iCon App supports 14 languages to provide a localized experience:
- Chinese
- Traditional Chinese (Hong Kong)
- English
- Spanish
- Spanish (Latin America)
- French
- Arabic
- Japanese
- German
- Italian
- Korean
- Russian
- Portuguese
- Portuguese (Brazil)
Automatic Language Setting:
The iCon app is designed to automatically match the language setting of your smartphone upon initial login. If your phone’s language is among the 14 supported languages, the Orphek iCon App will default to that language. If your phone’s language is not supported, the app will default to English.
Changing the Language Manually within the Orphek iCon App:
If you wish to use a different language than your phone’s default setting, or if the orphek iCon App has not automatically selected the correct language, you can change it manually within the iCon App by following these steps:
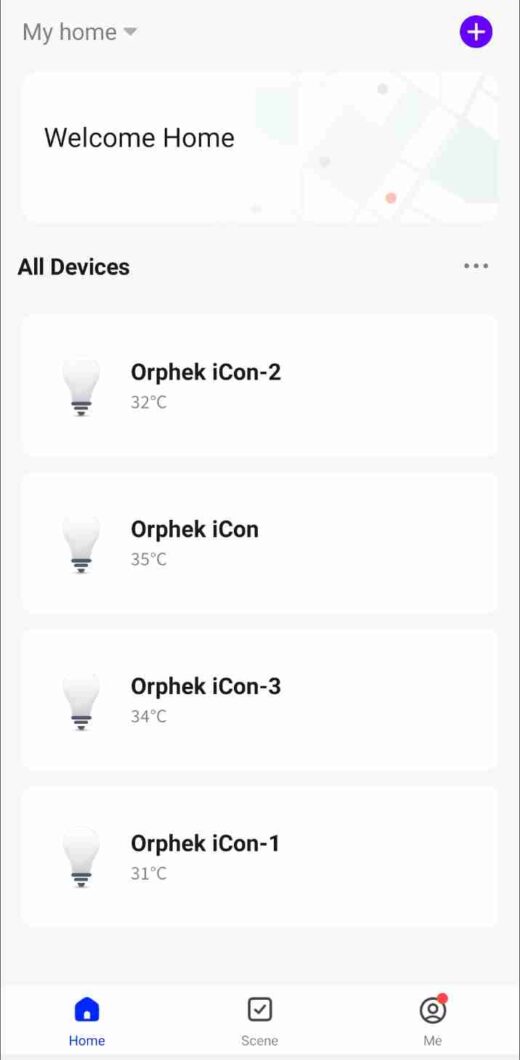
Step 1 – Navigate to the “Me” Section: Tap the “Me” icon, typically located in the bottom navigation bar of the app. Third icon on the bottom right corner of the screen as shown in the image below:
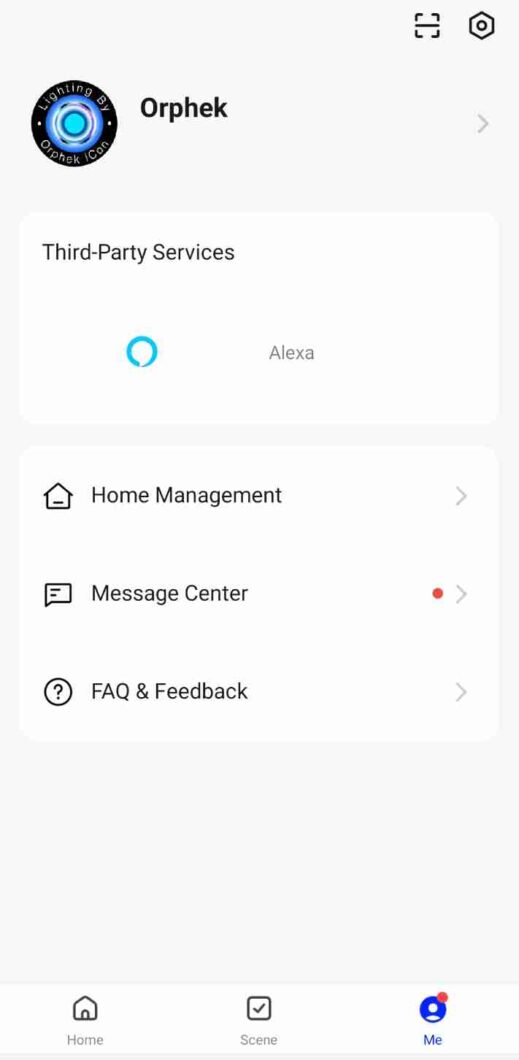
Step 2 – Access Settings: In the “Me” section, tap the settings button. This button is usually represented by a gear icon and is located in the top right corner of the screen.
Step 3 – Select “Language”: In the settings menu, locate and select the “Language” option.
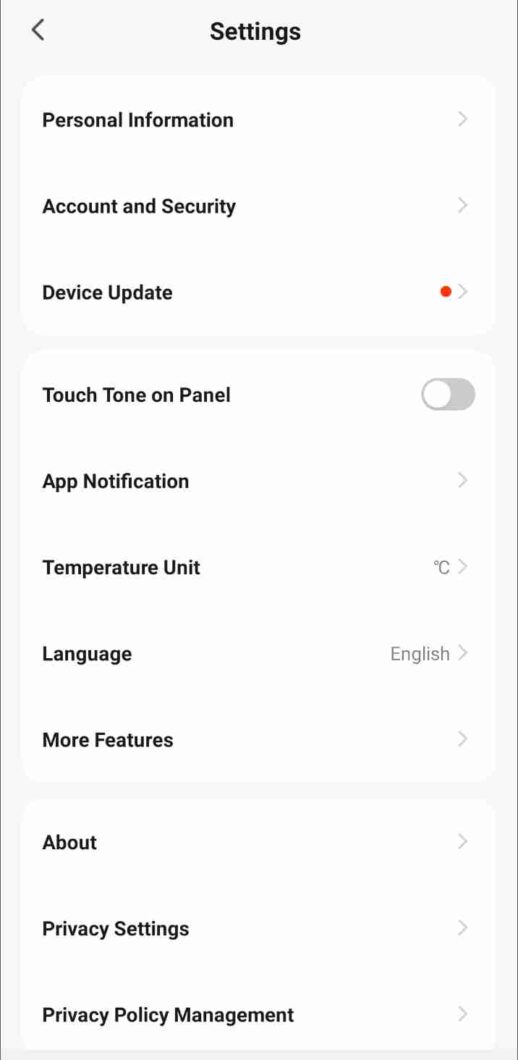
Step 4 – Choose Your Preferred Language: A list of available languages will be displayed. Tap on your preferred language to select it. The orphek iCon App will automatically update to reflect your chosen language.
Important Note:
The Orphek iCon App can only support the languages listed above. If your phone’s language is not within these options, the app will default to English. Changing the language within the iCon App will not affect the language settings of your smartphone.
Adding your light(s) for the first time
1. Press the Reset Button on the device (light) four times for Net Pairing. The light should indicate a flashing status.
IMPORTANT: You have a one-minute window to perform the following steps:
- Enter your Wi-Fi network name (SSID) and password for your Wi-Fi network. If you do not complete all the required information within this one-minute timeframe, you will need to press the reset button four times again.
- To incorporate the device, tap on the add button (+) located at the upper right corner of the screen within the app.

3. Tap on (ADD DEVICE) to initiate the search for the light(s).

4. The App will initiate a search for available devices. Once the device(s) are discovered, tap the (ADD) button to confirm the addition of the device(s).

4. Select your Wi-Fi network name from the displayed list, enter the password for your Wi-Fi network, and click (NEXT) to continue.

5. The Orphek iCon App will initiate the connection process.

6. Similarly, upon successful connection, a message stating “ADDED successfully” will display on the screen.

7. Click on the Device Light to access and program the light. The image below shows the Orphek light under “All Devices.”

In this section you will learn how to Find your Device ID (Vitual ID). Here is a short version of the procedure:
Finding Your Device ID (Virtual ID)
Useful for troubleshooting or support:
- Tap your device in All Devices.
- Tap Settings.
- Select System Settings.
- Tap Device Information.
- Your Device ID appears here.
Scroll down for an illustrated step-by-step version:
Locating Your Device ID (Virtual ID)
Why You Need Your Device ID:
Your Device ID, also known as the Virtual ID, is a unique identifier for your Orphek iCon light. You may need this ID for troubleshooting, support requests, or advanced configuration.
Steps to Find Your Device ID:
- 1. Select Your Light: Open the Orphek iCon App and tap on the specific light for which you need the Device ID.
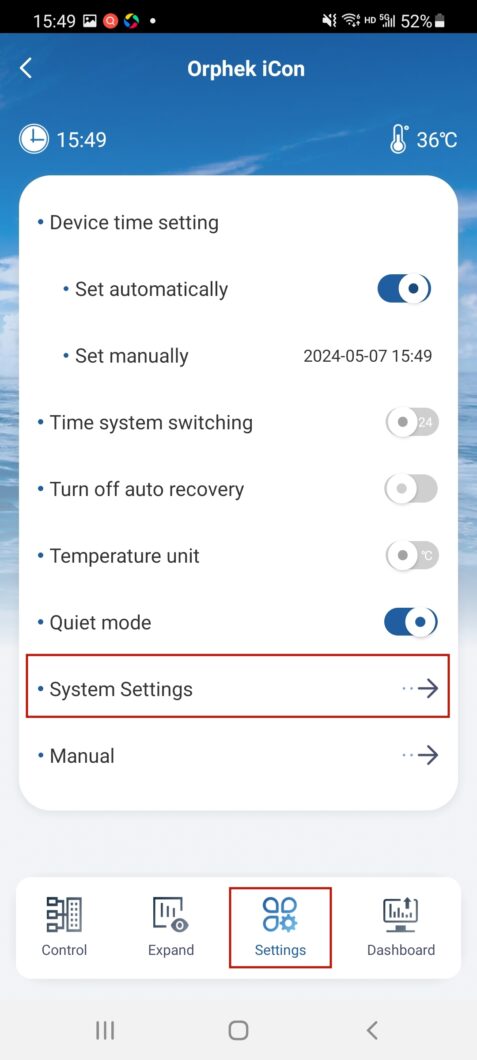
2. Access System Settings: Tap the “Setting” icon located at the bottom of the screen. On the Setting screen, select “System Settings, as shown in the image below:
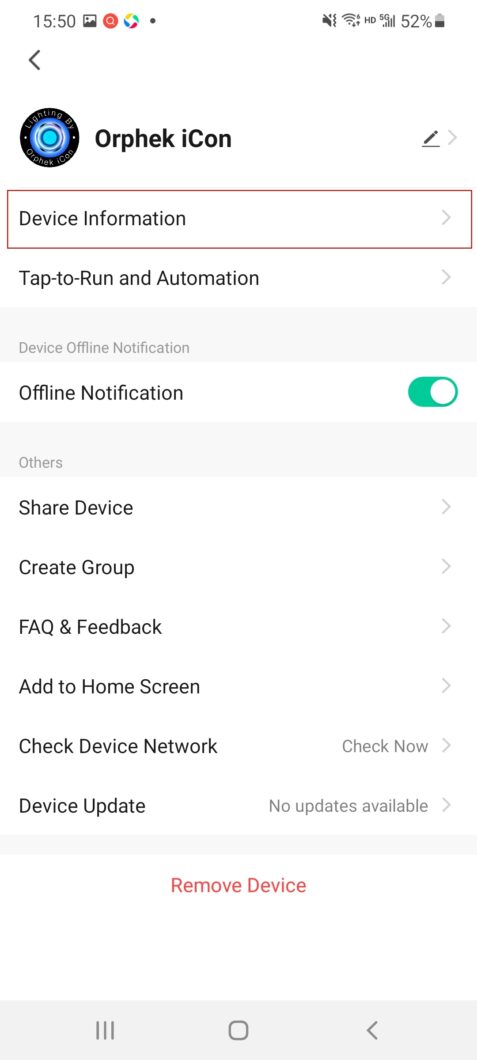
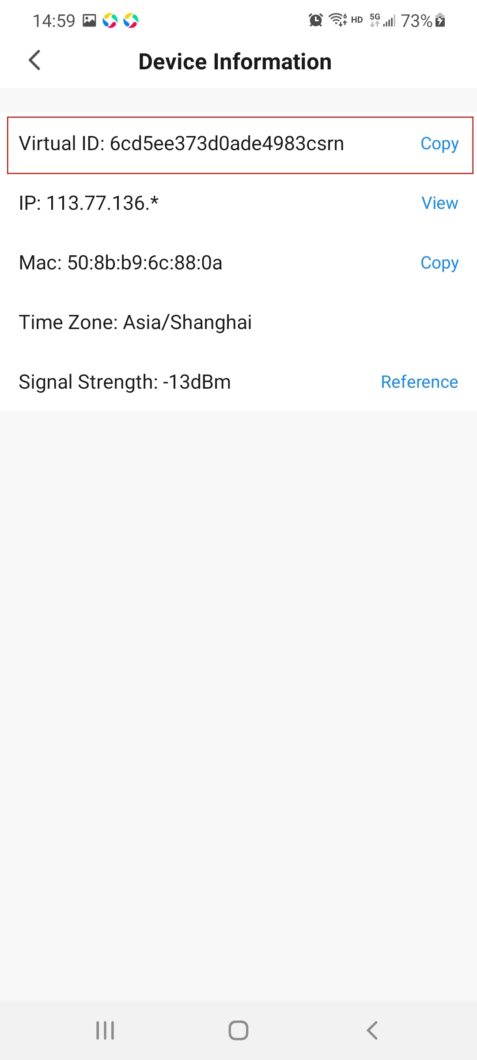
3. View Device Information: At the top of the System Settings screen, tap “Device Information.” Check the image below showing the “Device Information” option highlighted:
4. Locate Your Device ID: The Device ID (Virtual ID) will be displayed on the Device Information screen. Check the image below showing the Device ID displayed.
In the next sections you will learn how to control and monitor your light (s) with your Orphek App. We are offering you here a resume of all procedures, followed by an illustrated step-by-step version.
Here is a short version of the procedure:
Controlling & Monitoring:
- Dashboard: View current mode, channel percentages (0-100%), temperature, and time.
- Control:
- Sun & Moon Sync: Synchronizes lighting with real sunrise/sunset and moon phases.
- Simple Setting: Basic control for quick adjustments.
- Program: Create custom schedules.
- Quick: Temporary, real-time control over channel
Quick Function:
Adjust each of the 6 channels (0-100%).
Create and save presets, then access via presets menu.
Almost instant preview with “Quick.”
Advanced Features & Modes
Sun & Moon Synchronizer
- Aligns your lighting with local sunrise, sunset, moonrise, moonset times.
- Select location: Tap the map, pick your spot, confirm.
- Enable/Disable: Move Enable switch off/on, tap Send.
- Custom mode: Switch to Manual to adjust times.
- Moon Cycle: Activate for lunar phases, it auto-sets moonrise/set; no manual setting needed.
- Important: Always Send after adjustments to apply.
Moon Cycle (Lunar Mode)
- Operates during moonrise/moonset.
- Simulates lunar phases monthly.
- Light intensity increases/decreases daily by 0.067%.
- When active, illuminated in blue.
Simple Setting (Quick Customization)
- Set up to 8 time points with custom names.
- Adjust channel intensities for each point.
- Assign icons.
- Supports weekly scheduling by day.
Program Builder
- Create sunrise/sunset cycles using CLEAN for a blank schedule.
- Use sliders to set timing points.
- Program includes 3 key points, but can add more.
- Save programs with custom names.
- Preview schedule with the Play button.
- Edit or delete saved programs.
Effects: Clouds, Jellyfish, Lunar, Acclimation
- Clouds Mode: Mimics passing clouds, dims and brightens gradually.
- Jellyfish Mode: Tailored spectrum for jellyfish tanks.
- Lunar Mode: Simulates moon phases, ideal for coral spawning.
- Acclimation Mode: Gradual adjustment over 10 days; reduces stress when switching lights
Scroll down for a complete illustrated step-by-step version:
Orphek iCon App
Orphek is committed to making reef keeping easier and more successful. That’s why we’ve developed an intuitive app designed for reefers of all levels, from those just starting out to seasoned experts.
With the Orphek App, you can effortlessly program, control, and monitor your Orphek lights directly from your smartphone or tablet. Whether you’re at home on your local network or checking in from a distance, you’ll always have complete control over your aquarium’s lighting environment.
Ready to unlock the full potential of your Orphek lights?
This guide will walk you through the app’s features step-by-step. But first, let’s familiarize ourselves with the app’s main functions.
Upon launching the app, you will be greeted by the main screen, which displays four key functions:
Dashboard/ Control/ Expand/ Settings

Dashboard
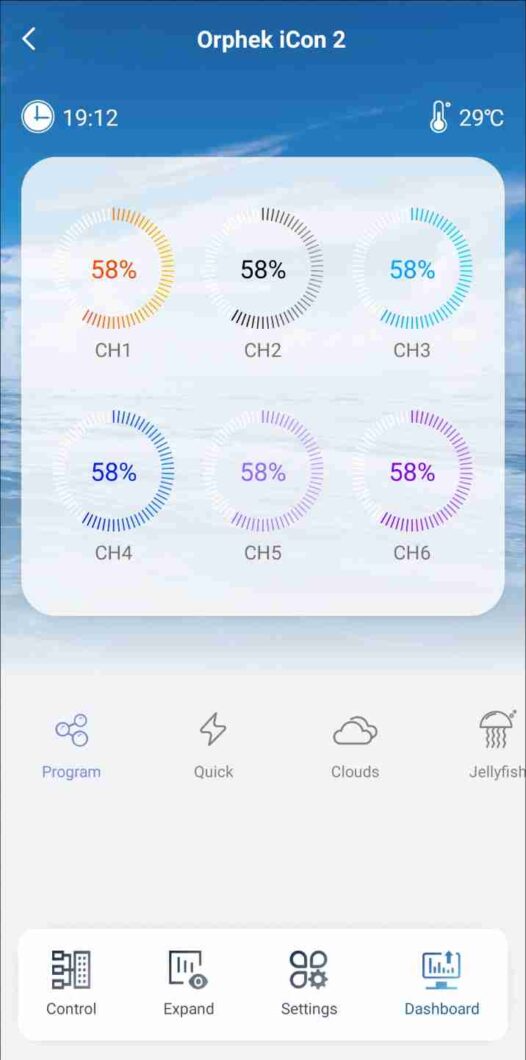
The dashboard feature facilitates the following functionalities:
- Monitor the current operating mode of your light(s) by observing the illuminated mode icon.
- Check the percentage of operation for each of the six (06) channels, ranging from Daytime 0-100% to Lunar 0-0.1%.
- Access information regarding temperature and time.
Control
The control feature enables the utilization of the the following 4 functionalities:
Sun & Moon Sync: Enables synchronization with solar and lunar cycles via a dedicated interface – Go to the page Sun & Moon Sync
Simple Setting: Provides a simplified configuration interface for common lighting parameters – Go to the page Simple Setting
Program: Enables user-defined lighting programs with customizable parameters.
Quick: Allows for real-time manipulation of individual channel intensities.
Quick Function Details
The Quick function allows for direct control over the color spectrum by manipulating the intensity of six independent channels.
Channel Control: Each channel’s intensity can be adjusted from 0% to 100%.
Customization: Users can create custom color combinations by adjusting individual channel intensities.
Simultaneous Adjustment: All channels can be adjusted simultaneously using the master control.

OBs.: The Quick function will operate for 2 hours, after which, the light will revert to the Program setting. This serves as a safety measure in the event, for example, that the light is unintentionally left on, potentially causing harm to your corals if running throughout the night. If you wish to deactivate this function for any reason, you can do so in the Settings by enabling Auto-recovery. By default, it is set to On. Simply move the button to the right.
Additionally, with the Quick set, you can:
1. Test the response of your corals to a specific spectrum/intensity of color.
2. Alter the color of your corals/tank for photography purposes.
3. Experiment with mixing color spectrums and intensities to identify the most suitable combinations.
4. Display different colors/intensities that are better suited for tank maintenance.
Saving your preferred combination of channels.
After identifying the perfect combination of channels, you can save it by clicking on the icon located in the upper-right corner:

A pop-up window will appear, prompting you to save the current preset.
- Assign a name to it and click on (SAVE), allowing you to reuse the saved combination in the future in the event you decide to switch to another configuration. As an example here, the saved configuration was named “Quick-1”.

2. Click on the second icon on the right corner up:

Upon clicking, you will be directed to a list of your saved combinations. You have the flexibility to assign any name you prefer.

VERY IMPORTANT – Updating the Orphek App:
If you already have the Orphek App installed on your device, make sure it is updated to the latest version.
Note: You can enable the Auto Upgrade feature to automatically update your light settings. However, some important updates may still require your confirmation.
Device Update: When a new update is available, the App will notify you with a pop-up message stating “NEW UPDATES.” Simply click on “UPDATE NOW.”
Once the update is complete, perform the NET PAIRING process again by pressing the reset button four times.
Clear Cache: To clear the cache, go to “Me,” then click the settings symbol (located at the top right), and select “Clear Cache.”
Sun & Moon Synchronizer
Sun & Moon Synchronizer is the latest and most advanced technology introduced by Orphek (and it will feature only in the updated version of Orphek App).
Upon initial entry into the application, users are introduced to the Sun & Moon Synchronizer feature (button on the left side up – Sun Moon Sync), which operates on default settings.
When navigating from the Dashboard, users will notice the Sun Moon Sync button illuminated in blue, indicating its activation.
The Sun Moon Sync feature is designed to align with your local sunrise and sunset times, as well as moonrise and moonset times. These times are obtained automatically, ensuring accuracy and convenience.
Additionally, the light intensity adjusts dynamically based on HELIUS data, enhancing user experience and environmental responsiveness. The included graph provides a visual representation of how light intensity varies throughout the day.
Two cyan markers on the time axis indicate the start and end of the moon cycle, providing clear reference points for users.

Location Selection and Configuration:
To specify your desired location, click to access the map interface, where you can pinpoint the desired place. After selecting the location, click the (SELECT) button to confirm your choice. If sunrise and sunset times cannot be retrieved for the chosen region, a notification will prompt you to select an alternative location, ensuring accurate data retrieval.


Managing Sun & Moon Sync Settings:
To deactivate the Sun & Moon Synchronizer feature, move the (ENABLE) button to the off position and click the (SEND) button to apply the changes.
To adjust the time settings, switch the mode from (AUTO) to (CUSTOM) by moving the respective button. Select the desired time point by clicking the side-facing arrow icon, then confirm your selection with the downward-facing arrow icon.
Once all adjustments are made, click the (SEND) button to implement the updated settings.

In Group mode (if you have multiple lights and create a group), the Sun & Moon Synchronizer feature operates differently. It only functions in custom mode, with the default time set to 0. You need to set the sunrise, sunset, moonrise, and moonset times in advance. The graph will update accordingly.


Important Note: Any changes or operations performed on the Sun & Moon Synchronizer feature require clicking the (SEND) button for them to take effect. Failure to do so will result in the light not executing the new changes or operations, and the modifications will not be saved.
Moon Cycle Activation and Functionality (LUNAR SCREEN):
By moving the (MOON CYCLE) button to the on position, the moon mode will operate during moonrise and moonset times. During this period, the Lunar function within the Expand section will activate automatically, with the start and end times determined by the moonrise and moonset times, respectively.
Note: In this case, you are not allowed to set the start and end times manually.

If you have previously set the start and end times in Lunar, you will observe that these times are automatically adjusted when you access the Lunar feature.
However, when you deactivate the Sun Moon Sync feature and initiate the Program to run, the Lunar start and end times will revert to the previously set times. This occurs because the Lunar function operates under the Program setting, leading to the reversion of time settings.

In Moon Cycle mode, the light intensity adjusts according to the calendar date, simulating the phases of the moon. The Elapsed Time indicator displays the current calendar date.

For instance, if today is the first day of the month, the Elapsed Time indicator will display “1 day” and the light intensity will operate at 0.067%. By the fifteenth day, corresponding to the full moon phase, the Elapsed Time will show “15 days” and the light intensity will increase to 1%.
The light intensity increases by 0.067% daily from the first to the fifteenth day, and then decreases by 0.067% each day thereafter until it reaches 0% on the thirtieth day.
Whether the Sun & Moon Synchronizer feature or the Program mode is active, when it is moon time, the lunar icon on the Dashboard will illuminate in blue, indicating that the moon mode is operational.

If the Sun Moon Sync is active and the sunrise and sunset times encompass the moonrise and moonset times, resulting in no lunar presence, all channels on the Dashboard will display 0%.
Simplified Configuration Mode (SIMPLE SETTING):
Upon accessing the Expand section, users encounter the Simplified Configuration mode.
Within the Simplified Configuration mode, users can establish their customized program to execute either throughout the week or on specific days, spanning from Sunday to Saturday.
In this mode, users can designate up to eight time points, assign custom names to each, and adjust the intensity of individual channels to their preferences.

Preset Time Points and Navigation:
Four predefined time points—Sunrise, Noon, Afternoon, and Sunset—are preconfigured within the interface (refer to the image below).
Users can scroll upwards on the screen to access and view these preset settings.

To incorporate additional time points, users can click the (ADD NEW) button to access the setting page (refer to the image below).
Within this setting screen, users can select the desired time and adjust the intensity for each individual channel or for all channels collectively.
Furthermore, users have the option to select an icon to represent the time point at the bottom of the screen. Upon completing adjustments, users can save the settings by clicking the (SAVE) button. If users wish to revert to default settings, they can click the (RESET) button.

Editing Preset and Added Time Points
Users have the capability to edit any of the four preset time points as well as the newly added time points by clicking on the respective area of each setting.

Upon entering the setting screen (as shown in the image below), users can select the desired time and adjust the intensity for each individual channel or for all channels collectively.
Additionally, users have the option to select an icon to represent the time point at the bottom of the screen. Once all adjustments are made, users can save the settings by clicking the (SAVE) button.

Furthermore, users can find the (DELETE) button located at the bottom of the screen, allowing them to remove the time point along with all associated settings.

Visual Interface Overview in Simple Setting
Upon entering Simple Setting, your attention is drawn to the prominent circular cursor display. All configured time points are visually represented on this circular ring.
To edit time adjustments, users can swiftly edit time points by relocating the corresponding icon.
As the icon is moved, the associated time point displayed below dynamically updates.
Notably, each time point is accompanied by a minus button (–). When clicked, this button turns to a plus (+). Activating hides the time point and removes its icon from the circular ring, effectively pausing its operation.
Conversely, by clicking the plus button (+) again, it will be restored to minus button (–), returning the time point to its active state and displaying its icon on the circular ring once again.

Weekly Activation Options in Simple Setting:
Located beneath the circular ring, users can access the weekly activation feature.
By clicking on any day within the week, users can initiate the Simple Setting for that specific day.

Program
The Program function empowers you to customize the programming of your lights, enabling you to select the intensity of light in each channel at a specific time. Alternatively, you can opt for the preexisting program – HELIUS.

HELIUS is a program designed to replicate nature by simulating sunrise and sunset. It comes integrated with the Orphek App and cannot be removed from your list.
This program, recommended by us, was developed based on scientific research outlining the benefits of sunlight for coral growth, especially SPS and LPS corals.
Upon entering the Program section, you will encounter the HELIUS graph, illustrating a cycle of 12 hours (from 9 a.m. to 21 p.m.) where intensity gradually increases to the highest point before transitioning to sunset.
Find here an example on how to create your own Helius Program
Creating your own program
Orphek provides you with an app. that is exceptionally user-friendly. To create a sunrise and sunset scenario, you only need to set up 3 timing points.
Let’s go through the process together:
You will also encounter a bar with 5 buttons and 3 icons.

Buttons:
The + and – buttons are employed to insert or delete time points.

The < and > buttons are utilized to make adjustments to the time. (We will provide detailed explanations on why and how to use them.)

By clicking on the Play button demonstrates how your created program will unfold, showcasing 24 hours of your program in a 2-minute preview.
This allows you to verify if it aligns with your intended settings and visualizes how it will appear.

Icons:
First icon from the right – Displays a list of saved programs.

Second icon – used to save the program.

Third icon – Initiates a cleaning procedure, allowing you to start with a blank program and create your own.

Atlantik iCon Creating your own program
Creating your own program step by step
1. Click the (CLEAN) icon. This initiates a cleaning procedure, allowing you to start with a blank program and create your own.

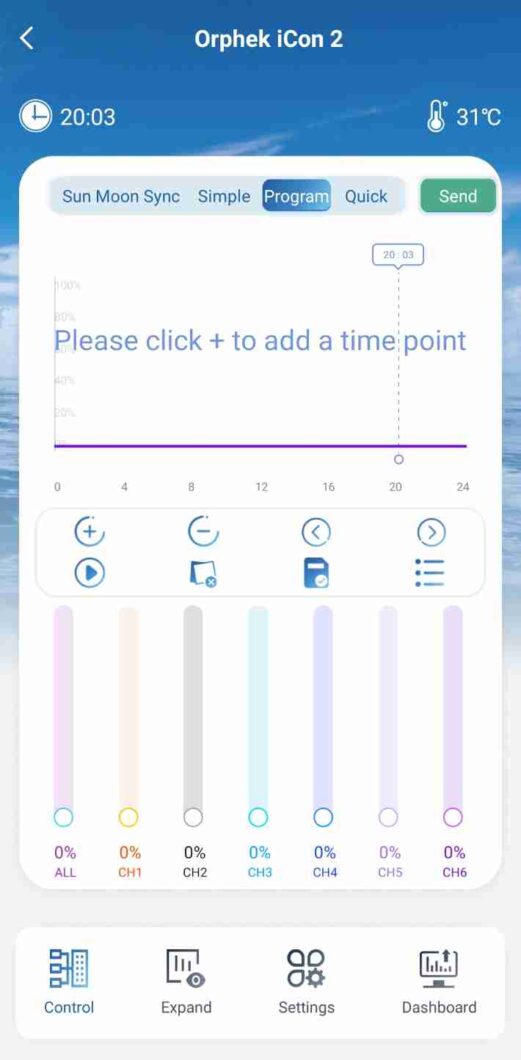
Now that you have a blank graph, commence from time point 1 (point 1 is the first hour of the day when your light will start running). We recommend starting the intensity at 0%, allowing for a gradual increase from zero.
Note: The app. incorporates smart dimming technology, eliminating the need to program the gradual increase and decrease of intensity. The smart intensity dimming technology will manage this automatically. Consequently, you won’t need to create numerous points.
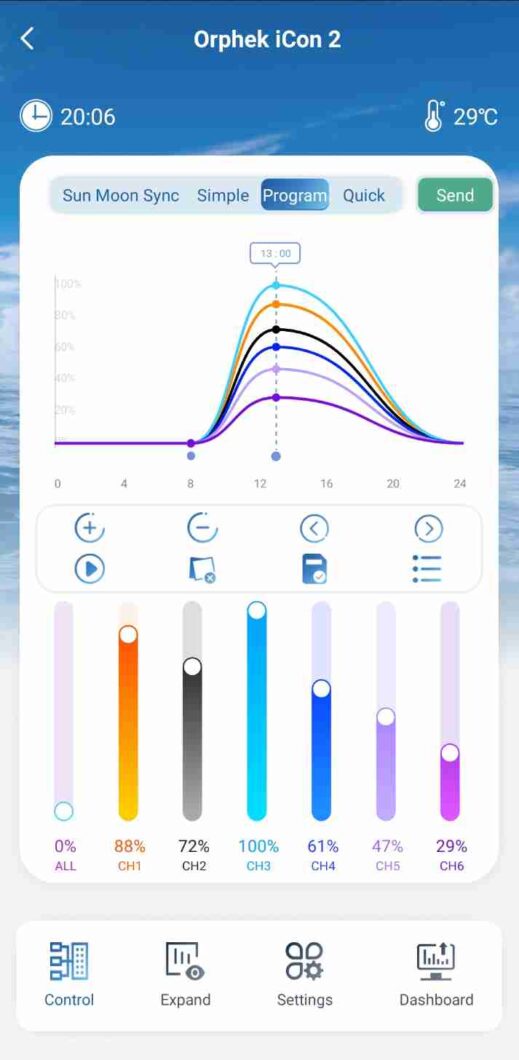
On the graph, you will encounter a time bar and a light intensity scale. The time bar spans from 0:00 to 24:00, while the intensity scale ranges from 0 to 100%.
Adding Time Point 1
1. Position the Time Line by shifting it left or right along the time bar, and leave it at the selected time.
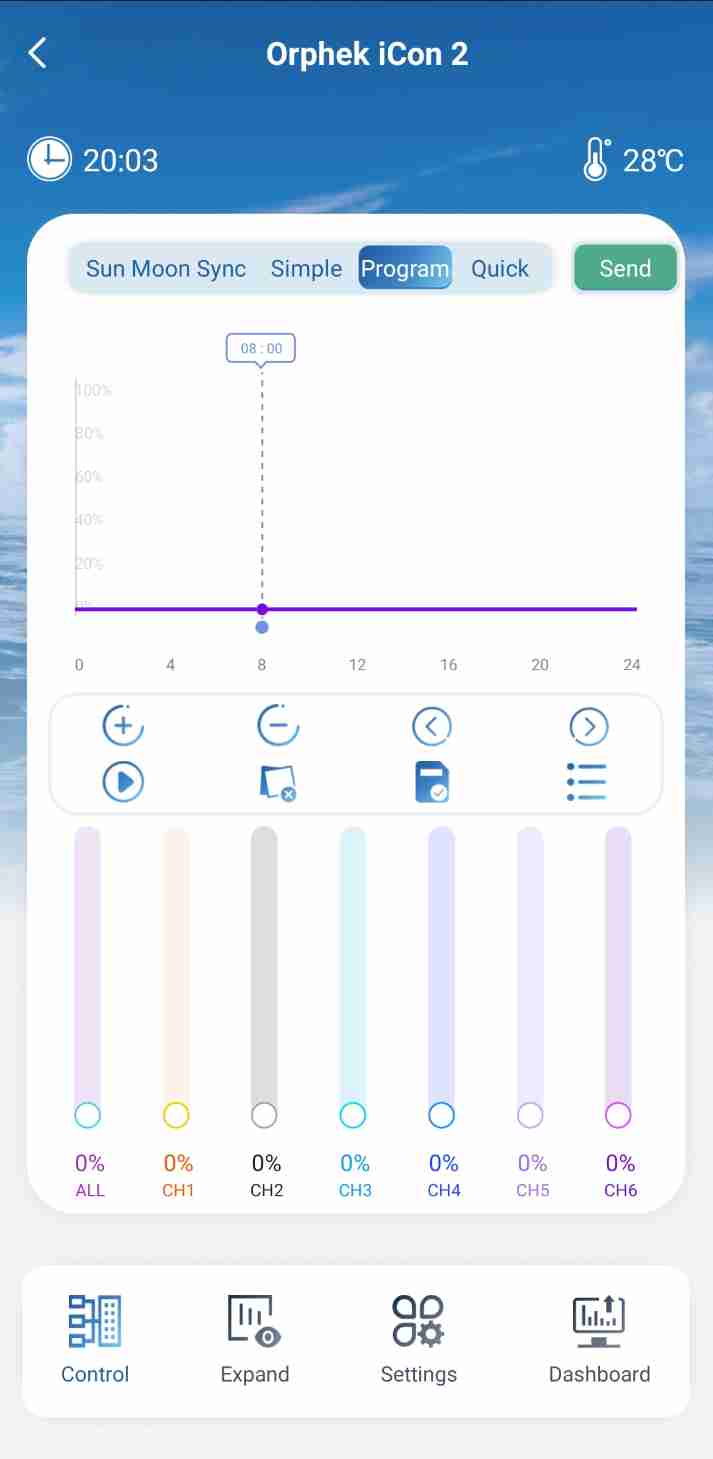
2. Click (+) button to insert the first point at the selected time.
If you opt to modify any chosen time, click on the (–) button. For time adjustments, employ the (<) and (>) buttons. For instance, to change from 12:05 to 12:10, use these buttons. Small differences are more easily adjusted using these buttons.
Adding Time Point 2 and Set the Channels’ light intensity
1. Place the Time Line by shifting it left or right along the time bar, and leave it at the selected time..
2. Click (+) button to insert point 2 at the selected time.

Setting Program Channels light intensity
Now, choose the light intensity for each channel. Recall that point 1 started at 0%. You can select the intensity of each channel by moving the button up or down. If you desire the same intensity for all channels at this specific point, choose the intensity using the (ALL) button.
Adding final Time point
This will be the last point created and the concluding time at the end of sunset, which will also be set to 0%..
1. Place the Time Line by moving it left or right on the time bar, leaving it at the chosen time.
2. Click the (+) button to insert point 3 at the selected time and set all channels to 0%.

Saving the program you created
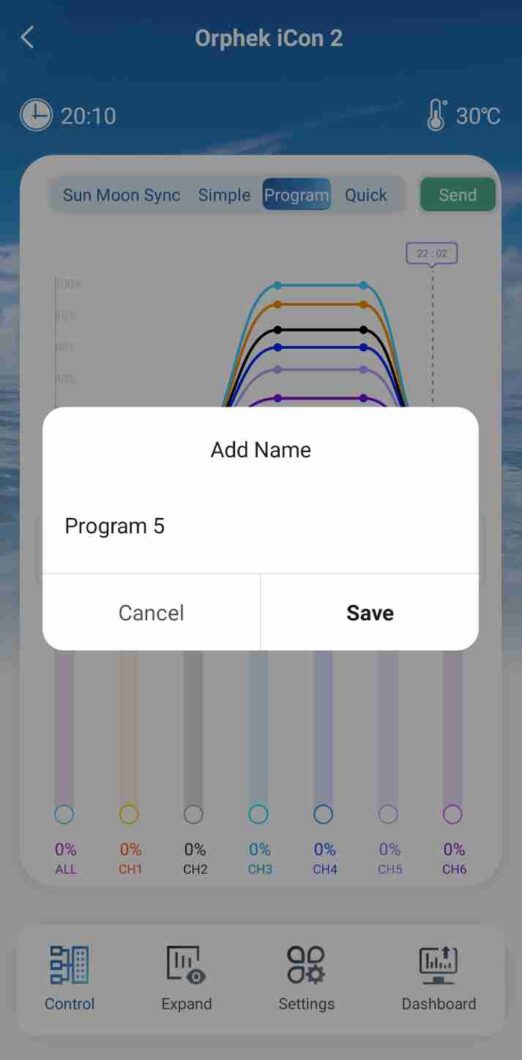
You can save the program you created by clicking on the (SAVE) icon in the upper-right corner.

A pop-up window will appear, prompting you to save the current preset. Provide it with a name and click on (SAVE). As an example we named it “Program 5”.
It’s important to note that while you can create multiple time points, as explained above, just 3 time points are typically sufficient to achieve the desired settings.
Click the (SEND) button located in the upper-right corner to activate and run the program.

Now that you have successfully created your own program, saved it in the list of programs, and can use it alongside HELIUS or other created programs, you have the flexibility to choose the one that best suits your preferences whenever you desire!
Erasing and renaming programs created

You also have the option to delete programs that you no longer find relevant or to rename them if you wish to change their names.
To erase programs, click on the (TRASH) icon and delete them.
To rename a program, click on the icon with the (PENCIL) and provide a new name.

Expand
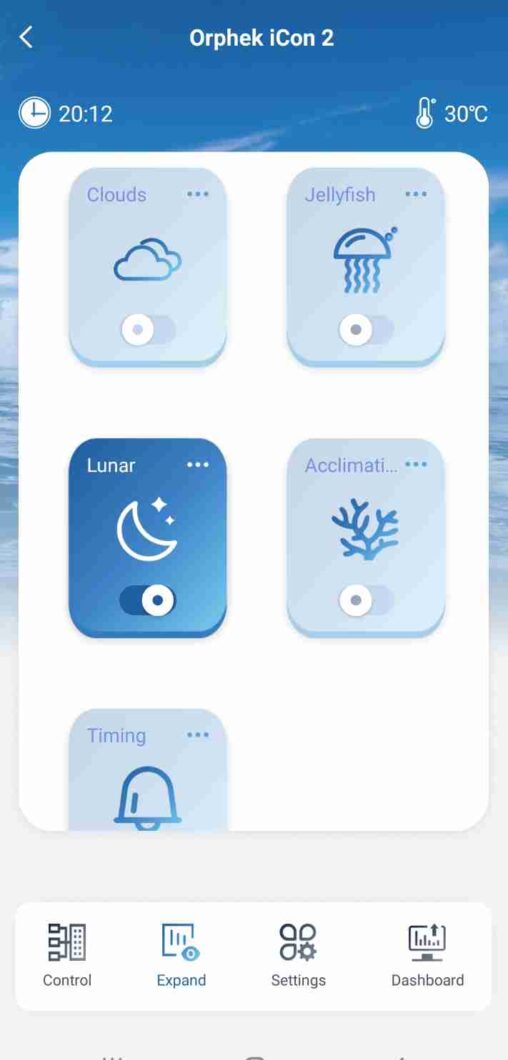
Expand – This feature displays all available modes, providing the option to enter each mode for enabling/disabling and setting the runtime.
Upon clicking the Expand button, users will be presented with five additional functions: Clouds, Jellyfish, Lunar (Moonlight), Acclimation and Timing.
Clouds
Clouds – Clouds mode allow you to mimic Nature and bring clouds shadowing effect to your tank. This creates a realistic passing cloud effect, where your corals are temporarily under a cloud cover. The benefit is to give your corals a moment of relief from intense lighting, which can help enhance their coloration and vibrancy.
Orphek has developed a highly natural cloud effect that gradually decreases the light intensity to simulate clouds passing over the water. The light then slowly returns to its original level, creating a seamless, natural transition.
To simulate “clouds passing over your tank,” you need to program specific cloud passing times, for example, from 08:00 to 20:00.
Clouds mode can only be activated through the program mode—it cannot be turned on manually or outside a scheduled program.
Important: Clouds mode is not compatible with Sun & Moon Synchronization. When Clouds mode is active, it overrides the Sun & Moon cycle, and both cannot run simultaneously.
How to do it
Click on (CLOUDS) to enter to Clouds program setting.
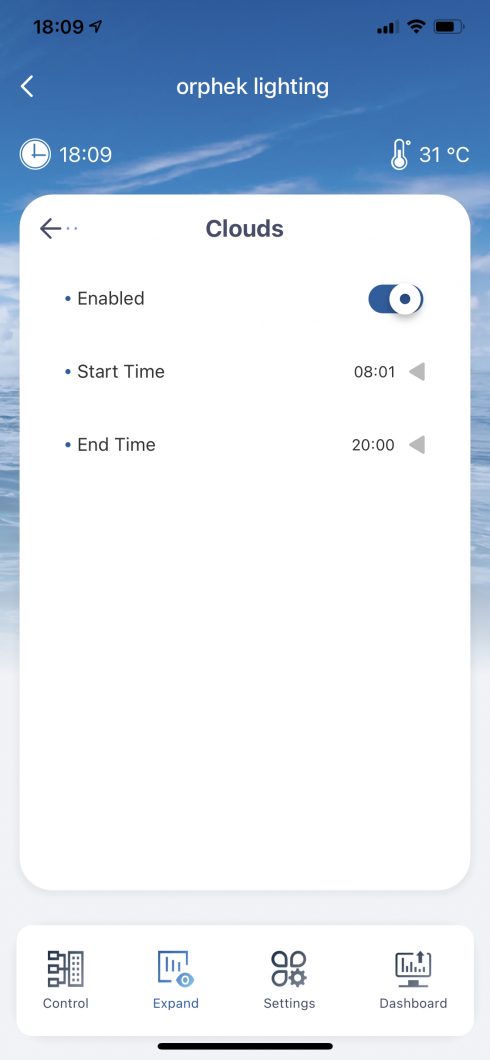
You can set the start time to run Clouds and equally program the time it will stop running.
Setting the Start and End Time:
Choose a starting time of 08:01 and an ending time of 20:00 to deactivate the program. In case of an incorrect time setting, a prompt will appear, advising the user to select a time between 08:01 and 20:00. It’s important to note that the programmed shutdown time for Clouds should always be later than the start time.
Example Configuration: Suppose you wish for clouds to pass over your tank from 13:00 to 16:00, providing your corals with a period of reduced light intensity.
Program Operation:
- After configuring the runtime (13:00 – 16:00), the Clouds program will execute every 15 minutes within this timeframe.
- During each 15-minute cycle, the cloud effect will run for 5 minutes.
Light Intensity Changes – What will happen during these 5 minutes:
During the 5-minute cloud effect cycle:
- Light intensity will gradually dim to 30% within the first minute.
- It will then remain at 30% for the next 3 minutes.
- Finally, it will slowly return to the original intensity within the last minute.
Repetition of Cycles:
After completing the cycle, it will repeat every 15 minutes until 16:00. Post 16:00, the light will revert to running the original program without the Clouds effect.
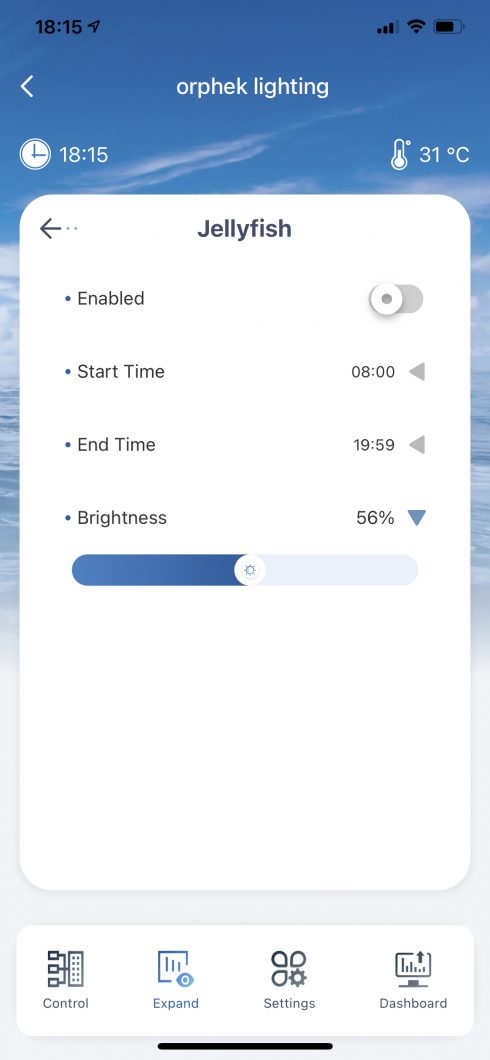
Jellyfish
Jellyfish Mode: This mode is specifically tailored for jellyfish tanks, aligning with their color spectrum and intensity requirements.
Configuration Steps:
- Click on (JELLYFISH) to access the Jellyfish mode program settings.
- Set the start time for the Jellyfish program, the time at which it will conclude, and the desired brightness.
Program Execution:
Once the time and brightness parameters are configured, the program will automatically progress through 41 successive changes in channels/colors until the designated end time of the program.
Lunar
Lunar Mode: The Lunar mode emulates a lunar light cycle, enhancing coral spawning conditions.
Background: Numerous coral reef animals exhibit lunar or semi-lunar periodicity in their breeding patterns. This means that their spawning activity peaks either once per lunar cycle, typically at the full moon, or twice per lunar cycle, occurring at both the full and new moon. With Lunar mode, users can now exert control over this cycle, influencing their corals’ spawning behavior.
Configuration Steps:
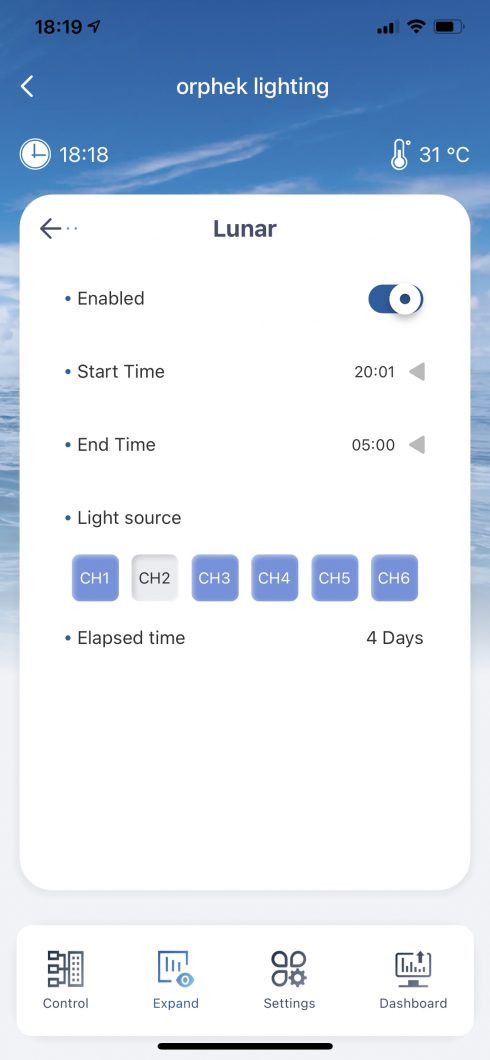
- Click on (LUNAR) to access the Lunar program settings.
- Set the start time for the Lunar program and the time at which it will conclude.
- Recommended starting time: 20:00 p.m.
- Suggested ending time: 08:01 a.m.
The Lunar program runs at night and in the early morning, lasting for a one-month period.
Users have the flexibility to choose which channel to use for the moonlight effect.
Operational Overview:
- At the beginning of the month, the device’s light intensity starts at 0%.
- Each day, the intensity gradually increases by 0.067%.
- On the 15th day, it reaches a peak intensity of 1%.
- Subsequently, the intensity decreases slowly by 0.067% each day.
- By the 30th day, it returns to 0%.
The elapsed time feature displays the number of days the moonlight effect has been active.
Acclimation
Acclimation Mode: the acclimation mode facilitates the gradual adjustment of corals to new environmental conditions, mitigating the impact of changes in color spectrum and light intensity. This helps prevent coral stress.
Configuration Steps:
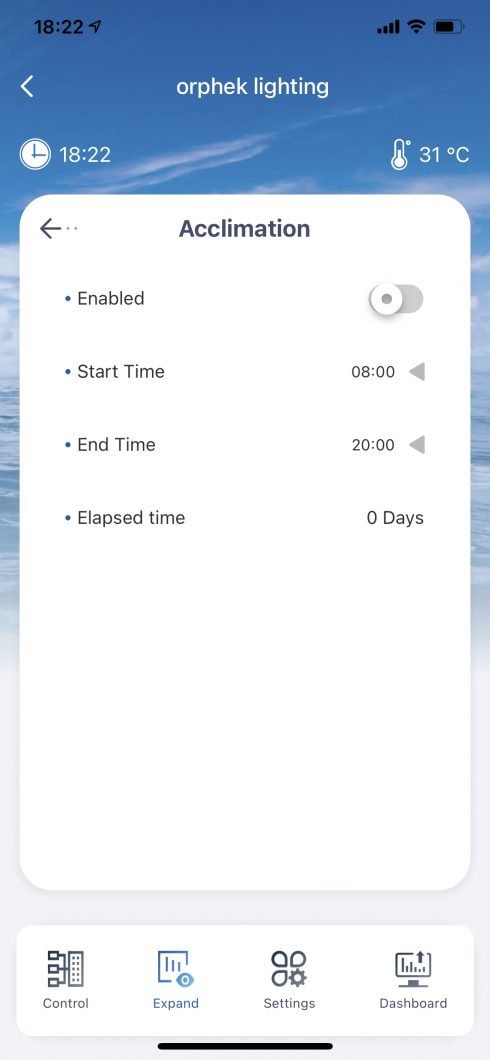
- Click on (ACCLIMATION) to access the Acclimation program settings..
- Set the start time for the Acclimation program and the time at which it will concluded.
- Recommended starting time: 08:00
- Time range: 08:00-23:00
Note: If the time is incorrectly set, a prompt will appear, instructing the user to choose a time between 08:00-23:00. It’s crucial to ensure that the programmed shutdown time for Acclimation is always later than the start time.
Operational Details:
- The Acclimation program runs continuously for 10 days.
- On the 11th day, the device’s light will revert to Program mode.
Intensity Progression:
- Day One starts with all channels at an intensity of 30%.
- Each subsequent day sees a 3% increase in light intensity.
- On the last day (Day 10), the intensity reaches 60%.
Additional Information:
Running both Lunar and Clouds, or both Jellyfish and Acclimation modes simultaneously is not possible. Attempting to do so will trigger a message from the App., prompting the user to turn off one of the modes.
IMPORTANT: Please skip the “Time Configuration” section below and the following section “Timing Configuration and Operation Overview”.
They are intended for use by public venues and public aquariums only.
Instead, scroll down and proceed directly to the “Settings” section.
Timing Configuration:
Upon accessing the Expand menu, users encounter the Timing feature.
This functionality enables users to schedule the operation of the light, specifying whether it should be active or inactive at the selected time, spanning from Sunday to Saturday.

Users can utilize the selector (ARROW ICON) to define the action, which presents five distinct options for selection: None / ON / Off / Light On Duration/ Light Off Duration.

Once the action is set, the adjacent time display enables selection of the desired timing. Utilize the selector (ARROW ICON) to establish the start time.

Timing Configuration and Operation Overview:
When users finish configuring their settings, they simply click (CONFIRM) to activate the timing button.
It’s important to understand that the timing button becomes enabled only when an action is specified. If no action is configured in the Timing section, manual activation of the button is not possible.
Actions:
None: Selecting “None” means no timer is set. The light will operate according to its scheduled routine.
On: Choosing “On” and specifying a start time will trigger the light to turn on at the designated time. If a new command is given to turn off the light, it will comply accordingly.
Off: Opting for “Off” and defining a time will prompt the light to turn off at the specified time. If a new command is given to turn on the light, it will activate accordingly.
Light On Duration: Selecting “Light On Duration” and setting the duration will keep the light on during the specified time period. If a new command is received to turn off the light, it will comply after the duration elapses.
Light Off Duration: Choosing “Light Off Duration” and setting the duration will keep the light off during the specified time period. If a new command is given to turn on the light, it will activate after the duration expires.
It’s important to recognize that when the light is operating in another mode, such as Program, and Timing is enabled, Timing takes precedence.
For example, if the light is scheduled to turn off at 21:00 in the Program mode and the Timer is configured to turn off at 20:00, the light will turn off at 20:00.
Subsequently, if the user selects “Program” in the app, the light will turn on according to the new command and continue operating until 21:00 based on the Program schedule.
Settings
The Orphek light offers a range of customizable options and advanced configurations.
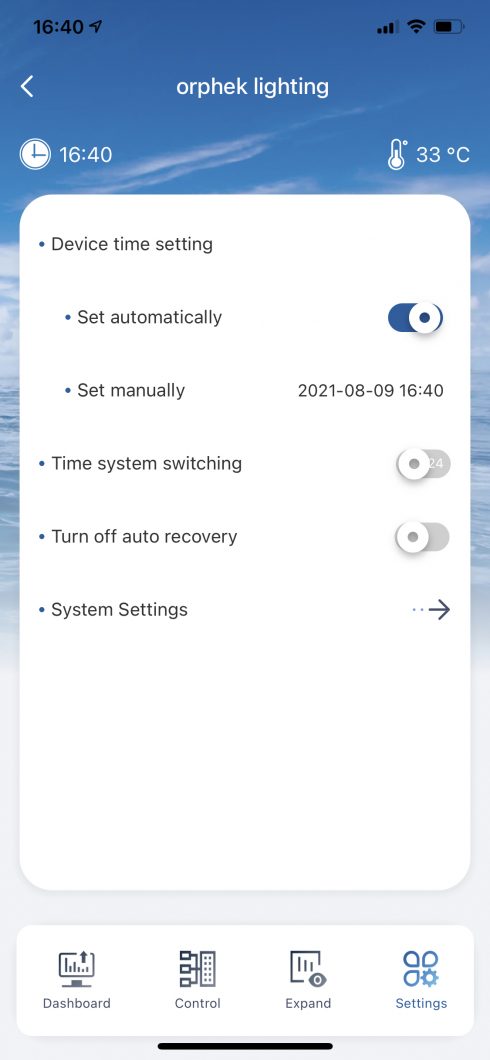
Time Setting Options:
- Automatic Time Setting: Access the settings and slide the button to the right to enable automatic time setting. Alternatively, disable this function to manually set the time.
- Time Format Adjustment: Modify the time format by toggling the switch button for the time system.
Auto-recovery Feature:
Auto-recovery Quick Mode: In the event of accidentally leaving the light on for an extended period, the Auto-recovery Quick mode engages for 2 hours. After this duration, the light will automatically revert to the programmed settings as a safety measure. To deactivate this function, navigate to Settings and turn on Auto-recovery. By default, it is turned on; simply move the button to the right.
Reset Procedure:
Reset procedure If there is no WiFi connection but you need to keep the light operational, you can use the reset procedure. This is useful if you experience WiFi connectivity issues but still want the light to function. To reset the device, follow these steps:
- Press and hold the reset button for 4-5 seconds.
- Release the reset button.
- The light will then continue to operate at 80% of its capacity.
High Temperature Alarm:
High temperature conditions are typically caused by faulty fans.
Obs.: If the temperature reaches 60℃, a high temperature warning will be triggered once. If the temperature increases to 65℃, the light will automatically shut off while the fans will run at maximum speed. Once the temperature decreases below 50℃, the light will automatically turn on and resume normal operation after a 10-second delay.
Upon receiving a high temperature alarm, follow these steps:
- Verify that all fans are functioning correctly.
- Ensure that all fans are properly installed, particularly if the light has been upgraded from an older version.
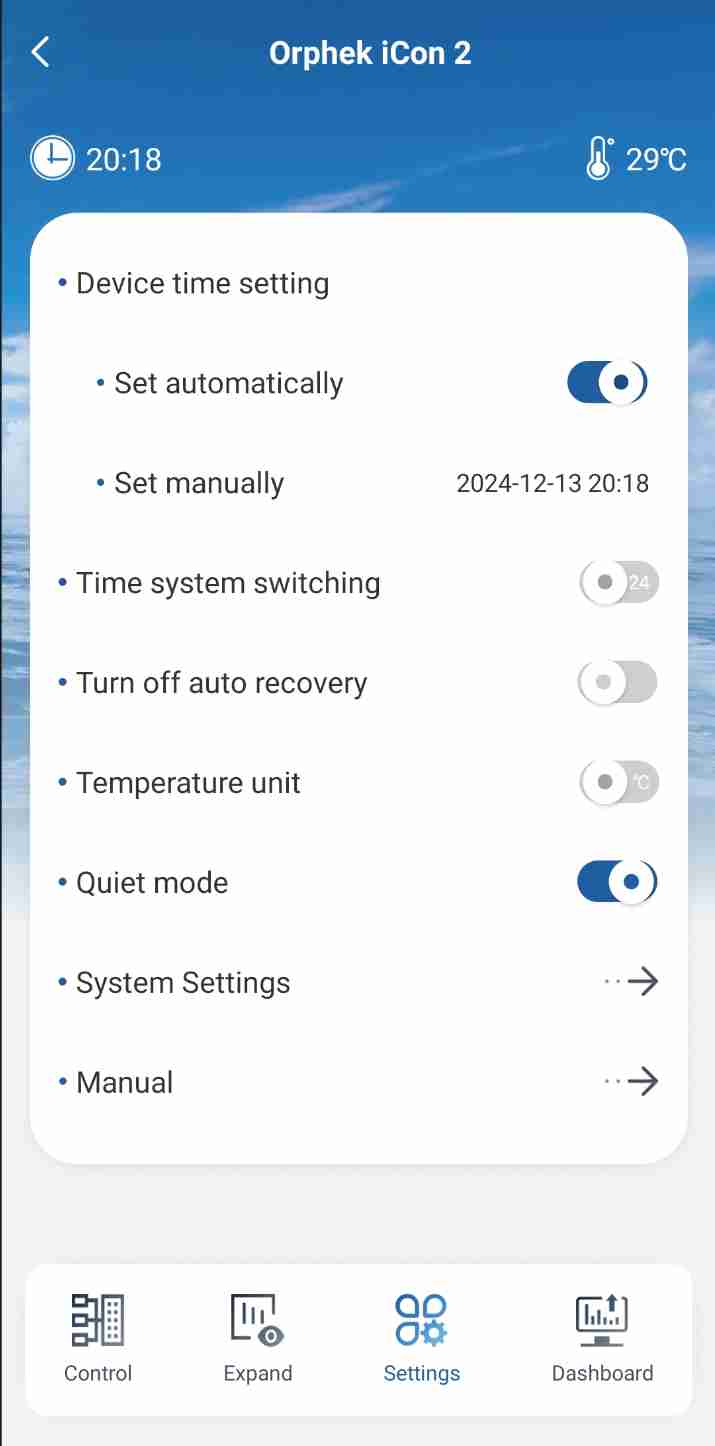
Quiet Mode:
You can also set the light to function on Quiet Mode through the settings.
Slide the button (QUIET MODE) to the right to enable Quiet Mode setting. Alternatively, disable this function by sliding the same button back to the left.
Note: In Quiet Mode, the light will operate more quietly, but the temperature will increase by approximately 3-5℃, making the light 3-5℃ hotter.
System settings
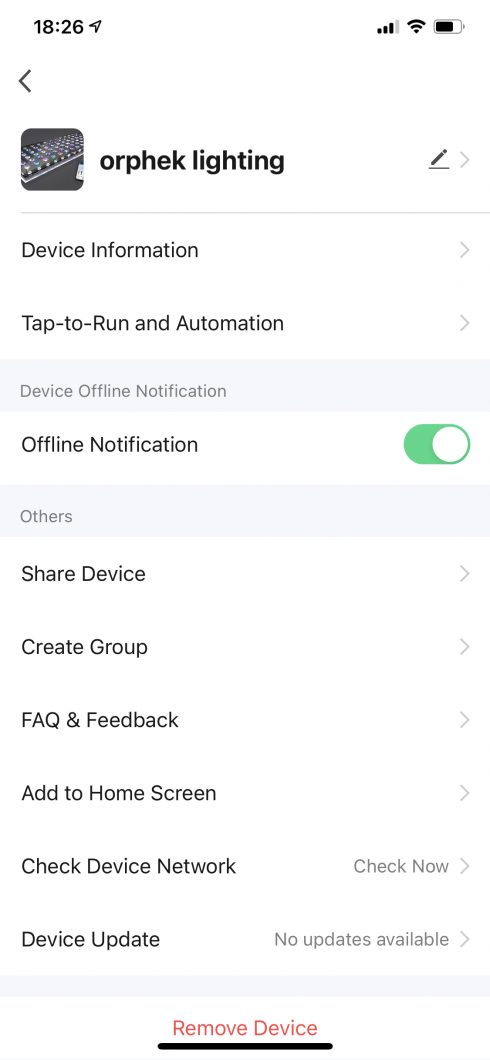
The System settings provide information about the light and enable various functionalities:
Light Information: Check detailed information about your light through System settings.
Offline Notification: Toggle the button to enable or disable offline notifications. Enabling this feature ensures you receive notifications when the light turns off.
Device Information: Access information about your system, including details such as IP address, through the Device Information section.
Pencil Icon: Clicking on the Pencil icon allows you to customize the light’s name, choosing one that suits your preferences. Additionally, you can add a profile photo.
Share Device: To grant access to your light from another device, use the Share device feature.
Create a Group: If you have multiple lights, you can group them together for centralized control and programming. Use the Create a group option for this purpose. (keep scrolling to learn step by step how to do it)
Add Home Screen: This feature allows you to conveniently place the App on your home screen for quick access.
Check Device Network: Assess the signal strength and connectivity of your device network through this option.
Remove Device: To reset your light, use the Remove device option. If you wish to reconnect your light, follow the instructions provided at the beginning of the manual.
Reset Procedure:Reset procedure If there is no WiFi connection but you need to keep the light operational, you can use the reset procedure. This is useful if you experience WiFi connectivity issues but still want the light to function. The light will then continue to operate at 80% of its capacity.
Me: In the Me section, you can add or modify your personal information, adjust your time zone, and upload a profile photo.
Third-Party Voice Service: Enable smart voice control through the Third-party voice service feature.
Home Management: Share device access with other members of your home using the Home Management option. Members will receive an invitation code, allowing them to view and control the light upon entering the code. (keep scrolling to learn step by step how to do it)
Create a Group

If you have multiple lights, you can group them together for centralized control and programming.

To create a group, follow these steps:
- Open the app and click on any of the lights.
- Navigate to Settings and then select System Settings.
- Click on (CREATE A GROUP).
- Select the lights you wish to include in the group.
- Click the (SAVE) button located in the upper right corner.
- Enter a name for the group.

Share Device
To grant access to your light from another device, use the Share device feature.
You have two options for sharing the lights: Share Device and Home Management.

To Share a Device, follow these steps:
Note: This option allows you to share only one light. The account you share with must be within the same data service center. Each registered account must select a region, enabling the app to identify whether the account belongs to the same data service center.
- Select the light you want to share.
- Go to Settings, then choose System Settings.
- Click on (SHARE DEVICE).
- Click (ADD) to enter the account you want to share the light with. Tip: You can share a light with multiple people by clicking (MORE).

Once completed, the shared device will appear on the other person’s phone.

Home Management
Share device access with other members of your home using the Home Management option. Members will receive an invitation code, allowing them to view and control the light upon entering the code.
To manage your home settings, follow these steps:
Click on (ME), then select then select (Home Management) to enter the settings.
By default, the connected lights belong to My Home. You can choose to create a new home and reconnect the lights to the new home you create.

To share My Home, click the (>) symbol next to My Home.


Choose share (App account) on the left corner of the Share options:


Note: If the account (usually a phone number) isn’t registered, a message will pop up indicating that the account cannot be added.

After adding the account, it will show as waiting for the person to join.

Click (ADD A MEMBER).
The person can enter to the app and click the (HOME ICON) in the upper left corner to choose (MY HOME) that you shared with them, or they can click (ME) and go to Home Management to choose (MY HOME).


